
Auto 110 Super Manual
Page 2
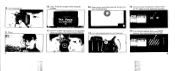
... check Holding the camera At the end of the SLR lens system. The Auto 110 Super is an extremely light and portable camera that uses 110 cartridge film. It combines the convenient size and easy loading of the 110 format with the technical advantages of the roll 2 Changing lenses 25 4 Using...36 18 Corrective eyepieces 37 20 Using the handstrap and soft case 38 22 Handling precautions 39 24 Warranty policy 40 1 THE PENTAX AUTO 110 SUPER SYSTEM The Pentax Auto 110 Super is an SLR (Single-lens-reflex) camera that can be tucked neatly into a pocket or carried in the palm of the...
... check Holding the camera At the end of the SLR lens system. The Auto 110 Super is an extremely light and portable camera that uses 110 cartridge film. It combines the convenient size and easy loading of the 110 format with the technical advantages of the roll 2 Changing lenses 25 4 Using...36 18 Corrective eyepieces 37 20 Using the handstrap and soft case 38 22 Handling precautions 39 24 Warranty policy 40 1 THE PENTAX AUTO 110 SUPER SYSTEM The Pentax Auto 110 Super is an SLR (Single-lens-reflex) camera that can be tucked neatly into a pocket or carried in the palm of the...
Auto 110 Super Manual
Page 3
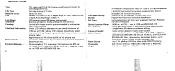
Cartridge-loading 110 film. 13rnm x 17mm. Pentax-110 24mm 1/2.8; 47-degree angle of the picture area. at f/18 - 1 sec. at f/2.8 with AF 130P or AF 100P at 1/60 sec. Automatic flash synch with ISO/ASA 100. Focusing Range: 0.35m -co. 110 bayonet mount; 80-...film, tripod socket, lens release button, wrist strap hook, battery holder, winder capability, etc. Central split-image focusing spot surrounded by pressing the exposure compensation button located on depressing shutter button when batteries are low. Green LED indicates adequate shutter speed (minimum of tripod or auto...
Cartridge-loading 110 film. 13rnm x 17mm. Pentax-110 24mm 1/2.8; 47-degree angle of the picture area. at f/18 - 1 sec. at f/2.8 with AF 130P or AF 100P at 1/60 sec. Automatic flash synch with ISO/ASA 100. Focusing Range: 0.35m -co. 110 bayonet mount; 80-...film, tripod socket, lens release button, wrist strap hook, battery holder, winder capability, etc. Central split-image focusing spot surrounded by pressing the exposure compensation button located on depressing shutter button when batteries are low. Green LED indicates adequate shutter speed (minimum of tripod or auto...
Auto 110 Super Manual
Page 4
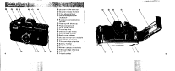
...0 0 to 0 0 41 -MOP aCMr°r.n"O N-t-moc • ffl 4 O Shutter mode selector O Shutter release button • Film advance lever Self•timer operation indicator 0 Exposure compensation button O Flash synch•shoe cap O Flash contact pin O Wrist strap hook ... Distance scale index IP Lens release button 11) Back cover release (jlIT Shutter/mirror box module Viewfinder eyepiece (tl Film cartridge chamber fri Battery holder IF Back cover window Q' Winder contact terminals (t) Film cartridge chamber Film drive coupler ori Tripod socket , A..., • n.f..t.of* • C2'; 5
...0 0 to 0 0 41 -MOP aCMr°r.n"O N-t-moc • ffl 4 O Shutter mode selector O Shutter release button • Film advance lever Self•timer operation indicator 0 Exposure compensation button O Flash synch•shoe cap O Flash contact pin O Wrist strap hook ... Distance scale index IP Lens release button 11) Back cover release (jlIT Shutter/mirror box module Viewfinder eyepiece (tl Film cartridge chamber fri Battery holder IF Back cover window Q' Winder contact terminals (t) Film cartridge chamber Film drive coupler ori Tripod socket , A..., • n.f..t.of* • C2'; 5
Auto 110 Super Manual
Page 5
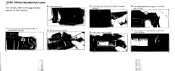
it stops. 0 5. Insert batteries and return holder to the appropriate section of this manual. 2. Remove battery holder. - 4. Inset I film (110 car tr idge). .40.1.r..).. • t 7. 1he numeral "1" will appear in the back Cover window. • 7 :BASIC OPERATING INSTRUCTIONS 1. • For details, refer to original position. 6. Set the shutter mode selector to the "A" (Automatic) position. Open back cover. 1. Turn film advance lever approx. 4 strokes until it ., 3.
it stops. 0 5. Insert batteries and return holder to the appropriate section of this manual. 2. Remove battery holder. - 4. Inset I film (110 car tr idge). .40.1.r..).. • t 7. 1he numeral "1" will appear in the back Cover window. • 7 :BASIC OPERATING INSTRUCTIONS 1. • For details, refer to original position. 6. Set the shutter mode selector to the "A" (Automatic) position. Open back cover. 1. Turn film advance lever approx. 4 strokes until it ., 3.
Auto 110 Super Manual
Page 6
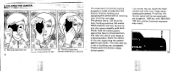
ti 8 10. f a Oili It f, • X+ 15. Then, gently press the button all the way and take the photograph. 14. Turn film advance lever for next exposure. ri 9. Focus. isAN Pocus iti1/ * MEMO. Confirm a green light appears in the back cover window. The end of the roll... been reached when an "X" appears in the viewfinder when you depress the shutter button halfway. • 13. MI.. 11. 8. Turn focusing ring. T urn the film advance lever until VlZ1fi appears, then remove the film cartridge. • 9 OINT.11. SFtepsn7s.8' 8 do not apply when using the p le 12.
ti 8 10. f a Oili It f, • X+ 15. Then, gently press the button all the way and take the photograph. 14. Turn film advance lever for next exposure. ri 9. Focus. isAN Pocus iti1/ * MEMO. Confirm a green light appears in the back cover window. The end of the roll... been reached when an "X" appears in the viewfinder when you depress the shutter button halfway. • 13. MI.. 11. 8. Turn focusing ring. T urn the film advance lever until VlZ1fi appears, then remove the film cartridge. • 9 OINT.11. SFtepsn7s.8' 8 do not apply when using the p le 12.
Auto 110 Super Manual
Page 9
...fire, as it for a long time. Always keep the batteries out of the reach of Alkaline batteries will not be sure to move the film cartridge. Close the back cover, and be using it may explode. QateliabliNNINIMINUlialltitio•fts- If batteries are inserted improperly, or if they have ...lamps in a shaded location to avoid possible light leakage, then remove the battery case and replace the batteries, taking care not to wind the film again before start shooting. N.B.: If the batteries go dead while there is at the same time with equivalent 1.5V Alkaline or Silveroxide batteries....
...fire, as it for a long time. Always keep the batteries out of the reach of Alkaline batteries will not be sure to move the film cartridge. Close the back cover, and be using it may explode. QateliabliNNINIMINUlialltitio•fts- If batteries are inserted improperly, or if they have ...lamps in a shaded location to avoid possible light leakage, then remove the battery case and replace the batteries, taking care not to wind the film again before start shooting. N.B.: If the batteries go dead while there is at the same time with equivalent 1.5V Alkaline or Silveroxide batteries....
Auto 110 Super Manual
Page 10
...110 cartridge film automatically adjusts the camera to take your first picture. Otherwise, we recommend ISO/ASA 64 or 100. 16 ADVANCING THE'FILM Turn the film advance lever about 4 times until the numeral "1" appears in the back cover window. Insert the film cartridge as shown. 2. ISO/ASA 400 film... is required. After each exposure, turn the film P advance lever to advance the film (see page 35/. No manual film speed setting is appropriate for the next exposure. You are...
...110 cartridge film automatically adjusts the camera to take your first picture. Otherwise, we recommend ISO/ASA 64 or 100. 16 ADVANCING THE'FILM Turn the film advance lever about 4 times until the numeral "1" appears in the back cover window. Insert the film cartridge as shown. 2. ISO/ASA 400 film... is required. After each exposure, turn the film P advance lever to advance the film (see page 35/. No manual film speed setting is appropriate for the next exposure. You are...
Auto 110 Super Manual
Page 13
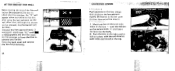
...-45.x 0 .) 23 CAt I I ION: Do not touch the flash contact pin with your body in order to hold the camera gently against your first film cartridge. Vertical position a (shutter release button at approx. 1/60 sec. No matter which position you do, the shutter speed will be sure to grip the... camera steadily with ISO/ASA 100 film, and an incorrect exposure may also use , be automatically set at bottom) It is important to take blur-free photos. HOLDING THE CAMERA •...
...-45.x 0 .) 23 CAt I I ION: Do not touch the flash contact pin with your body in order to hold the camera gently against your first film cartridge. Vertical position a (shutter release button at approx. 1/60 sec. No matter which position you do, the shutter speed will be sure to grip the... camera steadily with ISO/ASA 100 film, and an incorrect exposure may also use , be automatically set at bottom) It is important to take blur-free photos. HOLDING THE CAMERA •...
Auto 110 Super Manual
Page 14
...: 24 X 4. An "X" will be sure to advance any further. After that, although the shutter can be released, no photograph will appear when you advance the film after using the last exposure on the camera body f_;) and insert the lens into the body. 2. s, f • 1 PE N TAX M esidOrqM r Pa O..1t0 i~ X11 ' Pr... of the lens ' with the red distance scale index positioned at the top. AT THE END OF THE ROLL When nearing the end of the film roll (12 or 24 exposures), be taken. Turn the lens to the left until um or UM appears and the...
...: 24 X 4. An "X" will be sure to advance any further. After that, although the shutter can be released, no photograph will appear when you advance the film after using the last exposure on the camera body f_;) and insert the lens into the body. 2. s, f • 1 PE N TAX M esidOrqM r Pa O..1t0 i~ X11 ' Pr... of the lens ' with the red distance scale index positioned at the top. AT THE END OF THE ROLL When nearing the end of the film roll (12 or 24 exposures), be taken. Turn the lens to the left until um or UM appears and the...
Auto 110 Super Manual
Page 15
... the shutter release. The PF lens accepts filters and a lens hood with the PF lens, refer to the chart below for effective flash range. Film ASA 100 ASA Auto Flash AF 100P AF 130P AF 130P Effective Range approx, 2m - 3.5m approx. 2m - 4 approx. 1.4rn approx. 1,4m - 4.6m 27 ...attachment You can take photographs only at a preset distance of approx. 25cm between the subject and the film plane, i.e., when the focusing image is aligned. Using an auto flash unit When using an Auto Flash with a 30.5mm diameter. There will always be some variation in the actual effective range of...
... the shutter release. The PF lens accepts filters and a lens hood with the PF lens, refer to the chart below for effective flash range. Film ASA 100 ASA Auto Flash AF 100P AF 130P AF 130P Effective Range approx, 2m - 3.5m approx. 2m - 4 approx. 1.4rn approx. 1,4m - 4.6m 27 ...attachment You can take photographs only at a preset distance of approx. 25cm between the subject and the film plane, i.e., when the focusing image is aligned. Using an auto flash unit When using an Auto Flash with a 30.5mm diameter. There will always be some variation in the actual effective range of...

Auto 110 Super Manual
Page 19
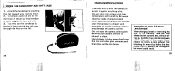
... using the AF100P Auto Flash. i. \ 25.5mm (for use with 24mm lens) 30.5mm (for 18mm lens) 37.5mm (for 50mm lens) I lonuls There is very bright. 34 AF 100P tato • oftwA44 g AF 130P Co\ 110 WINDER H This convenient winder automatically advances the film to Exposure 1 and continues advancing the film at the...
... using the AF100P Auto Flash. i. \ 25.5mm (for use with 24mm lens) 30.5mm (for 18mm lens) 37.5mm (for 50mm lens) I lonuls There is very bright. 34 AF 100P tato • oftwA44 g AF 130P Co\ 110 WINDER H This convenient winder automatically advances the film to Exposure 1 and continues advancing the film at the...
Auto 110 Super Manual
Page 21
... lens release button upward, as paint thinner or alcohol to the mount could result. 39 Be aware that the inside of the mount. Precaution on Auto 110 Super Lens Removal When changing lenses or removing the lens on the camera, slide the lens release button upward and, without first unlocking the mount by... • often becomes extremely hot. To remove, push the clip in a place with solvents such as damage to clean. You may damage the camera or film.
... lens release button upward, as paint thinner or alcohol to the mount could result. 39 Be aware that the inside of the mount. Precaution on Auto 110 Super Lens Removal When changing lenses or removing the lens on the camera, slide the lens release button upward and, without first unlocking the mount by... • often becomes extremely hot. To remove, push the clip in a place with solvents such as damage to clean. You may damage the camera or film.


