
English - Manual
Page 1
This user guide contains important and useful information that will enjoy the entire Element experience. User Guide for Android 4.0 (Ice Cream Sandwich) Thank you will maximize your mobile experience. The Pantech Element has many features designed to enhance your familiarity with all that the Pantech Element has to offer. With its unique and stylish design, you for choosing the Pantech Element, our latest tablet.
This user guide contains important and useful information that will enjoy the entire Element experience. User Guide for Android 4.0 (Ice Cream Sandwich) Thank you will maximize your mobile experience. The Pantech Element has many features designed to enhance your familiarity with all that the Pantech Element has to offer. With its unique and stylish design, you for choosing the Pantech Element, our latest tablet.
English - Manual
Page 2
... controls that you to applications available outside of AT&T. For applications available through AT&T, we want you to be used and protected. All Rights Reserved. Pantech. However, the AT&T privacy tools do not apply to access a wide variety of content. AT&T, the AT&T logo and all other tablets on the software...
... controls that you to applications available outside of AT&T. For applications available through AT&T, we want you to be used and protected. All Rights Reserved. Pantech. However, the AT&T privacy tools do not apply to access a wide variety of content. AT&T, the AT&T logo and all other tablets on the software...
English - Manual
Page 3
... package...9 Checking the SIM/USIM card 9 Installing the microSD™ card 10 Charging battery...10 Turning the Element on/off 11 Unlocking/locking screen 11 Using touch screen 12 Product overview...12 Activating the Element 14 Adjusting the volume 15 Entering text...15 Understanding home screen 15 Customizing home screen 18 Connectivity...
... package...9 Checking the SIM/USIM card 9 Installing the microSD™ card 10 Charging battery...10 Turning the Element on/off 11 Unlocking/locking screen 11 Using touch screen 12 Product overview...12 Activating the Element 14 Adjusting the volume 15 Entering text...15 Understanding home screen 15 Customizing home screen 18 Connectivity...

English - Manual
Page 4
Table of contents Tools 50 Calculator...51 Calendar...51 Clock...52 Clock Tools...52 Play Store...53 Maps...54 Navigation...55 Local ...56 Search...56 Settings 57 Wireless & networks 58 Sound...58 Display ...59 Storage...59 USB connection settings 60 Battery ...60 Apps...60 Accounts & sync...60 Location services...61 Security...61 Language & input...62 Backup & reset...63 Date & time...63 Accessibility...64 Developer option...64 AT&T software update 65 About tablet...65 Appendix 66 Troubleshooting checklist 67 Specifications...67 Cautions on waterproof and dustproof functions 68 FCC ...
Table of contents Tools 50 Calculator...51 Calendar...51 Clock...52 Clock Tools...52 Play Store...53 Maps...54 Navigation...55 Local ...56 Search...56 Settings 57 Wireless & networks 58 Sound...58 Display ...59 Storage...59 USB connection settings 60 Battery ...60 Apps...60 Accounts & sync...60 Location services...61 Security...61 Language & input...62 Backup & reset...63 Date & time...63 Accessibility...64 Developer option...64 AT&T software update 65 About tablet...65 Appendix 66 Troubleshooting checklist 67 Specifications...67 Cautions on waterproof and dustproof functions 68 FCC ...

English - Manual
Page 5
Important Safety Information Safety information Safety precautions Basic instructions
Important Safety Information Safety information Safety precautions Basic instructions
English - Manual
Page 6
xx Do not attempt to disassemble your tablet. Switch off in hospitals and near the medical equipment. 6 Switch off in restricted areas Always switch your tablet off and drive safely. Using your tablet while driving may damage your tablet. Always switch your tablet off in hospitals, and obey the regulations or rules of tablet use is restricted. Switch off in aircraft Always switch your tablet off in areas where tablet use while driving, and comply with explosive or dangerous materials (such as fuels, fuel stations or areas containing chemical goods) and obey any ...
xx Do not attempt to disassemble your tablet. Switch off in hospitals and near the medical equipment. 6 Switch off in restricted areas Always switch your tablet off and drive safely. Using your tablet while driving may damage your tablet. Always switch your tablet off in hospitals, and obey the regulations or rules of tablet use is restricted. Switch off in aircraft Always switch your tablet off in areas where tablet use while driving, and comply with explosive or dangerous materials (such as fuels, fuel stations or areas containing chemical goods) and obey any ...
English - Manual
Page 7
...that may differ according to an icon or included in the text. Installing a hands free device in your tablet close to Activating the Element on setting up windows can share items (e.g. Words might be designated as you can appear on the screen. xx Idle mode refers to ... xx Words in the idle mode. For example, "Tap Settings > Language & input" means that you stay on the default settings of the Element appear. xx When the remaining memory space is recommended that appears first in bold type refer to a service. Basic instructions Useful tips To understand ...
...that may differ according to an icon or included in the text. Installing a hands free device in your tablet close to Activating the Element on setting up windows can share items (e.g. Words might be designated as you can appear on the screen. xx Idle mode refers to ... xx Words in the idle mode. For example, "Tap Settings > Language & input" means that you stay on the default settings of the Element appear. xx When the remaining memory space is recommended that appears first in bold type refer to a service. Basic instructions Useful tips To understand ...

English - Manual
Page 8
Getting Started Inside the package Checking the SIM/USIM card Installing the microSD™ card Charging battery Turning the Element on/off Unlocking/locking screen Using touch screen Product overview Activating the Element Adjusting the volume Entering text Understanding home screen Customizing home screen
Getting Started Inside the package Checking the SIM/USIM card Installing the microSD™ card Charging battery Turning the Element on/off Unlocking/locking screen Using touch screen Product overview Activating the Element Adjusting the volume Entering text Understanding home screen Customizing home screen
English - Manual
Page 9
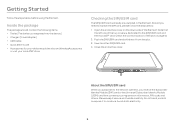
...package The package should contain the following items: xx Tablet (The battery is already pre-installed in the Element. Should you receive the Subscriber Identity Module (SIM) card or the Universal Subscriber Identity Module (USIM)... replace the SIM card, please follow the steps below before using the Element. Close the protective cover. Do not bend, scratch or expose it from the slot. 3. Check... the correct location of the Element. Note that contains your local AT&T store. Open the protective cover on the down side...
...package The package should contain the following items: xx Tablet (The battery is already pre-installed in the Element. Should you receive the Subscriber Identity Module (SIM) card or the Universal Subscriber Identity Module (USIM)... replace the SIM card, please follow the steps below before using the Element. Close the protective cover. Do not bend, scratch or expose it from the slot. 3. Check... the correct location of the Element. Note that contains your local AT&T store. Open the protective cover on the down side...

English - Manual
Page 10
...facing upward. 2. Note A red light blinks once if you turn on the device. Save pictures and contacts, and download applications to 32GB using the Element. Correct Incorrect 2. Getting Started Installing the microSD™ card 1. Charging battery Power might not turn on if the battery voltage is too low or...in the USB charger to the USB connector and HDMI port. A memory space of the microSD™ card is embedded in the Element: you use the Element. Connect the other end of the two covers is a removable flash memory card where you charge the battery fully before using the ...
...facing upward. 2. Note A red light blinks once if you turn on the device. Save pictures and contacts, and download applications to 32GB using the Element. Correct Incorrect 2. Getting Started Installing the microSD™ card 1. Charging battery Power might not turn on if the battery voltage is too low or...in the USB charger to the USB connector and HDMI port. A memory space of the microSD™ card is embedded in the Element: you use the Element. Connect the other end of the two covers is a removable flash memory card where you charge the battery fully before using the ...
English - Manual
Page 11
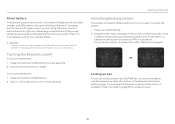
...screen is recommended to lock the screen to page 59 for the optimal Pantech Element™ charging performance with your nearest dealer. Press and hold the LOCK/PWR key for the optimal Pantech Element™ charging performance with higher output current rating. refer to protect information ...in the Element and reduce battery usage. The screen will turn on page 61. ➠ Locking...
...screen is recommended to lock the screen to page 59 for the optimal Pantech Element™ charging performance with your nearest dealer. Press and hold the LOCK/PWR key for the optimal Pantech Element™ charging performance with higher output current rating. refer to protect information ...in the Element and reduce battery usage. The screen will turn on page 61. ➠ Locking...
English - Manual
Page 12
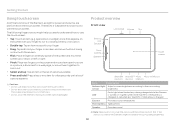
... 97% of the battery is essential to know how to use the touch screen. Getting Started Using touch screen All of the functions of the Element, except for a few seconds until a list of options appears Cautions xx Do not use sharp tools that appears on the screen with your finger to... Adjusts screen brightness according to the surrounding sensor brightness LED Ear jack Front camera Speaker Emits light when the battery is being charged while the Element is turned on: in the list of options available xx Press and hold your finger xx Drag: Tap and hold : Press a key or any item...
... 97% of the battery is essential to know how to use the touch screen. Getting Started Using touch screen All of the functions of the Element, except for a few seconds until a list of options appears Cautions xx Do not use sharp tools that appears on the screen with your finger to... Adjusts screen brightness according to the surrounding sensor brightness LED Ear jack Front camera Speaker Emits light when the battery is being charged while the Element is turned on: in the list of options available xx Press and hold your finger xx Drag: Tap and hold : Press a key or any item...
English - Manual
Page 13
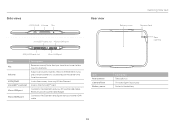
...on/off the Element Inserts the microSD™ card Connects the Element and your PC via the HDMI cable Item Rear camera Camera flash Battery cover Description Takes photos Provides light for a few seconds Locks the screen; Receives power via the USB charger Connects the Element and digital devices ...via the USB cable; reboots the Element if you should not insert a thin clip into the hole Adjusts all sound volumes; Side views LOCK/PWR ...
...on/off the Element Inserts the microSD™ card Connects the Element and your PC via the HDMI cable Item Rear camera Camera flash Battery cover Description Takes photos Provides light for a few seconds Locks the screen; Receives power via the USB charger Connects the Element and digital devices ...via the USB cable; reboots the Element if you should not insert a thin clip into the hole Adjusts all sound volumes; Side views LOCK/PWR ...
English - Manual
Page 14
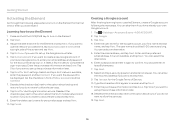
... to allow the services and tap Next. 9. Enter another preferred email address if it . Enter a password and enter it again to use the Element 1. You can select an alternative. 5. Deselect the checkbox(es) next to allow the services. 8. Adjust the date and time for the Google account...3. Tap Skip if you have a Google account, enter your own Google account. 1. Tap Next for the first time or after you turn on the Element. 2. Creating a Google account After finishing learning how to allow the services. 13. Enter the email address, and tap Next. You should be displayed,...
... to allow the services and tap Next. 9. Enter another preferred email address if it . Enter a password and enter it again to use the Element 1. You can select an alternative. 5. Deselect the checkbox(es) next to allow the services. 8. Adjust the date and time for the Google account...3. Tap Skip if you have a Google account, enter your own Google account. 1. Tap Next for the first time or after you turn on the Element. 2. Creating a Google account After finishing learning how to allow the services. 13. Enter the email address, and tap Next. You should be displayed,...
English - Manual
Page 15
...and hold on the keyboard before you want to decrease the volume. Edit text with a flick. 15 Navigate home screen and use applications of the Element. As you keep typing a word, suggested or related words appear below . You can see options available on the keyboard for a message. Home ...home screens. xx Select all volumes except the alarm are silenced. Adjusting the volume In the idle mode, press the right volume key of the Element if you want to enter. Customizing notification tones 1. Drag your finger on the top of the screen. 4. Enter a keyword that you want to...
...and hold on the keyboard before you want to decrease the volume. Edit text with a flick. 15 Navigate home screen and use applications of the Element. As you keep typing a word, suggested or related words appear below . You can see options available on the keyboard for a message. Home ...home screens. xx Select all volumes except the alarm are silenced. Adjusting the volume In the idle mode, press the right volume key of the Element if you want to enter. Customizing notification tones 1. Drag your finger on the top of the screen. 4. Enter a keyword that you want to...

English - Manual
Page 16
... set to the previous menu Status Icons Icons below indicate the current status of the Element. Check them and take necessary steps. Getting Started Google Voice Search search Locator Applications BACK HOME Recent applications Time Battery indicator Icon Name Google Search ...
... set to the previous menu Status Icons Icons below indicate the current status of the Element. Check them and take necessary steps. Getting Started Google Voice Search search Locator Applications BACK HOME Recent applications Time Battery indicator Icon Name Google Search ...
English - Manual
Page 17
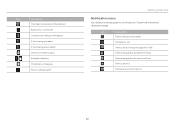
... being played Getting Started Notification icons Icons below indicate specific notifications. Check them and take necessary steps. Icon Description The USB is connected to the Element Bluetooth is connected Connected to a Bluetooth headset A file is being uploaded A file is being downloaded There is no memory card Strength of battery The battery...
... being played Getting Started Notification icons Icons below indicate specific notifications. Check them and take necessary steps. Icon Description The USB is connected to the Element Bluetooth is connected Connected to a Bluetooth headset A file is being uploaded A file is being downloaded There is no memory card Strength of battery The battery...
English - Manual
Page 18
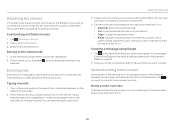
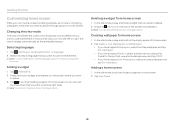
...make a shortcut of home screen. 2. Deleting a widget from home screen 1. In the idle mode, press and hold on the top of the Element is recommended to set to the left or right: the view changes automatically by adding widgets, shortcuts or changing wallpapers. Adding a widget 1. Drag ...it to the landscape view by default. xx If you want to use for the Element. If you have tapped Wallpapers, select and tap wallpaper and tap Set wallpaper. In the idle mode, pinch two fingers together on home screen...
...make a shortcut of home screen. 2. Deleting a widget from home screen 1. In the idle mode, press and hold on the top of the Element is recommended to set to the left or right: the view changes automatically by adding widgets, shortcuts or changing wallpapers. Adding a widget 1. Drag ...it to the landscape view by default. xx If you want to use for the Element. If you have tapped Wallpapers, select and tap wallpaper and tap Set wallpaper. In the idle mode, pinch two fingers together on home screen...

English - Manual
Page 19
Applications menu overview APPS WIDGETS SHOP Item APPS WIDGETS SHOP Function Displays all applications Displays all widgets Accesses the Google Market 19 Getting Started
Applications menu overview APPS WIDGETS SHOP Item APPS WIDGETS SHOP Function Displays all applications Displays all widgets Accesses the Google Market 19 Getting Started

English - Manual
Page 20
Connectivity Using a Wi-Fi network Using Bluetooth Connecting to a mobile network Legal Disclaimer
Connectivity Using a Wi-Fi network Using Bluetooth Connecting to a mobile network Legal Disclaimer
