
Operating Instructions
Page 5
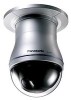
... when it possible to capture clear images of the scene from 0° to 256 camera positions. OPTIONAL ACCESORIES Dome Cover(approx.50 % transparency,smoked type WV-CS3S Ceiling Mount Bracket WV-Q105/WV-Q116/WV-Q117 Wall Mount Bracket WV-Q118 -5- FEATURES This Color CCTV Camera is held downwards.
... when it possible to capture clear images of the scene from 0° to 256 camera positions. OPTIONAL ACCESORIES Dome Cover(approx.50 % transparency,smoked type WV-CS3S Ceiling Mount Bracket WV-Q105/WV-Q116/WV-Q117 Wall Mount Bracket WV-Q118 -5- FEATURES This Color CCTV Camera is held downwards.
Operating Instructions
Page 6
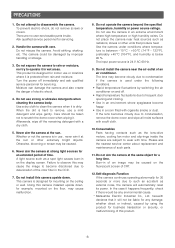
... conditions where temperature is between -10 °C - +50 °C {14 °F - 122 °F}, preferably +40 °C {104 °F}, and humidity is designed for example, mounted on the ceiling or wall. Do not place the camera near the air outlet of the color filter in the CCD. 7. Do not aim the camera at... strong light sources for an extended period of this camera upside down , for mounting on the floor, may be taken not to frequent door opening ...
... conditions where temperature is between -10 °C - +50 °C {14 °F - 122 °F}, preferably +40 °C {104 °F}, and humidity is designed for example, mounted on the ceiling or wall. Do not place the camera near the air outlet of the color filter in the CCD. 7. Do not aim the camera at... strong light sources for an extended period of this camera upside down , for mounting on the floor, may be taken not to frequent door opening ...
Operating Instructions
Page 11
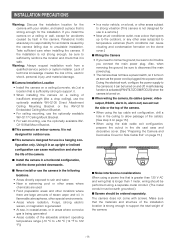
... location that is sufficiently strong to support it before you install the camera on a ceiling or wall, except for accidents caused by fault in the camera, Panasonic holds absolutely no responsibility for Side Cable Exit" on page 15.) ■ Noise... strength (like a drop ceiling), use the optionally available WV-Q105 Direct Attachment Ceiling Mounting Bracket or the WV-Q116 Embedded Ceiling Mount Bracket. • For ceiling mounting, use the optionally available WV-Q117 Ceiling Mount Bracket. • For wall mounting, use the optionally available WVQ118 Wall Mount Bracket. ■ This ...
... location that is sufficiently strong to support it before you install the camera on a ceiling or wall, except for accidents caused by fault in the camera, Panasonic holds absolutely no responsibility for Side Cable Exit" on page 15.) ■ Noise... strength (like a drop ceiling), use the optionally available WV-Q105 Direct Attachment Ceiling Mounting Bracket or the WV-Q116 Embedded Ceiling Mount Bracket. • For ceiling mounting, use the optionally available WV-Q117 Ceiling Mount Bracket. • For wall mounting, use the optionally available WVQ118 Wall Mount Bracket. ■ This ...
Operating Instructions
Page 12
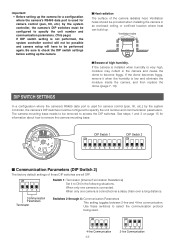
.... See steps 1 and 2 on page 15 for information about how to access the DIP switches. The camera mounting base needs to be provided when installing the camera in an enclosed ceiling or confined location where heat can build up the camera. ■ Heat radiation The surface of these switches to ON in...
.... See steps 1 and 2 on page 15 for information about how to access the DIP switches. The camera mounting base needs to be provided when installing the camera in an enclosed ceiling or confined location where heat can build up the camera. ■ Heat radiation The surface of these switches to ON in...

Operating Instructions
Page 15
...cable hole on the camera and then remove it . Rotate 15° Pull the camera mounting base up to remove it . Affix the camera mounting base onto the ceiling. See steps 1 and 2 below when mounting the camera on a ceiling or wall with a pair of the camera. Rotate the camera base unit in the ...direction indicated by placing it will not become lost. Put the screw in a place where it on the ceiling. Using the camera mounting base as shown below for Side Cable Exit The camera and decorative cover should be removed in order to prepare the camera. Preparing ...
...cable hole on the camera and then remove it . Rotate 15° Pull the camera mounting base up to remove it . Affix the camera mounting base onto the ceiling. See steps 1 and 2 below when mounting the camera on a ceiling or wall with a pair of the camera. Rotate the camera base unit in the ...direction indicated by placing it will not become lost. Put the screw in a place where it on the ceiling. Using the camera mounting base as shown below for Side Cable Exit The camera and decorative cover should be removed in order to prepare the camera. Preparing ...
Operating Instructions
Page 16
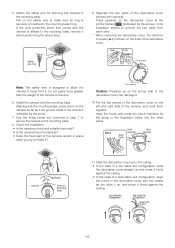
...cover. Back Unhook Safety wire ring Fix securely Press Note: The safety wire is affixed to the mounting base hook. Fix securely Press Caution: Pressing up and press it firmly against the ceiling. Put the two pieces of a top cable exit configuration, slide the decorative cover straight up on... the safety wire to make sure its ring is securely connected to the mounting base, remove it ? Align the hooks and press...
...cover. Back Unhook Safety wire ring Fix securely Press Note: The safety wire is affixed to the mounting base hook. Fix securely Press Caution: Pressing up and press it firmly against the ceiling. Put the two pieces of a top cable exit configuration, slide the decorative cover straight up on... the safety wire to make sure its ring is securely connected to the mounting base, remove it ? Align the hooks and press...
