User Manual
Page 1
...third parties which may arise through the use of this product. assumes no responsibility for any loss or claims by any means, electronic, mechanical, photocopying, recording, or otherwise, without notice. Ectaco, Inc. assumes no responsibility for any damage or loss resulting from ...to back up all important data on other media to change without permission from Ectaco, Inc. ECTACO Universal Translator™ ML320 10-Language Dictionary English, Czech, Finnish, French, German, Italian, Polish, Russian, Spanish, Turkish User's Manual Ectaco, Inc. assumes no responsibility for ...
...third parties which may arise through the use of this product. assumes no responsibility for any loss or claims by any means, electronic, mechanical, photocopying, recording, or otherwise, without notice. Ectaco, Inc. assumes no responsibility for any damage or loss resulting from ...to back up all important data on other media to change without permission from Ectaco, Inc. ECTACO Universal Translator™ ML320 10-Language Dictionary English, Czech, Finnish, French, German, Italian, Polish, Russian, Spanish, Turkish User's Manual Ectaco, Inc. assumes no responsibility for ...
User Manual
Page 2
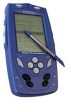
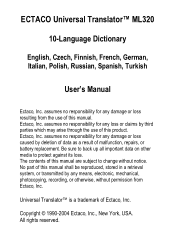
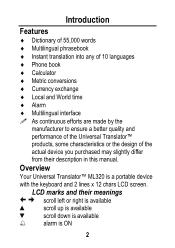
LCD marks and their description in this manual. Overview Your Universal Translator™ ML320 is ON 2 Introduction Features ♦ Dictionary of 55,000 words ♦ Multilingual phrasebook ♦ Instant translation into any of 10 languages ♦ Phone book ♦ Calculator ♦ Metric conversions ♦ Currency ...
LCD marks and their description in this manual. Overview Your Universal Translator™ ML320 is ON 2 Introduction Features ♦ Dictionary of 55,000 words ♦ Multilingual phrasebook ♦ Instant translation into any of 10 languages ♦ Phone book ♦ Calculator ♦ Metric conversions ♦ Currency ...

User Manual
Page 3
... will automatically shut off LANG Change the interface/source or target language PHRASES Go to Phrasebook PHONES Go to Phone Book DICT Go to Main Dictionary MENU Go to Main Menu ENTER Select a menu item, accept the changes, calculate ESC Go one step back SHIFT Access the secondary command or key...
... will automatically shut off LANG Change the interface/source or target language PHRASES Go to Phrasebook PHONES Go to Phone Book DICT Go to Main Dictionary MENU Go to Main Menu ENTER Select a menu item, accept the changes, calculate ESC Go one step back SHIFT Access the secondary command or key...
User Manual
Page 4
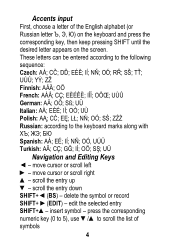
ZŽ Finnish: AÅÄ; OÖ French: AÀÂ; OÔŒ; EÈÉ; LŁ; I Ì; OÖ; move cursor or scroll right ▲ - scroll the entry up ▼ - DĎ; EÉĔ; RŘ; TŤ; UÙÛ German: AÄ; I Í; OÓ, UÚÜ Turkish: AÂ; UÜ Navigation and Editing Keys ◄ - scroll the entry down SHIFT+◄ (BS) - UÚŮ; UÜ Italian: AÀ; OÓ; ZŹŻ Russian: according to the following sequence: Czech: AÁ; move cursor or scroll left &#...
ZŽ Finnish: AÅÄ; OÖ French: AÀÂ; OÔŒ; EÈÉ; LŁ; I Ì; OÖ; move cursor or scroll right ▲ - scroll the entry up ▼ - DĎ; EÉĔ; RŘ; TŤ; UÙÛ German: AÄ; I Í; OÓ, UÚÜ Turkish: AÂ; UÜ Navigation and Editing Keys ◄ - scroll the entry down SHIFT+◄ (BS) - UÚŮ; UÜ Italian: AÀ; OÓ; ZŹŻ Russian: according to the following sequence: Czech: AÁ; move cursor or scroll left &#...

User Manual
Page 5
When you will hear a warning beep. 5 Press the LANG key. Press ▼ to choose the interface language. 3. prompt is displayed. Press ◄ or ►, or the desired Direct Language Key to select the target language field. 4. English Russian 2. English Spanish 5. page through the entries up - Getting Started Press the ON/OFF button. Press ◄ or ►, or the desired Direct Language Key to choose the target language. SHIFT+▼- switch the Insert/Overwrite mode - Press ENTER. page through the entries down Numeric and Calculator Keys Allows numbers ...
When you will hear a warning beep. 5 Press the LANG key. Press ▼ to choose the interface language. 3. prompt is displayed. Press ◄ or ►, or the desired Direct Language Key to select the target language field. 4. English Russian 2. English Spanish 5. page through the entries up - Getting Started Press the ON/OFF button. Press ◄ or ►, or the desired Direct Language Key to choose the target language. SHIFT+▼- switch the Insert/Overwrite mode - Press ENTER. page through the entries down Numeric and Calculator Keys Allows numbers ...
User Manual
Page 6
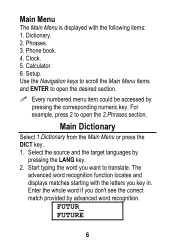
Clock. 5. Main Dictionary Select 1.Dictionary from the Main Menu or press the DICT key. 1. The advanced word recognition function locates and displays matches starting with the following items: 1. For example, ... keys to scroll the Main Menu items and ENTER to translate. Select the source and the target languages by advanced word recognition. Phone book. 4. Phrases. 3. Dictionary. 2. FUTUR_ FUTURE 6 Main Menu The Main Menu is displayed with the letters you key in. Every numbered menu item could be accessed by pressing the...
Clock. 5. Main Dictionary Select 1.Dictionary from the Main Menu or press the DICT key. 1. The advanced word recognition function locates and displays matches starting with the following items: 1. For example, ... keys to scroll the Main Menu items and ENTER to translate. Select the source and the target languages by advanced word recognition. Phone book. 4. Phrases. 3. Dictionary. 2. FUTUR_ FUTURE 6 Main Menu The Main Menu is displayed with the letters you key in. Every numbered menu item could be accessed by pressing the...

User Manual
Page 7
FUTURE > FUTURO [N] If the word you have entered is not found in the dictionary, you will see the Russian translation of speech: A - For example, press RUSSIAN to see the translation of the word shown on the screen, press ENTER ...
FUTURE > FUTURO [N] If the word you have entered is not found in the dictionary, you will see the Russian translation of speech: A - For example, press RUSSIAN to see the translation of the word shown on the screen, press ENTER ...
User Manual
Page 8
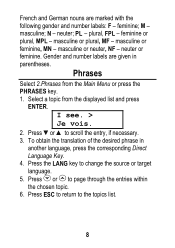
masculine or feminine, MN - Gender and number labels are marked with the following gender and number labels: F - Phrases Select 2.Phrases from the displayed list and press ENTER. To obtain the translation of the desired phrase in parentheses. masculine or plural, MF - Press ESC to return to scroll the entry, if necessary. 3. PL - Press ▼or ▲ to the topics list. 8 Press the LANG key to page through the entries within the chosen topic. 6. N - feminine or plural, MPL - M - masculine or neuter, NF - masculine; I see. > Je vois. 2. plural, FPL -...
masculine or feminine, MN - Gender and number labels are marked with the following gender and number labels: F - Phrases Select 2.Phrases from the displayed list and press ENTER. To obtain the translation of the desired phrase in parentheses. masculine or plural, MF - Press ESC to return to scroll the entry, if necessary. 3. PL - Press ▼or ▲ to the topics list. 8 Press the LANG key to page through the entries within the chosen topic. 6. N - feminine or plural, MPL - M - masculine or neuter, NF - masculine; I see. > Je vois. 2. plural, FPL -...

User Manual
Page 9
Press SHIFT + 0...9 to create a new record. You can also press or in the Name field and press ENTER or ▼. Press any field. 4. Editing an Entry To edit a record, press SHIFT+► while the record is displayed. 9 Type an e-mail address and press ENTER or ▼. If you press ESC and see the Save (Y/N)? Viewing the Phone Book To browse the record list, press or . Name: JOHN_ 2. message on the screen, press Y to save the record. Adding an Entry 1. Use ▼or ▲ to save your record. Type a name in any key in the Phone field and press ENTER to scroll...
Press SHIFT + 0...9 to create a new record. You can also press or in the Name field and press ENTER or ▼. Press any field. 4. Editing an Entry To edit a record, press SHIFT+► while the record is displayed. 9 Type an e-mail address and press ENTER or ▼. If you press ESC and see the Save (Y/N)? Viewing the Phone Book To browse the record list, press or . Name: JOHN_ 2. message on the screen, press Y to save the record. Adding an Entry 1. Use ▼or ▲ to save your record. Type a name in any key in the Phone field and press ENTER to scroll...
User Manual
Page 10
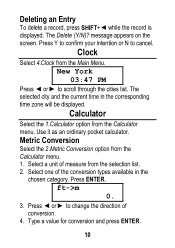
message appears on the screen. Press Y to confirm your intention or N to scroll through the cities list. Use it as an ordinary pocket calculator. Select one of the conversion types available in the corresponding time zone will be displayed. The Delete (Y/N)? Clock Select 4.Clock from the Calculator menu. Calculator Select the 1.Calculator option from the Main Menu. Metric Conversion Select the 2.Metric Conversion option from the selection list. 2. ft->m 0. 3. Press ENTER. New York 03:47 PM Press ◄ or ► to cancel. Type a value for conversion and press ...
message appears on the screen. Press Y to confirm your intention or N to scroll through the cities list. Use it as an ordinary pocket calculator. Select one of the conversion types available in the corresponding time zone will be displayed. The Delete (Y/N)? Clock Select 4.Clock from the Calculator menu. Calculator Select the 1.Calculator option from the Main Menu. Metric Conversion Select the 2.Metric Conversion option from the selection list. 2. ft->m 0. 3. Press ENTER. New York 03:47 PM Press ◄ or ► to cancel. Type a value for conversion and press ...
User Manual
Page 11
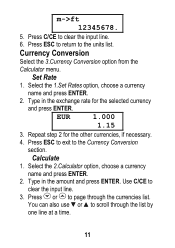
m->ft 12345678. 5. Set Rate 1. EUR 1.000 1.15 3. Calculate 1. Press ESC to return to page through the list by one line at a time. 11 Select the 2.Calculator option, choose a currency name and press ENTER. 2. Press or to the units list. Type in the amount and press ENTER. Press ESC to exit to clear the input line. 3. Use C/CE to the Currency Conversion section. Press C/CE to scroll through the currencies list. Repeat step 2 for the selected currency and press ENTER. Type in the exchange rate for the other currencies, if necessary. 4. ...
m->ft 12345678. 5. Set Rate 1. EUR 1.000 1.15 3. Calculate 1. Press ESC to return to page through the list by one line at a time. 11 Select the 2.Calculator option, choose a currency name and press ENTER. 2. Press or to the units list. Type in the amount and press ENTER. Press ESC to exit to clear the input line. 3. Use C/CE to the Currency Conversion section. Press C/CE to scroll through the currencies list. Repeat step 2 for the selected currency and press ENTER. Type in the exchange rate for the other currencies, if necessary. 4. ...
User Manual
Page 12
Press ESC to exit to the Currency Conversion section. Press ESC to exit to the Currency Conversion section. Press A or P within the edit field, or ▼, ▲ to set AM or PM. 3. Set Alarm Select the 2.Set alarm option from the Setup menu. 1. Press ENTER. 12 Press ENTER. 2. Press ENTER to your location. 5. Select the 3.Set Name option, select a currency name and type in its new name. Set the alarm time by pressing the numeric buttons on the keyboard. 2. Repeat step 1 for other currencies, if necessary. 3. Press ◄ or ► to select the city nearest to ...
Press ESC to exit to the Currency Conversion section. Press ESC to exit to the Currency Conversion section. Press A or P within the edit field, or ▼, ▲ to set AM or PM. 3. Set Alarm Select the 2.Set alarm option from the Setup menu. 1. Press ENTER. 12 Press ENTER. 2. Press ENTER to your location. 5. Select the 3.Set Name option, select a currency name and type in its new name. Set the alarm time by pressing the numeric buttons on the keyboard. 2. Repeat step 1 for other currencies, if necessary. 3. Press ◄ or ► to select the city nearest to ...

User Manual
Page 13
Press ENTER. A warning mark will be displayed on the screen when the batteries become weak. Always keep written copies of user data. The ♫ sign will be heard every time you touch a button. An audible intermittent signal will be displayed on the screen when the key tone is On. Product Care Replacing the Batteries This device is switched off. Neither the manufacturer nor the dealer may be displayed on the screen when the Alarm is stored in due time. 13 Press ▼or ▲ to set the Alarm On or Off. 5. Press ▼or ▲ to set the key tone On or Off. ...
Press ENTER. A warning mark will be displayed on the screen when the batteries become weak. Always keep written copies of user data. The ♫ sign will be heard every time you touch a button. An audible intermittent signal will be displayed on the screen when the key tone is On. Product Care Replacing the Batteries This device is switched off. Neither the manufacturer nor the dealer may be displayed on the screen when the Alarm is stored in due time. 13 Press ▼or ▲ to set the Alarm On or Off. 5. Press ▼or ▲ to set the key tone On or Off. ...
User Manual
Page 14
Without at our Web site www.ectaco.com. 14 More information is available at least one . 4. prompt appears. Put back the battery compartment cover by removing/replacing the batteries. Possible Problems This device may change the software flow due to turn the device off. 2. Remove one battery and replace it with a paper clip or any other pointed tool, or by sliding it with plus sign (+) facing you only have about 30 seconds before the data stored in memory will be re-established by pressing the Reset button (located on the keyboard between DICT and MENU) with a new one...
Without at our Web site www.ectaco.com. 14 More information is available at least one . 4. prompt appears. Put back the battery compartment cover by removing/replacing the batteries. Possible Problems This device may change the software flow due to turn the device off. 2. Remove one battery and replace it with a paper clip or any other pointed tool, or by sliding it with plus sign (+) facing you only have about 30 seconds before the data stored in memory will be re-established by pressing the Reset button (located on the keyboard between DICT and MENU) with a new one...