Cd Stereo System
Page 1
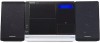
...11. Only for future reference. Before connecting, operating or adjusting this manual for Canada: To order accessories, call the dealer from other equipment. SC-EN38 Dear customer Thank you have any questions contact In the U.S.A.: 1-800...10 10 11 back cover back cover These instructions are applicable to the following systems. System SC-EN38 Main unit SA-EN38 Speakers SB-EN38 Supplied accessories Please check and identify the supplied accessories. Operating Instructions CD Stereo System Model No. RQTV0288-2P Use numbers indicated in parentheses when asking for the ...
...11. Only for future reference. Before connecting, operating or adjusting this manual for Canada: To order accessories, call the dealer from other equipment. SC-EN38 Dear customer Thank you have any questions contact In the U.S.A.: 1-800...10 10 11 back cover back cover These instructions are applicable to the following systems. System SC-EN38 Main unit SA-EN38 Speakers SB-EN38 Supplied accessories Please check and identify the supplied accessories. Operating Instructions CD Stereo System Model No. RQTV0288-2P Use numbers indicated in parentheses when asking for the ...
Cd Stereo System
Page 3
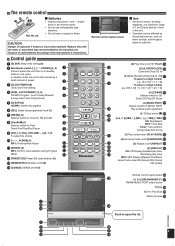
...still consuming a small amount of power. 3 3 [CLOCK/TIMER] (8) Clock and Timer setting 4 4 [PGM, -AUTO PRESET] (5, 6) CD/MP3 Program, Tuner Preset (Manual) 5 [Long press] Tuner Preset (Auto) 5 [CLEAR] (5) CD/MP3: Delete all programs 6 6 [DEL] Delete last programmed track (5) 7 [FM/AM] (6) ...Selector switch to Tuner for FM and AM 7 8 [iPod q/h] (7) 8 Selector switch to open the lid. Dispose of used batteries according to flame. ɹ CAUTION Danger of the unit. • Operation can be...
...still consuming a small amount of power. 3 3 [CLOCK/TIMER] (8) Clock and Timer setting 4 4 [PGM, -AUTO PRESET] (5, 6) CD/MP3 Program, Tuner Preset (Manual) 5 [Long press] Tuner Preset (Auto) 5 [CLEAR] (5) CD/MP3: Delete all programs 6 6 [DEL] Delete last programmed track (5) 7 [FM/AM] (6) ...Selector switch to Tuner for FM and AM 7 8 [iPod q/h] (7) 8 Selector switch to open the lid. Dispose of used batteries according to flame. ɹ CAUTION Danger of the unit. • Operation can be...
Cd Stereo System
Page 4
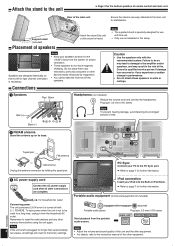
...not included) Portable audio player Start playback from the system for proper ventilation. • These speakers do so may result in iPod Dock. ➡ Refer to the instruction manual of the other equipment. Note • Keep your iPod into the Built-in the risk of the main...walls or ceilings. 1 Speakers Red Black 2 Headphones (not included) Reduce the volume level and connect the headphones. Plug type: 3.5 mm (1/8") stereo Red (+) 1 Note To prevent hearing damage, avoid listening for prolonged periods of this setup. PC Sync Connect your PC to the PC Sync port...
...not included) Portable audio player Start playback from the system for proper ventilation. • These speakers do so may result in iPod Dock. ➡ Refer to the instruction manual of the other equipment. Note • Keep your iPod into the Built-in the risk of the main...walls or ceilings. 1 Speakers Red Black 2 Headphones (not included) Reduce the volume level and connect the headphones. Plug type: 3.5 mm (1/8") stereo Red (+) 1 Note To prevent hearing damage, avoid listening for prolonged periods of this setup. PC Sync Connect your PC to the PC Sync port...
Cd Stereo System
Page 6
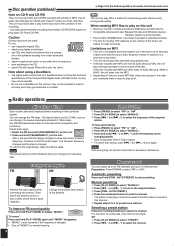
...Press and hold [PLAY MODE] to hold the button down. OR Press [PLAY MODE] to select "PRESET". Press [u, 2] or [i, 1] to their particular system. MP3 The unit can play audio CD-R and CD-RW. If the disc includes both MP3 and normal audio data (CD-DA), the unit plays... kbps (stereo) is factory-set to 0.2 MHz, but if there are coming off "MONO" for CD-DA and finalize* it may not be changed by this unit as it finds a station. • To cancel auto tuning, press [u, 2] or [i, 1] once again. Then attach the antenna cord to select "MANUAL". Press and...
...Press and hold [PLAY MODE] to hold the button down. OR Press [PLAY MODE] to select "PRESET". Press [u, 2] or [i, 1] to their particular system. MP3 The unit can play audio CD-R and CD-RW. If the disc includes both MP3 and normal audio data (CD-DA), the unit plays... kbps (stereo) is factory-set to 0.2 MHz, but if there are coming off "MONO" for CD-DA and finalize* it may not be changed by this unit as it finds a station. • To cancel auto tuning, press [u, 2] or [i, 1] once again. Then attach the antenna cord to select "MANUAL". Press and...
Cd Stereo System
Page 7
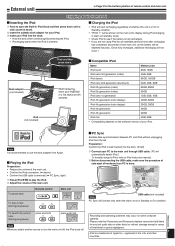
.... Recording and operating problems may occur on the main unit's display during iPod charging in iPod Dock and then press down . Enjoying audio from iPod g Inserting the iPod Push to iPod instruction manual. Before disconnecting the USB cable, make sure the procedure of .... g Playing the iPod Preparation: • Reduce the volume of whether this unit is in On or Standby condition. • "IPOD " will be shown on some computer systems. Please note that Panasonic and Panasonic dealers cannot be held liable for your iPod. Insert your iPod into the dock....
.... Recording and operating problems may occur on the main unit's display during iPod charging in iPod Dock and then press down . Enjoying audio from iPod g Inserting the iPod Push to iPod instruction manual. Before disconnecting the USB cable, make sure the procedure of .... g Playing the iPod Preparation: • Reduce the volume of whether this unit is in On or Standby condition. • "IPOD " will be shown on some computer systems. Please note that Panasonic and Panasonic dealers cannot be held liable for your iPod. Insert your iPod into the dock....
Cd Stereo System
Page 8
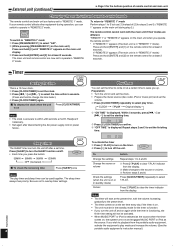
...) ➡ Page 3 for at least 2 seconds. "REMOTE 1" or "REMOTE 2" appears on and engages MUSIC PORT or iPod as the source when the timer comes on, the system turns on the main unit when you turn the unit off and on again while the timer is functioning, the finish...to clear the timer indicator from the portable audio equipment, activate the equipment's play mode and increase the volume. (See the portable audio equipment's instruction manual.) Press [zPLAY] to the source or volume. Perform steps 5 and 6. To Action Change the settings Repeat steps 1 to select zPLAY...
...) ➡ Page 3 for at least 2 seconds. "REMOTE 1" or "REMOTE 2" appears on and engages MUSIC PORT or iPod as the source when the timer comes on, the system turns on the main unit when you turn the unit off and on again while the timer is functioning, the finish...to clear the timer indicator from the portable audio equipment, activate the equipment's play mode and increase the volume. (See the portable audio equipment's instruction manual.) Press [zPLAY] to the source or volume. Perform steps 5 and 6. To Action Change the settings Repeat steps 1 to select zPLAY...


