

PVL353 User Guide
Page 1
Getting Started Basic Operation Special Features For Your Information Camcorder Operating Instructions Model No. Please save this product. For assistance, please call : 1-800-211-PANA(7262) or send e-mail to operate this manual. PV-L353 Please read these instructions carefully before attempting to : consumerproducts@panasonic.com LSQT0628A Guía para rápida consulta en español está incluida.
Getting Started Basic Operation Special Features For Your Information Camcorder Operating Instructions Model No. Please save this product. For assistance, please call : 1-800-211-PANA(7262) or send e-mail to operate this manual. PV-L353 Please read these instructions carefully before attempting to : consumerproducts@panasonic.com LSQT0628A Guía para rápida consulta en español está incluida.

PVL353 User Guide
Page 2
...Purchase Dealer Purchased From Dealer Address Dealer Phone No. Model No. CR2025 Clock Battery (installed in the information to retain this marker as your Camcorder. 1 pc. The serial number is on the tag located on the market today. Shoulder Strap (LSFC0012) (page 12) 1 pc. ... Adaptor (PV-A20) with Lens Cap Strap (LSGQ0049) (page 12) Use this manual as a reminder to yourself when the battery is for choosing Panasonic! Battery Pack (PV-BP15/LSSB0007) (pages 9, 10) 1 pc. Things You Should Know Thank you years of enjoyment. Unpack your reference only....
...Purchase Dealer Purchased From Dealer Address Dealer Phone No. Model No. CR2025 Clock Battery (installed in the information to retain this marker as your Camcorder. 1 pc. The serial number is on the tag located on the market today. Shoulder Strap (LSFC0012) (page 12) 1 pc. ... Adaptor (PV-A20) with Lens Cap Strap (LSGQ0049) (page 12) Use this manual as a reminder to yourself when the battery is for choosing Panasonic! Battery Pack (PV-BP15/LSSB0007) (pages 9, 10) 1 pc. Things You Should Know Thank you years of enjoyment. Unpack your reference only....
PVL353 User Guide
Page 3
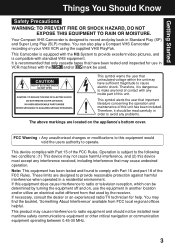
...been included. It is designed to this unit. FCC Warning : Any unauthorized changes or modifications to record and play a Compact VHS Camcorder recording on the appliance's bottom cover. If necessary, consult the dealer or an experienced radio/TV technician for use the equipment in... a residential environment. Your Compact VHS Camcorder is recommended that only cassette tapes that used . This Camcorder is equipped with Part 15 of contact with standard VHS equipment. This symbol warns the user that uninsulated voltage within the ...
...been included. It is designed to this unit. FCC Warning : Any unauthorized changes or modifications to record and play a Compact VHS Camcorder recording on the appliance's bottom cover. If necessary, consult the dealer or an experienced radio/TV technician for use the equipment in... a residential environment. Your Compact VHS Camcorder is recommended that only cassette tapes that used . This Camcorder is equipped with Part 15 of contact with standard VHS equipment. This symbol warns the user that uninsulated voltage within the ...

PVL353 User Guide
Page 5
.... This action could permanently damage the internal parts of overhead power lines or other hazards. 21. CARE • TO CLEAN YOUR CAMCORDER ... When installing an outside antenna system should not be damaged by a qualified technician to restore the video unit to unnecessary movement (...the unit is not designed to sustain direct exposure to disassemble this indicates a need for outdoor use strong or abrasive detergents when cleaning your Camcorder in direct sunlight, inside . Never push objects of coffee. Do not attempt to water, rain, sleet, snow, sand, dust, or ...
.... This action could permanently damage the internal parts of overhead power lines or other hazards. 21. CARE • TO CLEAN YOUR CAMCORDER ... When installing an outside antenna system should not be damaged by a qualified technician to restore the video unit to unnecessary movement (...the unit is not designed to sustain direct exposure to disassemble this indicates a need for outdoor use strong or abrasive detergents when cleaning your Camcorder in direct sunlight, inside . Never push objects of coffee. Do not attempt to water, rain, sleet, snow, sand, dust, or ...
PVL353 User Guide
Page 7
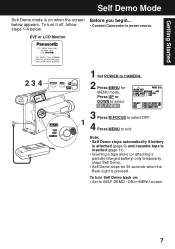
... you begin... Note: • Self Demo stops automatically if battery is attached (page 9) and cassette tape is pressed. To turn it off, follow • Connect Camcorder to power source. steps 1-4 below appears. EVF or LCD Monitor 2, 3, 4 1 Set POWER to exit. below . Press UP or DOWN to select SELF DEMO . 3 Press M.FOCUS...
... you begin... Note: • Self Demo stops automatically if battery is attached (page 9) and cassette tape is pressed. To turn it off, follow • Connect Camcorder to power source. steps 1-4 below appears. EVF or LCD Monitor 2, 3, 4 1 Set POWER to exit. below . Press UP or DOWN to select SELF DEMO . 3 Press M.FOCUS...
PVL353 User Guide
Page 10
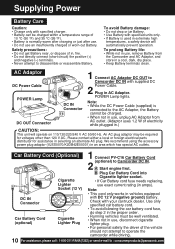
...dark, dry place. • Keep Battery terminals clean. To prolong Battery life: • While not in use , unplug AC Adaptor from the Camcorder and AC Adaptor, and store in .) CAUTION: This unit will automatically prevent operation. Safety precautions: • Do not get Battery near, or ...from AC outlet. (Adaptor uses 1.2 W of the vehicle should not attempt to operate the camcorder while driving. 10 For assistance, please call : 1-800-211-PANA(7262) or send e-mail to : consumerproducts@panasonic.com Use only specified car battery cord. • To avoid blowing the car battery cord...
...dark, dry place. • Keep Battery terminals clean. To prolong Battery life: • While not in use , unplug AC Adaptor from the Camcorder and AC Adaptor, and store in .) CAUTION: This unit will automatically prevent operation. Safety precautions: • Do not get Battery near, or ...from AC outlet. (Adaptor uses 1.2 W of the vehicle should not attempt to operate the camcorder while driving. 10 For assistance, please call : 1-800-211-PANA(7262) or send e-mail to : consumerproducts@panasonic.com Use only specified car battery cord. • To avoid blowing the car battery cord...

PVL353 User Guide
Page 12
... 1 Open the Hand Strap as shown. Lens Cap Attaching the Lens Cap Strap: Thread the Strap through Strap Rings on Camcorder. 2 Remove the Sensor tag. Attaching the Lens Cap Cord to : consumerproducts@panasonic.com Adjust the Length of the Shoulder Strap Pull a loop of strap from buckles. 2 Thread strap ends through the...
... 1 Open the Hand Strap as shown. Lens Cap Attaching the Lens Cap Strap: Thread the Strap through Strap Rings on Camcorder. 2 Remove the Sensor tag. Attaching the Lens Cap Cord to : consumerproducts@panasonic.com Adjust the Length of the Shoulder Strap Pull a loop of strap from buckles. 2 Thread strap ends through the...
PVL353 User Guide
Page 13
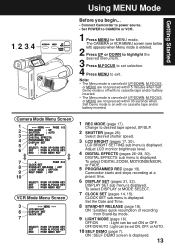
...MENU are not pressed within 30 seconds when Self Demo mode is displayed. 13 Change to CAMERA or VCR. 1 Press MENU for MENU mode. Camcorder starts and stops recording at a preset time. 6 DISPLAY SET (pages 31, 32). To select DISPLAY or MODE SELECT. 7 CLOCK SET (... 17). To select DIGITAL ZOOM, MOTIONSENSOR, or FADE. 5 PROGRAMMED REC (page 19). Using MENU Mode Getting Started 1, 2, 3, 4 Before you begin... • Connect Camcorder to power source. • Set POWER to desired tape speed, SP/SLP. 2 SHUTTER (page 25). CLOCK SET sub menu is displayed. DIGITAL EFFECTS sub menu...
...MENU are not pressed within 30 seconds when Self Demo mode is displayed. 13 Change to CAMERA or VCR. 1 Press MENU for MENU mode. Camcorder starts and stops recording at a preset time. 6 DISPLAY SET (pages 31, 32). To select DISPLAY or MODE SELECT. 7 CLOCK SET (... 17). To select DIGITAL ZOOM, MOTIONSENSOR, or FADE. 5 PROGRAMMED REC (page 19). Using MENU Mode Getting Started 1, 2, 3, 4 Before you begin... • Connect Camcorder to power source. • Set POWER to desired tape speed, SP/SLP. 2 SHUTTER (page 25). CLOCK SET sub menu is displayed. DIGITAL EFFECTS sub menu...
PVL353 User Guide
Page 14
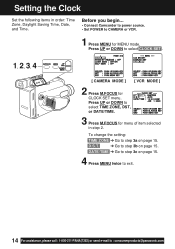
Before you begin... • Connect Camcorder to power source. • Set POWER to select CLOCK SET . 1, 2, 3, 4 [ CAMERA MODE ] [ VCR MODE ] 2 Press M.FOCUS for CLOCK SET menu. D.S.T. ➔ Go to step 3a ...-211-PANA(7262) or send e-mail to select TIME ZONE, DST, or DATE/TIME. 3 Press M.FOCUS for MENU mode. Press UP or DOWN to : consumerproducts@panasonic.com
Before you begin... • Connect Camcorder to power source. • Set POWER to select CLOCK SET . 1, 2, 3, 4 [ CAMERA MODE ] [ VCR MODE ] 2 Press M.FOCUS for CLOCK SET menu. D.S.T. ➔ Go to step 3a ...-211-PANA(7262) or send e-mail to select TIME ZONE, DST, or DATE/TIME. 3 Press M.FOCUS for MENU mode. Press UP or DOWN to : consumerproducts@panasonic.com

PVL353 User Guide
Page 15
... not observed in October) : back one hour. Setting the Clock Getting Started 3a Setting the Time Zone The Camcorder is preset to Eastern time. [ Time Zone chart ] Press UP or DOWN to fix. The Camcorder is pressed. 15 Repeat for minute, month, day, and year. Press UP or DOWN to DST: AUTO...
... not observed in October) : back one hour. Setting the Clock Getting Started 3a Setting the Time Zone The Camcorder is preset to Eastern time. [ Time Zone chart ] Press UP or DOWN to fix. The Camcorder is pressed. 15 Repeat for minute, month, day, and year. Press UP or DOWN to DST: AUTO...
PVL353 User Guide
Page 16
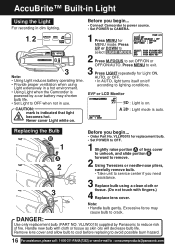
...when using a clean cloth or tissue. (Do not touch with cloth or tissue as skin oils will decrease bulb life. Before you begin ... • Connect Camcorder to power source. • Set POWER to OFF when not in dim lighting. Replacing the Bulb B 1 A 2 3 Before you begin ... • ...Order Part No. EVF or LCD Monitor A : Light is powered by Panasonic to reduce risk of lens cover to unhook, and slide portion B forward to remove. 2 Using Tweezers or needle-nose pliers, carefully remove bulb. • Take...
...when using a clean cloth or tissue. (Do not touch with cloth or tissue as skin oils will decrease bulb life. Before you begin ... • Connect Camcorder to power source. • Set POWER to OFF when not in dim lighting. Replacing the Bulb B 1 A 2 3 Before you begin ... • ...Order Part No. EVF or LCD Monitor A : Light is powered by Panasonic to reduce risk of lens cover to unhook, and slide portion B forward to remove. 2 Using Tweezers or needle-nose pliers, carefully remove bulb. • Take...
PVL353 User Guide
Page 17
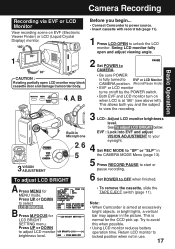
... OFF when finished. • To remove the cassette, slide the TAPE EJECT switch (page 11). Note: • When Camcorder is normal for the CCD pick-up. This allows both you begin... • Connect Camcorder to power source. • Insert cassette with record tab (page 11). 1 Press LCD-OPEN to view the recording... or LCD Monitor View recording scene on when LCD is at excessively bright objects, or bright lights, a vertical bar may block cassette door and damage Camcorder body. 4, A, B Built-in the picture. Before you and the subject to unlock the LCD monitor.
... OFF when finished. • To remove the cassette, slide the TAPE EJECT switch (page 11). Note: • When Camcorder is normal for the CCD pick-up. This allows both you begin... • Connect Camcorder to power source. • Insert cassette with record tab (page 11). 1 Press LCD-OPEN to view the recording... or LCD Monitor View recording scene on when LCD is at excessively bright objects, or bright lights, a vertical bar may block cassette door and damage Camcorder body. 4, A, B Built-in the picture. Before you and the subject to unlock the LCD monitor.
PVL353 User Guide
Page 18
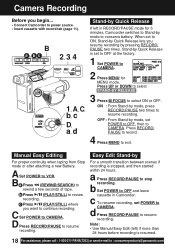
... to resume recording. d Press RECORD/PAUSE to OFF and leave cassette in RECORD/PAUSE mode for MENU mode. When set POWER to : consumerproducts@panasonic.com A Set POWER to resume recording. Easy Edit Stand-by mode to select ON or OFF. ON : From Stand-by Quick Release If left...to VCR. c To resume recording, set to ON, Stand-by pressing RECORD/ PAUSE two times. Note: • Use Manual Easy Edit (left in Camcorder. c Press (PLAY/STILL) where you resume recording by Quick Release lets you want to power source. • Insert cassette with record tab (page 11...
... to resume recording. d Press RECORD/PAUSE to OFF and leave cassette in RECORD/PAUSE mode for MENU mode. When set POWER to : consumerproducts@panasonic.com A Set POWER to resume recording. Easy Edit Stand-by mode to select ON or OFF. ON : From Stand-by Quick Release If left...to VCR. c To resume recording, set to ON, Stand-by pressing RECORD/ PAUSE two times. Note: • Use Manual Easy Edit (left in Camcorder. c Press (PLAY/STILL) where you resume recording by Quick Release lets you want to power source. • Insert cassette with record tab (page 11...

PVL353 User Guide
Page 19
...3 Press DOWN to OFF. 19 Recording will be done each minute. Press UP or DOWN to power source. Before you begin... • Connect Camcorder to select PROGRAMMED REC . 2 Press M.FOCUS. (Current time is displayed.) Each additional press of the options shown at tape end, or 12 ...hours after Interval Recording starts. • To cancel, set over 24 hours from current time. • Camcorder shuts off at left. Basic Operation Camera Recording Programmed Recording Set a recording start time by mode. *1 Record 5 seconds each minute. *2 Record 10...
...3 Press DOWN to OFF. 19 Recording will be done each minute. Press UP or DOWN to power source. Before you begin... • Connect Camcorder to select PROGRAMMED REC . 2 Press M.FOCUS. (Current time is displayed.) Each additional press of the options shown at tape end, or 12 ...hours after Interval Recording starts. • To cancel, set over 24 hours from current time. • Camcorder shuts off at left. Basic Operation Camera Recording Programmed Recording Set a recording start time by mode. *1 Record 5 seconds each minute. *2 Record 10...
PVL353 User Guide
Page 20
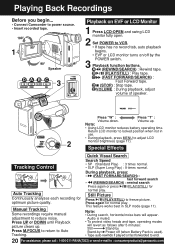
...-OPEN and swing LCD monitor fully open. 2 Set POWER to freeze picture. Manual Tracking Some recordings require manual adjustment to : consumerproducts@panasonic.com Audio is used). • Tape auto-rewinds if played or fast forwarded to end. 20 For assistance, please call : 1-800...to reduce noise. B (PLAY/STILL) : Play tape. Volume up . Press again or press normal play . Playing Back Recordings Before you begin... • Connect Camcorder to power source. • Insert recorded tape. 1 Speaker 3 D A B C E Playback on /off by Power off (when Battery Pack is muted. &#...
...-OPEN and swing LCD monitor fully open. 2 Set POWER to freeze picture. Manual Tracking Some recordings require manual adjustment to : consumerproducts@panasonic.com Audio is used). • Tape auto-rewinds if played or fast forwarded to end. 20 For assistance, please call : 1-800...to reduce noise. B (PLAY/STILL) : Play tape. Volume up . Press again or press normal play . Playing Back Recordings Before you begin... • Connect Camcorder to power source. • Insert recorded tape. 1 Speaker 3 D A B C E Playback on /off by Power off (when Battery Pack is muted. &#...
PVL353 User Guide
Page 21
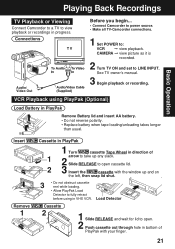
... playback or recordings in progress. Load Detector Cassette 2 1 Slide RELEASE and wait for lid to open. 2 Push cassette out through hole in VHS VCR. See TV owner's manual. 3 Begin playback or recording. VCR Playback using in bottom of 1 arrow to take up any slack. 2...lid. 2 3 Insert the cassette with your finger. 21 Connections Audio/ Video Out Before you begin... • Connect Camcorder to power source. • Make all TV-Camcorder connections. 1 Set POWER to fully retract before using PlayPak (Optional) Load Battery in direction of PlayPak with the window up...
... playback or recordings in progress. Load Detector Cassette 2 1 Slide RELEASE and wait for lid to open. 2 Push cassette out through hole in VHS VCR. See TV owner's manual. 3 Begin playback or recording. VCR Playback using in bottom of 1 arrow to take up any slack. 2...lid. 2 3 Insert the cassette with your finger. 21 Connections Audio/ Video Out Before you begin... • Connect Camcorder to power source. • Make all TV-Camcorder connections. 1 Set POWER to fully retract before using PlayPak (Optional) Load Battery in direction of PlayPak with the window up...
PVL353 User Guide
Page 22
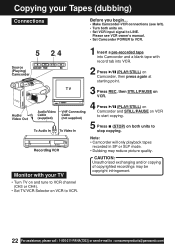
...VCR input signal to LINE. Please see VCR owner's manual. • Set Camcorder POWER to VCR. 5 Source (Playing) Camcorder 2, 4 Audio/ Video Out Monitor with record tab into VCR. 2 Press (PLAY/STILL) on Camcorder, then press again at starting point. 3 Press REC, then STILL/PAUSE ...VCR. 1 Insert a pre-recorded tape into Camcorder and a blank tape with your Tapes (dubbing) Connections Before you begin... • Make Camcorder-VCR connections (see left). • Turn both units to : consumerproducts@panasonic.com Note: • Camcorder will only playback tapes recorded in SP or...
...VCR input signal to LINE. Please see VCR owner's manual. • Set Camcorder POWER to VCR. 5 Source (Playing) Camcorder 2, 4 Audio/ Video Out Monitor with record tab into VCR. 2 Press (PLAY/STILL) on Camcorder, then press again at starting point. 3 Press REC, then STILL/PAUSE ...VCR. 1 Insert a pre-recorded tape into Camcorder and a blank tape with your Tapes (dubbing) Connections Before you begin... • Make Camcorder-VCR connections (see left). • Turn both units to : consumerproducts@panasonic.com Note: • Camcorder will only playback tapes recorded in SP or...
PVL353 User Guide
Page 23
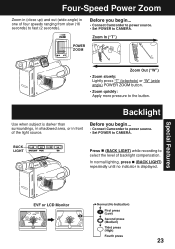
... power source. • Set POWER to the button. Before you begin ... • Connect Camcorder to power source. • Set POWER to CAMERA. BACK LIGHT Press (BACK LIGHT) while recording to fast (2 seconds). Four-Speed Power Zoom Zoom in (close ...
... power source. • Set POWER to the button. Before you begin ... • Connect Camcorder to power source. • Set POWER to CAMERA. BACK LIGHT Press (BACK LIGHT) while recording to fast (2 seconds). Four-Speed Power Zoom Zoom in (close ...

PVL353 User Guide
Page 24
....7 mm (1/2 inch) from subject if necessary. 4 Press "W" (wide angle) on POWER ZOOM to maximum wide angle. Bring Camcorder up close -ups) Auto Focus functions up to : consumerproducts@panasonic.com Focus Before you begin... • Connect Camcorder to power source. • Set POWER to remove "MF" in EVF or LCD monitor if necessary. Press...
....7 mm (1/2 inch) from subject if necessary. 4 Press "W" (wide angle) on POWER ZOOM to maximum wide angle. Bring Camcorder up close -ups) Auto Focus functions up to : consumerproducts@panasonic.com Focus Before you begin... • Connect Camcorder to power source. • Set POWER to remove "MF" in EVF or LCD monitor if necessary. Press...
PVL353 User Guide
Page 25
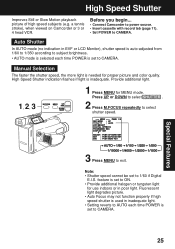
... each time POWER is needed for MENU mode. Note: • Shutter speed cannot be set to 1/60 if Digital E.I.S. a tennis stroke), when viewed on Camcorder or 3 or 4 head VCR. Press UP or DOWN to select SHUTTER . 2 Press M.FOCUS repeatedly to exit. feature is set to ON. •...from 1/60 to 1/350 according to subject brightness. • AUTO mode is selected each time POWER is inadequate. Before you begin... • Connect Camcorder to power source. • Insert cassette with record tab (page 11). • Set POWER to CAMERA. Auto Shutter In AUTO mode (no indication...
... each time POWER is needed for MENU mode. Note: • Shutter speed cannot be set to 1/60 if Digital E.I.S. a tennis stroke), when viewed on Camcorder or 3 or 4 head VCR. Press UP or DOWN to select SHUTTER . 2 Press M.FOCUS repeatedly to exit. feature is set to ON. •...from 1/60 to 1/350 according to subject brightness. • AUTO mode is selected each time POWER is inadequate. Before you begin... • Connect Camcorder to power source. • Insert cassette with record tab (page 11). • Set POWER to CAMERA. Auto Shutter In AUTO mode (no indication...

