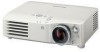

Hd Home Cinema Projector
Page 5
... SIGNAL LEVEL 34 INSTALLATION 35 SLEEP 35 ALTITUDE 35 LAMP POWER 35 LAMP RUNTIME 35 TEST PATTERN 35 TEMP and LAMP Indicators 36 Controlling alerts 36 Care and Replacement 37 Before cleaning 37 Cleaning your projector 37 Before replacing the Lamp unit 38 When to replace the Lamp unit 38 Replacing the lamp unit 39 Troubleshooting 40 Appendix Technical Information 41...
... SIGNAL LEVEL 34 INSTALLATION 35 SLEEP 35 ALTITUDE 35 LAMP POWER 35 LAMP RUNTIME 35 TEST PATTERN 35 TEMP and LAMP Indicators 36 Controlling alerts 36 Care and Replacement 37 Before cleaning 37 Cleaning your projector 37 Before replacing the Lamp unit 38 When to replace the Lamp unit 38 Replacing the lamp unit 39 Troubleshooting 40 Appendix Technical Information 41...
Hd Home Cinema Projector
Page 7
... close to safety During a thunderstorm, do not touch the projector or the cable. Do not allow it . The lamp can hurt or damage your hands or other appliances such as air conditioners and electrical device by a qualified technician. Before replacing the lamp, be used . Replacement of the air outlet port. Preparation Precautions with regard to...
... close to safety During a thunderstorm, do not touch the projector or the cable. Do not allow it . The lamp can hurt or damage your hands or other appliances such as air conditioners and electrical device by a qualified technician. Before replacing the lamp, be used . Replacement of the air outlet port. Preparation Precautions with regard to...
Hd Home Cinema Projector
Page 8
... inserting the batteries, make sure the polarities (+ and -) are constantly making efforts to clean inside of the projector before moving the projector. If the lamp has broken, ventilate the room immediately. Ask your dealer about the replacement of time, disconnect the power cord plug from the wall outlet as these materials could cause fire...
... inserting the batteries, make sure the polarities (+ and -) are constantly making efforts to clean inside of the projector before moving the projector. If the lamp has broken, ventilate the room immediately. Ask your dealer about the replacement of time, disconnect the power cord plug from the wall outlet as these materials could cause fire...
Hd Home Cinema Projector
Page 10
... do not let it with your LCD. 10 - Moreover, when not using the projector, cover it become dirty or damaged. Lamp The lamp may need to prevent outside light or light from indoor lamps from fingerprints or anything else, this will be replaced earlier due to variables such as individual lamp characteristics, usage conditions and the installation...
... do not let it with your LCD. 10 - Moreover, when not using the projector, cover it become dirty or damaged. Lamp The lamp may need to prevent outside light or light from indoor lamps from fingerprints or anything else, this will be replaced earlier due to variables such as individual lamp characteristics, usage conditions and the installation...
Hd Home Cinema Projector
Page 13
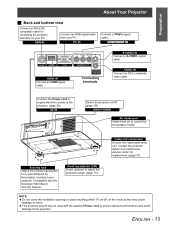
... only be used with the Kesington MicroSaver Security System. Connect the Power cord to supply electronic power to the projector. (page 26) AC IN Switch the projector on/off. (page 19) MAIN POWER Air intake port Intake fresh air to adjust the projection angle. (page 15) NOTE: Do not ...COMPONENT IN S-VIDEO IN Connect a S-VIDEO signal cable. Connecting terminals VIDEO IN Connect an RCA composite video cable. PC IN Connect a YPBPR signal cable. Lamp unit component Houses the replaceable lamp unit. Front leg adjuster (L/R) Screw up/down to control the temperature inside. ENGLISH - 13
... only be used with the Kesington MicroSaver Security System. Connect the Power cord to supply electronic power to the projector. (page 26) AC IN Switch the projector on/off. (page 19) MAIN POWER Air intake port Intake fresh air to adjust the projection angle. (page 15) NOTE: Do not ...COMPONENT IN S-VIDEO IN Connect a S-VIDEO signal cable. Connecting terminals VIDEO IN Connect an RCA composite video cable. PC IN Connect a YPBPR signal cable. Lamp unit component Houses the replaceable lamp unit. Front leg adjuster (L/R) Screw up/down to control the temperature inside. ENGLISH - 13
Hd Home Cinema Projector
Page 35
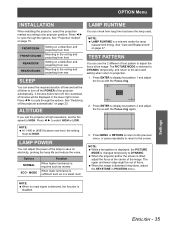
... the 2 different of test pattern to cycle through the options. LAMP POWER You can use the projector at the center of minutes will be displayed in a small room 3. Options NORMAL ECO - The upper and lower edge might be HIGH. See "Care and Replacement" on page 15. See "Switching off , the countdown of the...
... the 2 different of test pattern to cycle through the options. LAMP POWER You can use the projector at the center of minutes will be displayed in a small room 3. Options NORMAL ECO - The upper and lower edge might be HIGH. See "Care and Replacement" on page 15. See "Switching off , the countdown of the...
Hd Home Cinema Projector
Page 36
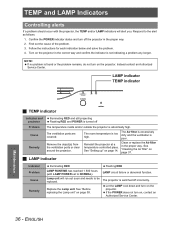
...the problem. 4. The room temperature is poor. Replace the Lamp unit. Let the LAMP cool down and turn on page 37. Respond to the alert as follows. 1. LAMP indicator TEMP indicator Maintenance J TEMP indicator Indicator and projector Problem Cause Remedy Illuminating RED and still projecting Flashing...is excessively dirty and the ventilation is too high. Clean or replace the Air filter in the correct way and confirm the indicator is turned off incorrectly. See "Before replacing the Lamp unit" on the projector. NOTE: If no problem is abnormally high. Instead contact ...
...the problem. 4. The room temperature is poor. Replace the Lamp unit. Let the LAMP cool down and turn on page 37. Respond to the alert as follows. 1. LAMP indicator TEMP indicator Maintenance J TEMP indicator Indicator and projector Problem Cause Remedy Illuminating RED and still projecting Flashing...is excessively dirty and the ventilation is too high. Clean or replace the Air filter in the correct way and confirm the indicator is turned off incorrectly. See "Before replacing the Lamp unit" on the projector. NOTE: If no problem is abnormally high. Instead contact ...
Hd Home Cinema Projector
Page 37
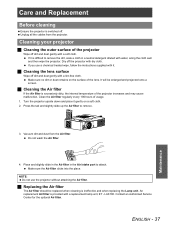
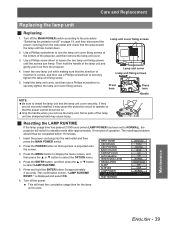
... intake port to attach. Make sure the Air filter clicks into the place. Cleaning your projector J Cleaning the outer surface of the projector increases and may cause malfunction. LAX100. It will be replaced when cleaning is provided with a replacement lamp unit, ET - Place and slightly slide in the Air filter in a neutral detergent diluted with...
... intake port to attach. Make sure the Air filter clicks into the place. Cleaning your projector J Cleaning the outer surface of the projector increases and may cause malfunction. LAX100. It will be replaced when cleaning is provided with a replacement lamp unit, ET - Place and slightly slide in the Air filter in a neutral detergent diluted with...
Hd Home Cinema Projector
Page 38
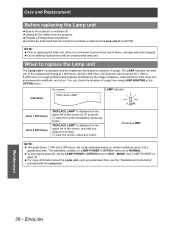
... screen immediately, press any button. Care and Replacement Before replacing the Lamp unit Ensure the projector is consumable and the brightness decreases by the usage conditions, characteristics of the lamp unit, environmental conditions, and so on page 35. On screen LAMP indicator Indication REPLACE LAMP Over 1 800 hours Over 2 000 hours "REPLACE LAMP" is displayed on certain conditions and is...
... screen immediately, press any button. Care and Replacement Before replacing the Lamp unit Ensure the projector is consumable and the brightness decreases by the usage conditions, characteristics of the lamp unit, environmental conditions, and so on page 35. On screen LAMP indicator Indication REPLACE LAMP Over 1 800 hours Over 2 000 hours "REPLACE LAMP" is displayed on certain conditions and is...
Hd Home Cinema Projector
Page 39
... Some parts of the projector, and then remove the lamp unit cover. 3. Insert the power cord plug into the wall outlet and then press the MAIN POWER switch. 2. Press and hold the handle of operation. Care and Replacement Replacing the lamp unit J Replacing 1. The resetting procedure should... thus be turned on page 19, and then disconnect the power cord plug from the projector. 4. Press the ENTER button, and then press the F or ...
... Some parts of the projector, and then remove the lamp unit cover. 3. Insert the power cord plug into the wall outlet and then press the MAIN POWER switch. 2. Press and hold the handle of operation. Care and Replacement Replacing the lamp unit J Replacing 1. The resetting procedure should... thus be turned on page 19, and then disconnect the power cord plug from the projector. 4. Press the ENTER button, and then press the F or ...


