Operating Instructions
Page 5
... Setup ...16 Installing the Software ...16 System Requirements ...16 Software Installation ...16 Connecting to a Computer 17 Power Supply ...17 Installing the Ribbon Cassette 18 Mounting the Ribbon Cassette 18 Removing the Ribbon Cassette 20 Handling Paper ...20 Fanfold Paper (Tractor Push Mode 20 Single Sheets and Envelopes (Friction Mode 23 Self Test ...24...
... Setup ...16 Installing the Software ...16 System Requirements ...16 Software Installation ...16 Connecting to a Computer 17 Power Supply ...17 Installing the Ribbon Cassette 18 Mounting the Ribbon Cassette 18 Removing the Ribbon Cassette 20 Handling Paper ...20 Fanfold Paper (Tractor Push Mode 20 Single Sheets and Envelopes (Friction Mode 23 Self Test ...24...
Operating Instructions
Page 11
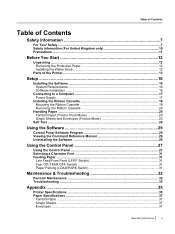
Caution Labels Operation • Do not operate the printer without installing paper and a ribbon cassette. • Do not obstruct printhead movement while the printer is operating. &#... 40 °C (104 °F). • For details about obtaining the Material Safety Data Sheet. Ink Ribbon • Do not store the ink ribbon in direct sunlight or in a place with high concentrations of dust or chemical fumes, solvents, etc. ...8226; Do not leave the CD-ROM where it . Please ask your Panasonic sales company about the ink ribbon, please refer to the Material Safety Data Sheet (MSDS).
Caution Labels Operation • Do not operate the printer without installing paper and a ribbon cassette. • Do not obstruct printhead movement while the printer is operating. &#... 40 °C (104 °F). • For details about obtaining the Material Safety Data Sheet. Ink Ribbon • Do not store the ink ribbon in direct sunlight or in a place with high concentrations of dust or chemical fumes, solvents, etc. ...8226; Do not leave the CD-ROM where it . Please ask your Panasonic sales company about the ink ribbon, please refer to the Material Safety Data Sheet (MSDS).

Operating Instructions
Page 12
CD-ROM Installation Manual 12 Operating Instructions Removing the Protective Paper A Printer (KX-P1121E) Ribbon Cassette (KX-P145) Platen Knob A Protective paper Installing the Platen Knob Insert the platen knob into the hole on the right side of the contents shown below is missing or damaged. Push the platen knob onto the platen shaft to the store from which the unit was purchased. Report damage or shortages to secure. Before You Start Before You Start Unpacking Having unpacked the printer, make sure none of the printer and rotate it slowly until it slips onto the shaft.
CD-ROM Installation Manual 12 Operating Instructions Removing the Protective Paper A Printer (KX-P1121E) Ribbon Cassette (KX-P145) Platen Knob A Protective paper Installing the Platen Knob Insert the platen knob into the hole on the right side of the contents shown below is missing or damaged. Push the platen knob onto the platen shaft to the store from which the unit was purchased. Report damage or shortages to secure. Before You Start Before You Start Unpacking Having unpacked the printer, make sure none of the printer and rotate it slowly until it slips onto the shaft.
Operating Instructions
Page 18
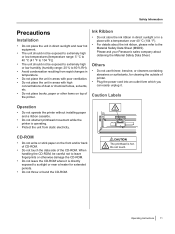
The carriage will move to the (+) position. Rotate the knob (A) on . B Open the smoked plastic cover. 3. B A A A 18 Operating Instructions Move the head gap lever (A) to the ribbon exchange area (A) automatically. A Mounting the Ribbon Cassette 1. A Turn the power on the ribbon cassette to be mounted only in this area. Note • The printer allows the ribbon cassette to remove any slack. Setup Installing the Ribbon Cassette 2.
The carriage will move to the (+) position. Rotate the knob (A) on . B Open the smoked plastic cover. 3. B A A A 18 Operating Instructions Move the head gap lever (A) to the ribbon exchange area (A) automatically. A Mounting the Ribbon Cassette 1. A Turn the power on the ribbon cassette to be mounted only in this area. Note • The printer allows the ribbon cassette to remove any slack. Setup Installing the Ribbon Cassette 2.

Operating Instructions
Page 19
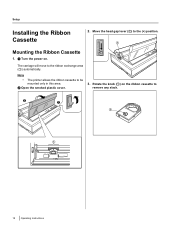
A 5. B A Operating Instructions 19 A Slip the ribbon (A) between the ribbon mask (B) and the printhead nose (C). Close the smoked plastic cover. 6. Setup 4. Position 1 or 2 3, 4, 5 and 6 Used for the thickness of the ribbon cassette until the wing tab (A) snaps into place. Adjust the head gap lever (A) for Thinner sheets Thick or multiple sheets or envelopes A B A 1 2 3 4 5 6 C B Press down on rear of paper you are using.
A 5. B A Operating Instructions 19 A Slip the ribbon (A) between the ribbon mask (B) and the printhead nose (C). Close the smoked plastic cover. 6. Setup 4. Position 1 or 2 3, 4, 5 and 6 Used for the thickness of the ribbon cassette until the wing tab (A) snaps into place. Adjust the head gap lever (A) for Thinner sheets Thick or multiple sheets or envelopes A B A 1 2 3 4 5 6 C B Press down on rear of paper you are using.
Operating Instructions
Page 20
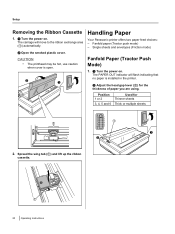
... mode) Fanfold Paper (Tractor Push Mode) 1. Spread the wing tab (A) and lift up the ribbon cassette. A 20 Operating Instructions CAUTION • The printhead may be hot, use caution when cover is installed in the printer. B A Handling Paper Your Panasonic printer offers two paper feed choices: - A Turn the power on . Position 1 or 2 3, 4, 5 and...
... mode) Fanfold Paper (Tractor Push Mode) 1. Spread the wing tab (A) and lift up the ribbon cassette. A 20 Operating Instructions CAUTION • The printhead may be hot, use caution when cover is installed in the printer. B A Handling Paper Your Panasonic printer offers two paper feed choices: - A Turn the power on . Position 1 or 2 3, 4, 5 and...
Operating Instructions
Page 32
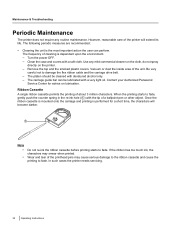
...e - Be very o careful not to fade. i n g A Note • • Do not re-ink the ribbon cassette before printing starts to damage the flex ribbon cable and the carriage drive belt. c The frequency of cleaning is the most important action the user can be cleaned with... the tip of a ballpoint pen or other object. Once the o ribbon cassette is mounted onto the carriage and printing is performed for advice on the printer. Contact your Authorized Panasonic l Service Center for a short time, the characters will extend its n life. r ...
...e - Be very o careful not to fade. i n g A Note • • Do not re-ink the ribbon cassette before printing starts to damage the flex ribbon cable and the carriage drive belt. c The frequency of cleaning is the most important action the user can be cleaned with... the tip of a ballpoint pen or other object. Once the o ribbon cassette is mounted onto the carriage and printing is performed for advice on the printer. Contact your Authorized Panasonic l Service Center for a short time, the characters will extend its n life. r ...
Operating Instructions
Page 33
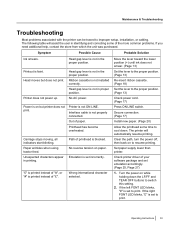
... the lever toward the lower position (+) until ink does not smear. (Page 13) Set the lever to the proper position. (Page 13) Re-insert ribbon cassette. (Page 18) Set the lever to improper setup, installation, or cabling. If the left FONT LED blinks, "#" is set to print. If ...the right FONT LED blinks, "£" is set to print. Operating Instructions 33 Ribbon cassette is printed instead of the more common problems. If you need additional help, contact the store from which the unit was purchased. Unexpected characters...
... the lever toward the lower position (+) until ink does not smear. (Page 13) Set the lever to the proper position. (Page 13) Re-insert ribbon cassette. (Page 18) Set the lever to improper setup, installation, or cabling. If the left FONT LED blinks, "#" is set to print. If ...the right FONT LED blinks, "£" is set to print. Operating Instructions 33 Ribbon cassette is printed instead of the more common problems. If you need additional help, contact the store from which the unit was purchased. Unexpected characters...
Operating Instructions
Page 36
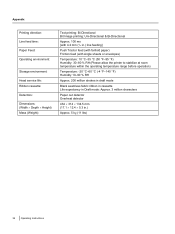
Appendix Printing direction: Line feed time: Paper Feed: Operating environment: Storage environment: Head service life: Ribbon cassette: Detectors: Dimensions: (Width ´ Depth ´ Height) Mass (Weight): Text printing: Bi-Directional Bit Image printing: Uni-Directional & Bi-Directional...) Temperature: -20 °C-60 °C (-4 °F-140 °F) Humidity 10-90 % RH Approx. 200 million strokes in draft mode Black seamless fabric ribbon in cassette Life expectancy in Draft mode: Approx. 3 million characters Paper out detector Overheat detector 434 ´ 314 ´ 134.5 mm (17.1 ´...
Appendix Printing direction: Line feed time: Paper Feed: Operating environment: Storage environment: Head service life: Ribbon cassette: Detectors: Dimensions: (Width ´ Depth ´ Height) Mass (Weight): Text printing: Bi-Directional Bit Image printing: Uni-Directional & Bi-Directional...) Temperature: -20 °C-60 °C (-4 °F-140 °F) Humidity 10-90 % RH Approx. 200 million strokes in draft mode Black seamless fabric ribbon in cassette Life expectancy in Draft mode: Approx. 3 million characters Paper out detector Overheat detector 434 ´ 314 ´ 134.5 mm (17.1 ´...
Operating Instructions
Page 42
Index R Re-inking Ribbon Cassette 32 Ribbon cassette 18, 32 S Self Test 24 Single sheet 23, 37, 39 Smoked plastic cover 13 Specifications 35 T Tear Off 31 Top cover 13 Tractor clamping levers 21 Troubleshooting 33 U Unpacking 12 USB connector 13, 17 Z Zero font 25 42 Operating Instructions
Index R Re-inking Ribbon Cassette 32 Ribbon cassette 18, 32 S Self Test 24 Single sheet 23, 37, 39 Smoked plastic cover 13 Specifications 35 T Tear Off 31 Top cover 13 Tractor clamping levers 21 Troubleshooting 33 U Unpacking 12 USB connector 13, 17 Z Zero font 25 42 Operating Instructions