
Proprietary Telephone
Page 8
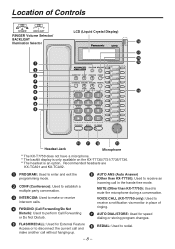
.... 3 INTERCOM: Used to make another call in place of Controls RINGER 21 0 BACKLIGHT RINGER Volume Selector/ BACKLIGHT Illumination Selector 1 2 3 4 5 6 7 8 9 LCD (Liquid Crystal Display) 18 17 16 15 14 Headset Jack 10 11 12 13 Microphone * The KX-T7750 does not have a microphone. * The backlit display is only available on the KX-T7730/7731/7735/7736. * The...
.... 3 INTERCOM: Used to make another call in place of Controls RINGER 21 0 BACKLIGHT RINGER Volume Selector/ BACKLIGHT Illumination Selector 1 2 3 4 5 6 7 8 9 LCD (Liquid Crystal Display) 18 17 16 15 14 Headset Jack 10 11 12 13 Microphone * The KX-T7750 does not have a microphone. * The backlit display is only available on the KX-T7730/7731/7735/7736. * The...
Proprietary Telephone
Page 9
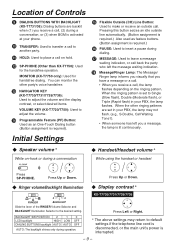
...other ringing patterns are backlit when (1) you have a message or a call. When the ringing pattern is set in your phone. 10 TRANSFER: Used to transfer a call to another party. 11 HOLD: Used to the desired setting. Press Up or Down. MONITOR (KX-T7750 only): Used...* While using the handset or headset Press SP-PHONE. Ringer volume/Backlight illumination Display contrast * RINGER 21 0 BACKLIGHT Slide the lever of Controls 9 DIALING BUTTONS WITH BACKLIGHT (KX-T7731/36): Dialing buttons are set to make or receive an outside line automatically. (Button assignment is required.)...
...other ringing patterns are backlit when (1) you have a message or a call. When the ringing pattern is set in your phone. 10 TRANSFER: Used to transfer a call to another party. 11 HOLD: Used to the desired setting. Press Up or Down. MONITOR (KX-T7750 only): Used...* While using the handset or headset Press SP-PHONE. Ringer volume/Backlight illumination Display contrast * RINGER 21 0 BACKLIGHT Slide the lever of Controls 9 DIALING BUTTONS WITH BACKLIGHT (KX-T7731/36): Dialing buttons are set to make or receive an outside line automatically. (Button assignment is required.)...
Proprietary Telephone
Page 10
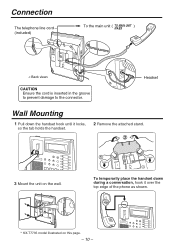
Connection The telephone line cord (included) To the main unit ( TO MAIN UNIT ) /PABX < Back view> CAUTION Ensure the cord is inserted in the groove to prevent damage to the connector. Headset Wall Mounting 1 Pull down during a conversation, hook it locks, so the tab holds the handset. 2 Remove the attached stand. 2 1 3 Mount the unit on this page. - 10 - To temporarily place the handset down the handset hook until it over the top edge of the phone as shown. * KX-T7735 model illustrated on the wall.
Connection The telephone line cord (included) To the main unit ( TO MAIN UNIT ) /PABX < Back view> CAUTION Ensure the cord is inserted in the groove to prevent damage to the connector. Headset Wall Mounting 1 Pull down during a conversation, hook it locks, so the tab holds the handset. 2 Remove the attached stand. 2 1 3 Mount the unit on this page. - 10 - To temporarily place the handset down the handset hook until it over the top edge of the phone as shown. * KX-T7735 model illustrated on the wall.


