
Operating Instructions
Page 1
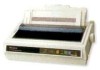
Operating Instructions Impact Dot Matrix Printer KX-P3696 - a • • se • t S # ••- 4 is 4••,•1 • k • • • 4 . • $ Before operating this unit. please read these instructions completely.
Operating Instructions Impact Dot Matrix Printer KX-P3696 - a • • se • t S # ••- 4 is 4••,•1 • k • • • 4 . • $ Before operating this unit. please read these instructions completely.
Operating Instructions
Page 2
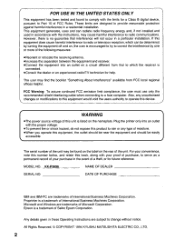
... USE IN THE UNITED STATES ONLY This equipment has been tested and found on the label on a circuit different from FCC local regional offices helpful. KX-P3696 NAME OF DEALER SERIAL NO. This equipment generates, uses and can be determined by turning the equipment off and on the nameplate. Any details given... in a residential installation. These limits are subject to a host computer. MODEL NO.. All Rights Reserved. © COPYRIGHT 1994 KYUSHU MATSUSHITA ELECTRIC CO., LTD. 2 Plug the printer only into an outlet on the rear of Seiko Epson Corporation.
... USE IN THE UNITED STATES ONLY This equipment has been tested and found on the label on a circuit different from FCC local regional offices helpful. KX-P3696 NAME OF DEALER SERIAL NO. This equipment generates, uses and can be determined by turning the equipment off and on the nameplate. Any details given... in a residential installation. These limits are subject to a host computer. MODEL NO.. All Rights Reserved. © COPYRIGHT 1994 KYUSHU MATSUSHITA ELECTRIC CO., LTD. 2 Plug the printer only into an outlet on the rear of Seiko Epson Corporation.
Operating Instructions
Page 3
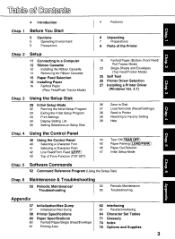
..., Front Feed/ Pull Tractor Mode) 23 Single Sheets and Envelopes (Top Feed/Friction Mode) 25 Self Test 26 Printer Driver Selection C) 27 Installing a Printer Driver tv (Windows Ver. 3.1) Chap. 3 Using the Setup Disk 28 Initial Setup Mode 32 Running the Initial ...Troubleshooting 55 Periodic Maintenance/ 55 Troubleshooting 55 Periodic Maintenance Troubleshooting Appendix 57 Initialization/Hex Dump 57 Initialization/Hex Dump 58 Printer Specifications 60 Paper Specifications 60 Fanfold Paper/Single Sheet/Envelope 61 Printing Area 62 Interfacing 62 Parallel Interfacing 64 Character Set...
..., Front Feed/ Pull Tractor Mode) 23 Single Sheets and Envelopes (Top Feed/Friction Mode) 25 Self Test 26 Printer Driver Selection C) 27 Installing a Printer Driver tv (Windows Ver. 3.1) Chap. 3 Using the Setup Disk 28 Initial Setup Mode 32 Running the Initial ...Troubleshooting 55 Periodic Maintenance/ 55 Troubleshooting 55 Periodic Maintenance Troubleshooting Appendix 57 Initialization/Hex Dump 57 Initialization/Hex Dump 58 Printer Specifications 60 Paper Specifications 60 Fanfold Paper/Single Sheet/Envelope 61 Printing Area 62 Interfacing 62 Parallel Interfacing 64 Character Set...
Operating Instructions
Page 4
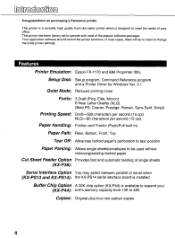
... to be no need to expand your office. In most of your (KX-P44): unit's memory capacity from 13K to meet the needs of the popular software packages. 0 0 Congratulations on purchasing a Panasonic printer. Your application software should control the printer functions. This printer has been factory set to operate with most cases, there will be...
... to be no need to expand your office. In most of your (KX-P44): unit's memory capacity from 13K to meet the needs of the popular software packages. 0 0 Congratulations on purchasing a Panasonic printer. Your application software should control the printer functions. This printer has been factory set to operate with most cases, there will be...
Operating Instructions
Page 5
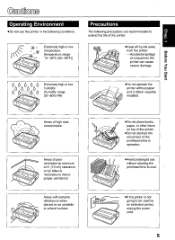
...placed on an unstable o or unlevel surface N •Do not place books, paper, or other items on all liquids away from the printer 3, -Accidental spillage of the printhead while in operation. •Avoid prolonged use without paper and a ribbon cassette installed. Areas of high ...dust concentration \ Areas of poor ventilation [a minimum of 4" (10 cm) clearance on top of the printer. •Do not obstruct the movement of a liquid into the printer can cause severe damage. 'MIS ri0A Oi0108 00000 0 0 0 0 \ "N\ Extremely high or low humidity (humidity range...
...placed on an unstable o or unlevel surface N •Do not place books, paper, or other items on all liquids away from the printer 3, -Accidental spillage of the printhead while in operation. •Avoid prolonged use without paper and a ribbon cassette installed. Areas of high ...dust concentration \ Areas of poor ventilation [a minimum of 4" (10 cm) clearance on top of the printer. •Do not obstruct the movement of a liquid into the printer can cause severe damage. 'MIS ri0A Oi0108 00000 0 0 0 0 \ "N\ Extremely high or low humidity (humidity range...
Operating Instructions
Page 6
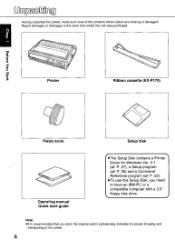
... computer with a 3.5" floppy disk drive. Note: • It is recommended that you need to the store from which the unit was purchased. ..or mizt, Printer Ribbon cassette (KX-P170) vets noA aiolag 0 Platen knob Setup disk Operating manual Quick start guide •The Setup Disk contains... a Printer Driver for Windows Ver. 3.1 (u P. 27), a Setup program (air P. 28) and a Command Reference program (6w P. 52). •To use this Setup Disk, you save ...
... computer with a 3.5" floppy disk drive. Note: • It is recommended that you need to the store from which the unit was purchased. ..or mizt, Printer Ribbon cassette (KX-P170) vets noA aiolag 0 Platen knob Setup disk Operating manual Quick start guide •The Setup Disk contains... a Printer Driver for Windows Ver. 3.1 (u P. 27), a Setup program (air P. 28) and a Command Reference program (6w P. 52). •To use this Setup Disk, you save ...
Operating Instructions
Page 7
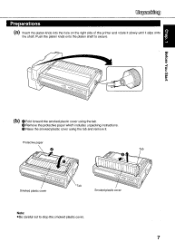
... knob onto the platen shaft to drop the smoked plastic cover. 7 0 0 Preparations (a) Insert the platen knob into the hole on the right side of the printer and rotate it slowly until it . Raise the smoked plastic cover using the tab. e Remove the protective paper which includes unpacking instructions. Protective paper 3 Tab...
... knob onto the platen shaft to drop the smoked plastic cover. 7 0 0 Preparations (a) Insert the platen knob into the hole on the right side of the printer and rotate it slowly until it . Raise the smoked plastic cover using the tab. e Remove the protective paper which includes unpacking instructions. Protective paper 3 Tab...
Operating Instructions
Page 8
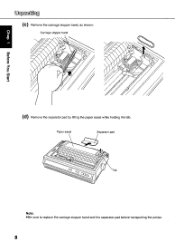
Paper easel Separator pad Tab Note: •Be sure to replace the carriage stopper band and the separator pad before transporting the printer. 8 (C) Remove the carriage stopper band, as shown: O Carriage stopper band tv NTht i 0•% paiS noA woos (d) Remove the separator pad by lifting the paper easel while holding the tab.
Paper easel Separator pad Tab Note: •Be sure to replace the carriage stopper band and the separator pad before transporting the printer. 8 (C) Remove the carriage stopper band, as shown: O Carriage stopper band tv NTht i 0•% paiS noA woos (d) Remove the separator pad by lifting the paper easel while holding the tab.
Operating Instructions
Page 9
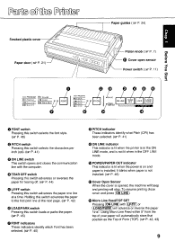
... been selected. (a P. 40) (;) PITCH indicator These indicators identify what Pitch (CPI) has been selected. (ffir P. 41) (I) ON LINE indicator This indicator is lit when the printer is in the ON LINE mode, and is not lit when in the OFF LINE mode. 0 POWER/PAPER OUT indicator This indicator is lit when...
... been selected. (a P. 40) (;) PITCH indicator These indicators identify what Pitch (CPI) has been selected. (ffir P. 41) (I) ON LINE indicator This indicator is lit when the printer is in the ON LINE mode, and is not lit when in the OFF LINE mode. 0 POWER/PAPER OUT indicator This indicator is lit when...
Operating Instructions
Page 11
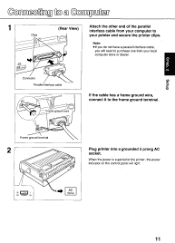
... power indicator on the control panel will light. 0 MEI OFF POWER ON AC Socket 11 Frame ground terminal Plug printer into a grounded 3 prong AC socket. When the power is supplied to purchase one from your computer to the frame ground terminal. mC) m N ci) C ...If the cable has a frame ground wire, connect it to your printer and secure the printer clips. 0 EGM 0 e 0 (Rear View) Clips .;r Connector Parallel interface cable Frame ground wire Attach the other end of the parallel interface cable from ...
... power indicator on the control panel will light. 0 MEI OFF POWER ON AC Socket 11 Frame ground terminal Plug printer into a grounded 3 prong AC socket. When the power is supplied to purchase one from your computer to the frame ground terminal. mC) m N ci) C ...If the cable has a frame ground wire, connect it to your printer and secure the printer clips. 0 EGM 0 e 0 (Rear View) Clips .;r Connector Parallel interface cable Frame ground wire Attach the other end of the parallel interface cable from ...
Operating Instructions
Page 12
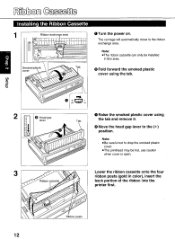
... to drop the smoked plastic cover. •The printhead may be installed in color), insert the Ribbon cassette r' back portion of the ribbon into the printer first. o Fold forward the smoked plastic cover using the tab. 0 OFF POWER ON 2 Head gap lever 0 Raise the smoked plastic cover using Tab the tab...
... to drop the smoked plastic cover. •The printhead may be installed in color), insert the Ribbon cassette r' back portion of the ribbon into the printer first. o Fold forward the smoked plastic cover using the tab. 0 OFF POWER ON 2 Head gap lever 0 Raise the smoked plastic cover using Tab the tab...
Operating Instructions
Page 15
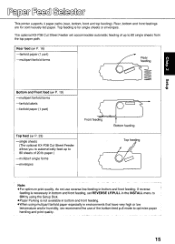
... Bottom and Front feed (air P. 19) -multipart fanfold forms -fanfold labels -fanfold paper (1 part) c O Front feeding Bottom feeding Top feed (a P. 23) -single sheets (The optional KX-P38 Cut Sheet Feeder allows you to automatically feed up to optimize paper handing and print quality. _ 15 The optional... bottom feed pull mode to 80 single sheets from the top paper path. Rear, bottom and front feedings are for single sheets or envelopes. a 0 0 This printer supports 4 paper paths (rear, bottom, front and top feeding). Top feeding is not available in bottom and front feeding.
... Bottom and Front feed (air P. 19) -multipart fanfold forms -fanfold labels -fanfold paper (1 part) c O Front feeding Bottom feeding Top feed (a P. 23) -single sheets (The optional KX-P38 Cut Sheet Feeder allows you to automatically feed up to optimize paper handing and print quality. _ 15 The optional... bottom feed pull mode to 80 single sheets from the top paper path. Rear, bottom and front feedings are for single sheets or envelopes. a 0 0 This printer supports 4 paper paths (rear, bottom, front and top feeding). Top feeding is not available in bottom and front feeding.

Operating Instructions
Page 16
... tractor mechanism downward until the tractors fall into place, then release. The PAPER OUT indicator will flash indicating that paper is not installed in the printer. 0 0 0 Fanfold Paper: (Rear Feed/Push Tractor Mode) 1 I El O 03 03 Paper feed selector N-N .0 ccoo 2 V 3 4 las 5 Head gap 6 lever 0 0 OFF POWER ON OTurn the power on...
... tractor mechanism downward until the tractors fall into place, then release. The PAPER OUT indicator will flash indicating that paper is not installed in the printer. 0 0 0 Fanfold Paper: (Rear Feed/Push Tractor Mode) 1 I El O 03 03 Paper feed selector N-N .0 ccoo 2 V 3 4 las 5 Head gap 6 lever 0 0 OFF POWER ON OTurn the power on...
Operating Instructions
Page 17
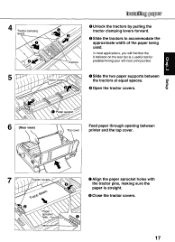
... -0 I%) O Slide the two paper supports between the tractors at equal spaces. 0 Open the tractor covers. (Rear view) Top cover 41> Feed paper through opening between printer and the top cover. Tractor clamping levers 0 0 Tractors N Tractor covers 0 0 Paper support paper 0 Unlock the tractors by pulling the tractor clamping levers forward. 0 Slide the...
... -0 I%) O Slide the two paper supports between the tractors at equal spaces. 0 Open the tractor covers. (Rear view) Top cover 41> Feed paper through opening between printer and the top cover. Tractor clamping levers 0 0 Tractors N Tractor covers 0 0 Paper support paper 0 Unlock the tractors by pulling the tractor clamping levers forward. 0 Slide the...
Operating Instructions
Page 19
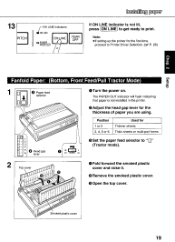
...or 2 Thinner sheets 3, 4, 5 or 6 Thick sheets or multi-part forms Head gap lever IL o MEI OFF POWER ON ()Set the paper feed selector to Printer Driver Selection. (a P. 26) Fanfold Paper: (Bottom, Front Feed/Pull Tractor Mode) -ma0 Paper feed 4 selector OTurn the power on. Smoked plastic cover 19 The...PAPER OUT indicator will flash indicating that paper is not lit, press ON LINE to get ready to print. Note: •If setting up the printer for the first time, proceed to " (Tractor mode). 2 Top cover 310{ so 0 Fold forward the smoked plastic cover and raise it. ...
...or 2 Thinner sheets 3, 4, 5 or 6 Thick sheets or multi-part forms Head gap lever IL o MEI OFF POWER ON ()Set the paper feed selector to Printer Driver Selection. (a P. 26) Fanfold Paper: (Bottom, Front Feed/Pull Tractor Mode) -ma0 Paper feed 4 selector OTurn the power on. Smoked plastic cover 19 The...PAPER OUT indicator will flash indicating that paper is not lit, press ON LINE to get ready to print. Note: •If setting up the printer for the first time, proceed to " (Tractor mode). 2 Top cover 310{ so 0 Fold forward the smoked plastic cover and raise it. ...
Operating Instructions
Page 21
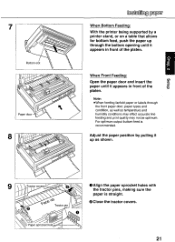
Adjust the paper position by a printer stand, or on a table that allows for bottom feed, push the paper up as temperature and humidity conditions may effect accurate line feeding and print ... through the bottom opening until it appears in front of the -o platen. e Bottom slot r -o\ Paper door 04 6 153 .o\ Installing i t.licaji When Bottom Feeding: With the printer being supported by pulling it up through the front paper door, paper types and condition, as well as shown.
Adjust the paper position by a printer stand, or on a table that allows for bottom feed, push the paper up as temperature and humidity conditions may effect accurate line feeding and print ... through the bottom opening until it appears in front of the -o platen. e Bottom slot r -o\ Paper door 04 6 153 .o\ Installing i t.licaji When Bottom Feeding: With the printer being supported by pulling it up through the front paper door, paper types and condition, as well as shown.
Operating Instructions
Page 22
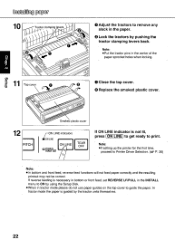
... in the center of the paper sprocket holes when locking. O Lock the tractors by the tractor units themselves. 22 Note: •If setting up the printer for the first time, proceed to guide the paper. Top cover O Close the top cover. O Replace the smoked plastic cover. 12 PITCH Smoked plastic ... INSTALL menu to ON by using the Setup Disk. •When in tractor mode please do not use paper guides on the top cover to Printer Driver Selection. (ow P. 26) Note: •In bottom and front feed, reverse feed functions will not feed paper correctly and the resulting printout may ...
... in the center of the paper sprocket holes when locking. O Lock the tractors by the tractor units themselves. 22 Note: •If setting up the printer for the first time, proceed to guide the paper. Top cover O Close the top cover. O Replace the smoked plastic cover. 12 PITCH Smoked plastic ... INSTALL menu to ON by using the Setup Disk. •When in tractor mode please do not use paper guides on the top cover to Printer Driver Selection. (ow P. 26) Note: •In bottom and front feed, reverse feed functions will not feed paper correctly and the resulting printout may ...
Operating Instructions
Page 23
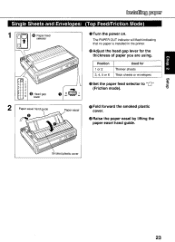
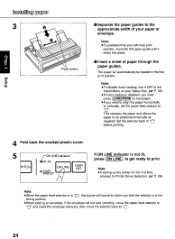
... o Fold forward the smoked plastic cover. oro .0 Smoked plastic cover 23 The PAPER OUT indicator will flash indicating that no paper is installed in the printer. Installing paper Single Sheets and Envelopes: (Top Feed/Friction Mode) Ella Paper feed selector 0 Turn the power on. C) Position Used for the thickness of paper...
... o Fold forward the smoked plastic cover. oro .0 Smoked plastic cover 23 The PAPER OUT indicator will flash indicating that no paper is installed in the printer. Installing paper Single Sheets and Envelopes: (Top Feed/Friction Mode) Ella Paper feed selector 0 Turn the power on. C) Position Used for the thickness of paper...
Operating Instructions
Page 24
... position. •When loading an envelope, if the envelope will automatically be positioned manually as required. Note: •If setting up the printer for the first time, proceed to Printer Driver Selection. (ow P. 26) Note: •When the paper feed selector is not lit, press (ON LINE,, to get ready to print...
... position. •When loading an envelope, if the envelope will automatically be positioned manually as required. Note: •If setting up the printer for the first time, proceed to Printer Driver Selection. (ow P. 26) Note: •When the paper feed selector is not lit, press (ON LINE,, to get ready to print...
Operating Instructions
Page 25
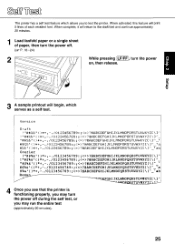
... 2 While pressing ,LF/FF turn the power C) on, then release. 3A sample printout will return to test the printer. serves as a self test. A Once you may run the entire test (approximately 20 minutes). 25 functioning properly, ...you may turn the power off during the self test, or you see that the printer is -I 10123456789:;?@ABCDEFGHIJKLMN0PQRSTUVWXYZ 0123456789:;?@ABCDEFGHIJKLMN0PQRSTUVWXYZE\l -_s #$%& 1()*+,-./0123456789:;?@ABCDEFGHIJKLMN0PQRSTUVWXYZ[\]^_*a VW()*+,-./0123456789:;?@ABCDEFGHIJKLMN0PQRSTUVWXYZ(\l -_sab Roma FGHIJKLMNOPQRSTUVWXY2[\)" STUVWXYZ...
... 2 While pressing ,LF/FF turn the power C) on, then release. 3A sample printout will return to test the printer. serves as a self test. A Once you may run the entire test (approximately 20 minutes). 25 functioning properly, ...you may turn the power off during the self test, or you see that the printer is -I 10123456789:;?@ABCDEFGHIJKLMN0PQRSTUVWXYZ 0123456789:;?@ABCDEFGHIJKLMN0PQRSTUVWXYZE\l -_s #$%& 1()*+,-./0123456789:;?@ABCDEFGHIJKLMN0PQRSTUVWXYZ[\]^_*a VW()*+,-./0123456789:;?@ABCDEFGHIJKLMN0PQRSTUVWXYZ(\l -_sab Roma FGHIJKLMNOPQRSTUVWXY2[\)" STUVWXYZ...


