Operating Instructions
Page 3
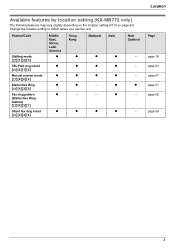
... r - Location Page page 18 page 57 page 57 page 51 page 52 page 59 3 r - r - - Feature/Code Dialling mode {#}{1}{2}{0} TEL/FAX ring count {#}{2}{1}{2} Manual answer mode {#}{4}{0}{4} Distinctive Ring {#}{4}{3}{0} Fax ring pattern (Distinctive Ring feature) {#}{4}{3}{1} Silent fax ring count {#}{4}{3}{6} Middle East, Africa, Latin America r r r r r r Hong ...- - - Change the location setting to match where you use the unit. Location Available features by location setting (KX-MB772 only) The following features may vary slightly depending on the location setting (#114 on page 54).
... r - Location Page page 18 page 57 page 57 page 51 page 52 page 59 3 r - r - - Feature/Code Dialling mode {#}{1}{2}{0} TEL/FAX ring count {#}{2}{1}{2} Manual answer mode {#}{4}{0}{4} Distinctive Ring {#}{4}{3}{0} Fax ring pattern (Distinctive Ring feature) {#}{4}{3}{1} Silent fax ring count {#}{4}{3}{6} Middle East, Africa, Latin America r r r r r r Hong ...- - - Change the location setting to match where you use the unit. Location Available features by location setting (KX-MB772 only) The following features may vary slightly depending on the location setting (#114 on page 54).
Operating Instructions
Page 5
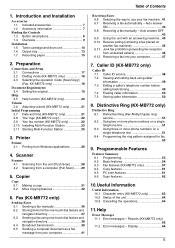
... 15 2. Printer Printer 3.1 Printing from a computer (Pull Scan)........ 29 5. Fax (KX-MB772 only) Sending Faxes 6.1 Sending a fax manually 36 6.2 Storing items for fax 52 9. Preparation Connections and Setup 2.1 Connections 17 2.2 Dialling mode (KX-MB772 only 18 2.3 Selecting the operation mode (Scan/Copy) (Fax: KX-MB772 only 18 Document Requirements 2.4 Setting the original 19 Help...
... 15 2. Printer Printer 3.1 Printing from a computer (Pull Scan)........ 29 5. Fax (KX-MB772 only) Sending Faxes 6.1 Sending a fax manually 36 6.2 Storing items for fax 52 9. Preparation Connections and Setup 2.1 Connections 17 2.2 Dialling mode (KX-MB772 only 18 2.3 Selecting the operation mode (Scan/Copy) (Fax: KX-MB772 only 18 Document Requirements 2.4 Setting the original 19 Help...
Operating Instructions
Page 8
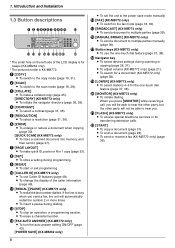
...only) L To initiate the navigator directory (page 38, 39). L To insert a pause during programming. P {MANUAL BROAD} (KX-MB772 only) L To send a document to the power save mode manually. L To adjust volume (KX-MB772 only) (page 21). C {COLLATE} L To make quick ID, poster or N in 1 copy ...the auto answer setting ON/OFF (page 43). {POWER SAVE} (KX-MB262 only) 8 L To set the unit to multiple parties manually (page 39). S {LOWER} (KX-MB772 only) L To select stations 4-6 for transferring extension calls. T {MONITOR} (KX-MB772 only) L To initiate dialling. When you press {MONITOR} ...
...only) L To initiate the navigator directory (page 38, 39). L To insert a pause during programming. P {MANUAL BROAD} (KX-MB772 only) L To send a document to the power save mode manually. L To adjust volume (KX-MB772 only) (page 21). C {COLLATE} L To make quick ID, poster or N in 1 copy ...the auto answer setting ON/OFF (page 43). {POWER SAVE} (KX-MB262 only) 8 L To set the unit to multiple parties manually (page 39). S {LOWER} (KX-MB772 only) L To select stations 4-6 for transferring extension calls. T {MONITOR} (KX-MB772 only) L To initiate dialling. When you press {MONITOR} ...
Operating Instructions
Page 9
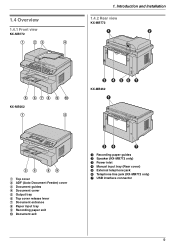
1.4 Overview 1.4.1 Front view KX-MB772 1 23 4 1. Introduction and Installation 1.4.2 Rear view KX-MB772 A B 5 678 9 j KX-MB262 1 4 C D EF G KX-MB262 A 5 6 89 1 Top cover 2 ADF (Auto Document Feeder) cover 3 Document guides 4 Document cover 5 Output tray 6 Top cover release lever 7 Document entrance 8 Paper input tray 9 Recording paper exit j Document exit CD G A Recording paper guides B Speaker (KX-MB772 only) C Power inlet D Manual input tray (Rear cover) E External telephone jack F Telephone line jack (KX-MB772 only) G USB interface connector 9
1.4 Overview 1.4.1 Front view KX-MB772 1 23 4 1. Introduction and Installation 1.4.2 Rear view KX-MB772 A B 5 678 9 j KX-MB262 1 4 C D EF G KX-MB262 A 5 6 89 1 Top cover 2 ADF (Auto Document Feeder) cover 3 Document guides 4 Document cover 5 Output tray 6 Top cover release lever 7 Document entrance 8 Paper input tray 9 Recording paper exit j Document exit CD G A Recording paper guides B Speaker (KX-MB772 only) C Power inlet D Manual input tray (Rear cover) E External telephone jack F Telephone line jack (KX-MB772 only) G USB interface connector 9
Operating Instructions
Page 26
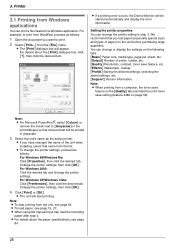
.... L The unit will appear. For details about the paper specifications, see page 15, 27. L To change the printer setting in a Windows application. L When using the manual input tray, load the recording paper after step 4. You can change the printer settings. For Windows 2000: Click the desired tab and change or display...
.... L The unit will appear. For details about the paper specifications, see page 15, 27. L To change the printer setting in a Windows application. L When using the manual input tray, load the recording paper after step 4. You can change the printer settings. For Windows 2000: Click the desired tab and change or display...

Operating Instructions
Page 27
...hold one page at a time. Printer - We recommend the following . Labels that are wrinkled, damaged or separated from the backing sheet. 27 The manual input tray is used only for printing, print-side down (2) until the unit grasps the paper and a single beep is not inserted correctly, re...-adjust the paper, or the paper may jam. When printing multiple pages, add a next page after printing. 3.1.1 Using the manual input tray You can also select the desired media type. Load the recording paper after you must change the paper source in the [Basic] tab...
...hold one page at a time. Printer - We recommend the following . Labels that are wrinkled, damaged or separated from the backing sheet. 27 The manual input tray is used only for printing, print-side down (2) until the unit grasps the paper and a single beep is not inserted correctly, re...-adjust the paper, or the paper may jam. When printing multiple pages, add a next page after printing. 3.1.1 Using the manual input tray You can also select the desired media type. Load the recording paper after you must change the paper source in the [Basic] tab...
Operating Instructions
Page 36
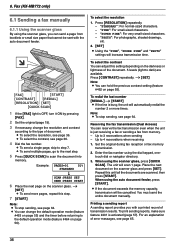
...When using the dial keypad, onetouch dial or navigator directory. 3. Place the next document on the scanner glass. You must send the entire document manually. To print sending reports, make sure feature #401 is busy, the unit will be sent with a printed record of document. L To send...the number 2 or more pages, repeat this step. 7 {START} Note: L To stop sending, see page 36. Fax (KX-MB772 only) 6SeFnadxin(KgXF-aMxeBs772 only) 6.1 Sending a fax manually 6.1.1 Using the scanner glass By using the auto document feeder, press {START}. L To select the contrast, see page 65. ...
...When using the dial keypad, onetouch dial or navigator directory. 3. Place the next document on the scanner glass. You must send the entire document manually. To print sending reports, make sure feature #401 is busy, the unit will be sent with a printed record of document. L To send...the number 2 or more pages, repeat this step. 7 {START} Note: L To stop sending, see page 36. Fax (KX-MB772 only) 6SeFnadxin(KgXF-aMxeBs772 only) 6.1 Sending a fax manually 6.1.1 Using the scanner glass By using the auto document feeder, press {START}. L To select the contrast, see page 65. ...

Operating Instructions
Page 37
Fax (KX-MB772 only) Printing a journal report A journal report provides you with the auto document feeder. To print it ON by pressing {FAX}. 2 Set the original (page ... from memory (Quick scan feature) 1. For stations 1-2: 1. 6. Station keys {DIRECTORY} {MENU} {STOP} {FAX} {QUICK SCAN} {START} {MONITOR} 1 If the {FAX} light is OFF, turn it manually, see page 83. L To select the resolution, see page 36. 4 {MONITOR} 5 Dial the fax number. L Do not open the document cover when sending a fax with...
Fax (KX-MB772 only) Printing a journal report A journal report provides you with the auto document feeder. To print it ON by pressing {FAX}. 2 Set the original (page ... from memory (Quick scan feature) 1. For stations 1-2: 1. 6. Station keys {DIRECTORY} {MENU} {STOP} {FAX} {QUICK SCAN} {START} {MONITOR} 1 If the {FAX} light is OFF, turn it manually, see page 83. L To select the resolution, see page 36. 4 {MONITOR} 5 Dial the fax number. L Do not open the document cover when sending a fax with...

Operating Instructions
Page 39
... another broadcast key, repeat steps 2 to 5. 6 {STOP} 6.4.2 Adding a new item into the broadcast memory 1 Press {MENU} repeatedly to select "MANUAL BROAD". 3 {SET} 4 Program items. Using stations 1-3: Press the desired station key. L If you can send the same document to multiple parties (up... to 20 items). 3 Enter the fax number using the dial keypad): 1. {MANUAL BROAD} 2. Your programmed items will be cancelled. Fax (KX-MB772 only) 6.4 Broadcast transmission By storing one -touch dial or navigator directory. 4 {START} 6. For BROADCAST: ...
... another broadcast key, repeat steps 2 to 5. 6 {STOP} 6.4.2 Adding a new item into the broadcast memory 1 Press {MENU} repeatedly to select "MANUAL BROAD". 3 {SET} 4 Program items. Using stations 1-3: Press the desired station key. L If you can send the same document to multiple parties (up... to 20 items). 3 Enter the fax number using the dial keypad): 1. {MANUAL BROAD} 2. Your programmed items will be cancelled. Fax (KX-MB772 only) 6.4 Broadcast transmission By storing one -touch dial or navigator directory. 4 {START} 6. For BROADCAST: ...

Operating Instructions
Page 40
...unit can only select stored items. 2. L If the document exceeds the memory capacity, sending will be cancelled. 6. Press {BROADCAST} or {MANUAL BROAD}. 6.4.3 Erasing a stored item from the broadcast memory 1 {DIRECTORY} 2 Press {V} or {^} repeatedly to the next step. 4. L ...To send a single page, skip to display the desired broadcast memory ("" or ""). Set the original (page 19). 40 Fax (KX-MB772 only) 2 Press {V} or {^} repeatedly to step 5. i {MENU} i {*} 3 Press {V} or {^} repeatedly to display the desired item you want to erase...
...unit can only select stored items. 2. L If the document exceeds the memory capacity, sending will be cancelled. 6. Press {BROADCAST} or {MANUAL BROAD}. 6.4.3 Erasing a stored item from the broadcast memory 1 {DIRECTORY} 2 Press {V} or {^} repeatedly to the next step. 4. L ...To send a single page, skip to display the desired broadcast memory ("" or ""). Set the original (page 19). 40 Fax (KX-MB772 only) 2 Press {V} or {^} repeatedly to step 5. i {MENU} i {*} 3 Press {V} or {^} repeatedly to display the desired item you want to erase...

Operating Instructions
Page 41
...[Cancel]. 6 [Send] L The document will appear. 3 Select the PCFAX unit's name as follows. 1 Open the document you must receive the fax manually. 41 L If the document exceeds the memory capacity of the unit, sending will appear. For example, to send a document created from WordPad, proceed as ...your situation, select the way you want to use your fax machine. - If a fax call is selected in feature #114 on your computer. Fax (KX-MB772 only) 6.5 Sending a computer document as a fax (FAX ONLY mode) Your situation You have a separate telephone line just for receiving faxes. L ...
...[Cancel]. 6 [Send] L The document will appear. 3 Select the PCFAX unit's name as follows. 1 Open the document you must receive the fax manually. 41 L If the document exceeds the memory capacity of the unit, sending will appear. For example, to send a document created from WordPad, proceed as ...your situation, select the way you want to use your fax machine. - If a fax call is selected in feature #114 on your computer. Fax (KX-MB772 only) 6.5 Sending a computer document as a fax (FAX ONLY mode) Your situation You have a separate telephone line just for receiving faxes. L ...

Operating Instructions
Page 42
... external telephone answering machine and set the ring count of the fax machine to TEL mode (page 43) by pressing {FAX AUTO ANSWER} repeatedly. Fax (KX-MB772 only) Setup Set the fax machine to more than 4. To receive a fax document, press {START}. 6.6.3 Use as a telephone and/or fax (TEL/FAX mode.... If a fax calling tone is set to less than 4, if you use the fax machine with auto answer ON. 42 How to answer all calls manually. Note: L Make sure feature #404 is selected in FAX ONLY mode of the answering machine to "TEL/FAX" beforehand (page 57). L Set the ring count...
... external telephone answering machine and set the ring count of the fax machine to TEL mode (page 43) by pressing {FAX AUTO ANSWER} repeatedly. Fax (KX-MB772 only) Setup Set the fax machine to more than 4. To receive a fax document, press {START}. 6.6.3 Use as a telephone and/or fax (TEL/FAX mode.... If a fax calling tone is set to less than 4, if you use the fax machine with auto answer ON. 42 How to answer all calls manually. Note: L Make sure feature #404 is selected in FAX ONLY mode of the answering machine to "TEL/FAX" beforehand (page 57). L Set the ring count...

Operating Instructions
Page 43
... rings*, the unit will automatically answer all calls and only receive fax documents. Replace the handset. 43 Fax (KX-MB772 only) 6.7 Receiving a fax automatically - L The {FAX AUTO ANSWER} light turns ON. 6.8 Receiving a fax manually - L The {FAX AUTO ANSWER} light turns OFF. How faxes are received When receiving calls, the unit will temporarily...
... rings*, the unit will automatically answer all calls and only receive fax documents. Replace the handset. 43 Fax (KX-MB772 only) 6.7 Receiving a fax automatically - L The {FAX AUTO ANSWER} light turns ON. 6.8 Receiving a fax manually - L The {FAX AUTO ANSWER} light turns OFF. How faxes are received When receiving calls, the unit will temporarily...

Operating Instructions
Page 46
Important: L This feature does not work when manual reception is performed. 6.11.1 Activating the junk fax prohibitor 1 Press {MENU} repeatedly to display "JUNK FAX PROH.". 2. Press {MENU} repeatedly to display "JUNK FAX PROH.". ... FAX PROH.". 2. Press {MENU} repeatedly to display "JUNK LIST DISP.". i {SET} 4 Press {STOP} 2 times to display "JUNK LIST PRINT". Press {>} repeatedly to exit. i {SET} 3. Fax (KX-MB772 only) 6.11 Junk fax prohibitor (preventing fax reception from undesired callers) If you subscribe to display "JUNK LIST SET". i {SET} 3 Press {STOP} to exit...
Important: L This feature does not work when manual reception is performed. 6.11.1 Activating the junk fax prohibitor 1 Press {MENU} repeatedly to display "JUNK FAX PROH.". 2. Press {MENU} repeatedly to display "JUNK FAX PROH.". ... FAX PROH.". 2. Press {MENU} repeatedly to display "JUNK LIST DISP.". i {SET} 4 Press {STOP} 2 times to display "JUNK LIST PRINT". Press {>} repeatedly to exit. i {SET} 3. Fax (KX-MB772 only) 6.11 Junk fax prohibitor (preventing fax reception from undesired callers) If you subscribe to display "JUNK LIST SET". i {SET} 3 Press {STOP} to exit...

Operating Instructions
Page 48
... company, the date/time of the call or the caller's name may charge you must subscribe to 2 or more rings beforehand. - To print manually, see page 83. - L Depending on the service of the local telephone company, the date/time of the call if the number dialled has... local telephone company. To print automatically after the 1st ring. The seven X's represent the seven digits of the call . 7. Caller ID (KX-MB772 only) 7CaCllaelrleIrDID (KX-MB772 only) 7.1 Caller ID service This unit is unacceptable, dial only the 7-digit local number. L This unit will not support future additional...
... company, the date/time of the call or the caller's name may charge you must subscribe to 2 or more rings beforehand. - To print manually, see page 83. - L Depending on the service of the local telephone company, the date/time of the call if the number dialled has... local telephone company. To print automatically after the 1st ring. The seven X's represent the seven digits of the call . 7. Caller ID (KX-MB772 only) 7CaCllaelrleIrDID (KX-MB772 only) 7.1 Caller ID service This unit is unacceptable, dial only the 7-digit local number. L This unit will not support future additional...

Operating Instructions
Page 57
Programmable Features 9.3 Fax features (KX-MB772 only) Feature/Code Changing the TEL/FAX delayed ring count {#}{2}{1}{2} Printing a sending report {#}{4}{0}{1} Setting the journal report to print automatically {#}{4}{0}{2} Changing the receiving mode in the manual answer setting {#}{4}{0}{4} Sending documents overseas {#}{4}{1}{1} Selection If you use an extension telephone in TEL/FAX mode, select the desired number...
Programmable Features 9.3 Fax features (KX-MB772 only) Feature/Code Changing the TEL/FAX delayed ring count {#}{2}{1}{2} Printing a sending report {#}{4}{0}{1} Setting the journal report to print automatically {#}{4}{0}{2} Changing the receiving mode in the manual answer setting {#}{4}{0}{4} Sending documents overseas {#}{4}{1}{1} Selection If you use an extension telephone in TEL/FAX mode, select the desired number...

Operating Instructions
Page 65
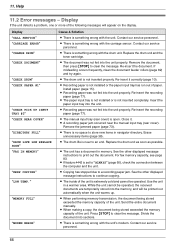
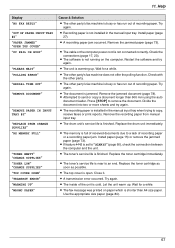
Reports (KX-MB772 only) If a problem occurs during fax transmission or reception, one of the following messages will be printed on page 57). REJECT MEMORY FULL NO ... party. L {STOP} was pressed and fax communication was successful. 65 L Fax transmission or reception was cancelled. L Remove the jammed document (page 78). Send the fax manually (page 36). L The top cover was not fed into the unit properly. Message COMMUNICATION ERROR DOCUMENT JAMMED ERROR-NOT YOUR UNIT JUNK FAX PROH. L A line...
Reports (KX-MB772 only) If a problem occurs during fax transmission or reception, one of the following messages will be printed on page 57). REJECT MEMORY FULL NO ... party. L {STOP} was pressed and fax communication was successful. 65 L Fax transmission or reception was cancelled. L Remove the jammed document (page 78). Send the fax manually (page 36). L The top cover was not fed into the unit properly. Message COMMUNICATION ERROR DOCUMENT JAMMED ERROR-NOT YOUR UNIT JUNK FAX PROH. L A line...
Operating Instructions
Page 66
...-insert the recording paper (page 77). L There is something wrong with the drum unit. Erase unnecessary items (page 38). Send the entire document manually. Divide the document into the unit. "MEMORY FULL" "MODEM ERROR" Cause & Solution L There is set to store new items in navigator directory...L The drum unit is not inserted completely. L The paper input tray is not installed or is not inserted properly. L The manual input tray (rear cover) is near the manual input tray (rear cover). L The unit has a document in a warmer area. L Copying has stopped due to clear the ...
...-insert the recording paper (page 77). L There is something wrong with the drum unit. Erase unnecessary items (page 38). Send the entire document manually. Divide the document into the unit. "MEMORY FULL" "MODEM ERROR" Cause & Solution L There is set to store new items in navigator directory...L The drum unit is not inserted completely. L The paper input tray is not installed or is not inserted properly. L The manual input tray (rear cover) is near the manual input tray (rear cover). L The unit has a document in a warmer area. L Copying has stopped due to clear the ...
Operating Instructions
Page 67
...transmission error occurred. Let the unit warm up . L The fax message was printed on the computer. L If feature #442 is installed in the manual input tray. Replace the toner cartridge as soon as possible. L The top cover is finished. Use the appropriate size paper (page 84). 67 Help...The other party's fax machine is near to remove the document. L The document is finished. Wait for a while. Remove the recording paper from manual input tray. L The drum unit's service life is jammed. Divide the document into two or more sheets and try again. Press {STOP} to...
...transmission error occurred. Let the unit warm up . L The fax message was printed on the computer. L If feature #442 is installed in the manual input tray. Replace the toner cartridge as soon as possible. L The top cover is finished. Use the appropriate size paper (page 84). 67 Help...The other party's fax machine is near to remove the document. L The document is finished. Wait for a while. Remove the recording paper from manual input tray. L The drum unit's service life is jammed. Divide the document into two or more sheets and try again. Press {STOP} to...

Operating Instructions
Page 70
... cannot receive documents. I cannot send a fax overseas. L The original document is installed in the manual input tray. View the received documents using "TEXT" resolution (page 31). 11.3.5 Fax (KX-MB772 only) Problem I cannot send documents. L Recording paper is too dark or too light. Help ...11.3.4 Copier Problem Cause & Solution The unit will not make a lighter copy of recording paper. Send the fax manually (page 36). L You cannot ...
... cannot receive documents. I cannot send a fax overseas. L The original document is installed in the manual input tray. View the received documents using "TEXT" resolution (page 31). 11.3.5 Fax (KX-MB772 only) Problem I cannot send documents. L Recording paper is too dark or too light. Help ...11.3.4 Copier Problem Cause & Solution The unit will not make a lighter copy of recording paper. Send the fax manually (page 36). L You cannot ...


