
Operation Manual
Page 1
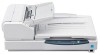
Before reading these instructions and the enclosed installation manual. Please carefully read these instructions, please read the installation manual enclosed with this unit. Keep all documentation in a safe place for future reference. Operating Manual High Speed Color Scanner Model No. KV-S7075C These instructions contain information on operating the scanner.
Before reading these instructions and the enclosed installation manual. Please carefully read these instructions, please read the installation manual enclosed with this unit. Keep all documentation in a safe place for future reference. Operating Manual High Speed Color Scanner Model No. KV-S7075C These instructions contain information on operating the scanner.

Operation Manual
Page 2
... other countries, or both. ≥ Intel and Intel Core are included. Introduction Thank you for purchasing a Panasonic High Speed Color Scanner. ∫ About the documentation The scanner documentation consists of their respective owners. ∫ International ENERGY STAR Program As an ENERGY STAR® Partner..., Panasonic has determined that this product meets the ENERGY STAR guidelines for scanner maintenance. (You can view this manual by clicking the help button on RTIV.) ≥ ...
... other countries, or both. ≥ Intel and Intel Core are included. Introduction Thank you for purchasing a Panasonic High Speed Color Scanner. ∫ About the documentation The scanner documentation consists of their respective owners. ∫ International ENERGY STAR Program As an ENERGY STAR® Partner..., Panasonic has determined that this product meets the ENERGY STAR guidelines for scanner maintenance. (You can view this manual by clicking the help button on RTIV.) ≥ ...

Operation Manual
Page 3
... a USB hub, it is recommended to BildscharbV. 3 FCC Warning: To assure continued FCC compliance, the user must use a USB 2.0 interface. ≥ If you connect the scanner to operate this equipment in conformity with EN ISO 7779.
... a USB hub, it is recommended to BildscharbV. 3 FCC Warning: To assure continued FCC compliance, the user must use a USB 2.0 interface. ≥ If you connect the scanner to operate this equipment in conformity with EN ISO 7779.

Operation Manual
Page 4
... jams from the paper slot 30 ≥ Removing paper jams from the exit path 31 Cleaning the Unit 32 ≥ Outside of the scanner 32 ≥ Inside the scanner 32 ≥ Cleaning the paper feed roller, separation roller, and double feed prevention roller 33 ≥ Cleaning the drive rollers and free rollers...
... jams from the paper slot 30 ≥ Removing paper jams from the exit path 31 Cleaning the Unit 32 ≥ Outside of the scanner 32 ≥ Inside the scanner 32 ≥ Cleaning the paper feed roller, separation roller, and double feed prevention roller 33 ≥ Cleaning the drive rollers and free rollers...

Operation Manual
Page 9
Please ask your Panasonic sales company about the roller cleaning paper, please refer to the Material Safety Data Sheet (MSDS). Precautions ∫ Installation ≥ Do not place the unit ...-ROM ≥ Do not write or stick paper on the front and/or back of CD-ROM. ≥ Do not touch the data side of scanner. ≥ Plug the power cord into an outlet from which generate electronic or magnetic noise. ≥ Protect the unit from static electricity. ≥ Do not...
Please ask your Panasonic sales company about the roller cleaning paper, please refer to the Material Safety Data Sheet (MSDS). Precautions ∫ Installation ≥ Do not place the unit ...-ROM ≥ Do not write or stick paper on the front and/or back of CD-ROM. ≥ Do not touch the data side of scanner. ≥ Plug the power cord into an outlet from which generate electronic or magnetic noise. ≥ Protect the unit from static electricity. ≥ Do not...

Operation Manual
Page 10
... documents may be imposed on those found guilty. In particular, pay attention to the following are examples of items that may be illegal in the scanner. ≥ Periodically back up important data. ≥ When having your computer or hard disk serviced, or when disposing of certain documents. Notice Install your computer...
... documents may be imposed on those found guilty. In particular, pay attention to the following are examples of items that may be illegal in the scanner. ≥ Periodically back up important data. ≥ When having your computer or hard disk serviced, or when disposing of certain documents. Notice Install your computer...

Operation Manual
Page 13
... Identification Power indicator (LED) Power switch ∫ About the power indicator (LED) The power indicator (LED) indicates the status of the scanner as follows: LED light Green Green (flashing) Orange Orange (flashing) Red Status Ready to scan or scanning Sleep mode Ready to scan or...error occurred *2 *1: The rollers need to Operating Instructions (CD-ROM) for the way of cleaning or replacing the rollers. *1, *2: Check the status of the scanner. ≥ The power indicator (LED) will now light. Refer to "Installing Software" in the CD-ROM. Refer to be cleaned or replaced. ∫ ...
... Identification Power indicator (LED) Power switch ∫ About the power indicator (LED) The power indicator (LED) indicates the status of the scanner as follows: LED light Green Green (flashing) Orange Orange (flashing) Red Status Ready to scan or scanning Sleep mode Ready to scan or...error occurred *2 *1: The rollers need to Operating Instructions (CD-ROM) for the way of cleaning or replacing the rollers. *1, *2: Check the status of the scanner. ≥ The power indicator (LED) will now light. Refer to "Installing Software" in the CD-ROM. Refer to be cleaned or replaced. ∫ ...

Operation Manual
Page 19
7 Adjust the document guide to the size of the document to be used for scanning the documents. 19 Loading Documents on the ADF Document guide Exit stopper 8 Open your scanning application*1 and scan the documents. *1 The software RTIV and QuickScan Pro demo, included with the length between 420 mm (A3 size) or 432 mm (17 in.) and 2540 mm (100 in.) close the exit stopper. Adjust the exit stopper to the size of the document to be output. ≥ When scanning the document with the scanner, can be scanned.
7 Adjust the document guide to the size of the document to be used for scanning the documents. 19 Loading Documents on the ADF Document guide Exit stopper 8 Open your scanning application*1 and scan the documents. *1 The software RTIV and QuickScan Pro demo, included with the length between 420 mm (A3 size) or 432 mm (17 in.) and 2540 mm (100 in.) close the exit stopper. Adjust the exit stopper to the size of the document to be output. ≥ When scanning the document with the scanner, can be scanned.

Operation Manual
Page 22
... to the center of the paper slot. 9 Open your scanning application*1 and scan the documents. *1 The software RTIV and QuickScan Pro demo, included with the scanner, can be used for scanning the documents. 22 Document guides selector 1 2 8 Place the document on the ADF 7 Remove the document and lock the document guide...
... to the center of the paper slot. 9 Open your scanning application*1 and scan the documents. *1 The software RTIV and QuickScan Pro demo, included with the scanner, can be used for scanning the documents. 22 Document guides selector 1 2 8 Place the document on the ADF 7 Remove the document and lock the document guide...

Operation Manual
Page 25
... the document cover and remove the document. 7 Open your scanning application*1 and scan the documents. *1 The software RTIV and QuickScan Pro demo, included with the scanner, can be used for scanning the documents. ∫ Scanning thick documents When scanning thick documents such as a book, please note the following items: ≥ Please...
... the document cover and remove the document. 7 Open your scanning application*1 and scan the documents. *1 The software RTIV and QuickScan Pro demo, included with the scanner, can be used for scanning the documents. ∫ Scanning thick documents When scanning thick documents such as a book, please note the following items: ≥ Please...

Operation Manual
Page 27
Center of the page 25 mm (1 in.) ≥ Use the control sheet that the pattern is 25 mm (1 in.) from the [Manuals] list on your scanner. 3 Select [Control Sheet] from the top of the screen. 4 Print the control sheets at the specified size; Scanning will appear. - Do not fold or crease ...
Center of the page 25 mm (1 in.) ≥ Use the control sheet that the pattern is 25 mm (1 in.) from the [Manuals] list on your scanner. 3 Select [Control Sheet] from the top of the screen. 4 Print the control sheets at the specified size; Scanning will appear. - Do not fold or crease ...

Operation Manual
Page 28
... background color is locked in its previous setting, the shading adjustment must be performed. Exit door release 2 Pull the exit door release to black. The scanner comes from factory set to open the exit door. 3 Using your finger, turn the reference plate (B) over . ≥ Confirm that the reference plate has changed...
... background color is locked in its previous setting, the shading adjustment must be performed. Exit door release 2 Pull the exit door release to black. The scanner comes from factory set to open the exit door. 3 Using your finger, turn the reference plate (B) over . ≥ Confirm that the reference plate has changed...

Operation Manual
Page 29
... the document cover. ≥ When you close the document cover, close it securely until it clicks into place. ∫ Flatbed sheet setting 1 Turn off the scanner. Changing the Reference Plate Setting 5 Close the exit door slowly until it in the direction of the flatbed glass. ≥ Set the flatbed sheet to...
... the document cover. ≥ When you close the document cover, close it securely until it clicks into place. ∫ Flatbed sheet setting 1 Turn off the scanner. Changing the Reference Plate Setting 5 Close the exit door slowly until it in the direction of the flatbed glass. ≥ Set the flatbed sheet to...

Operation Manual
Page 32
... paper (Model No. For supplies and accessories: Call 1-866-823-0002 (U.S.A. Please use thinner, benzine, or cleaners containing abrasives or surfactants, for a long period of scanner. ≥ Clean the unit at least once a week or when 20,000 sheets have been scanned, whichever comes first. ≥ Clean the rollers, sensors and... dots or white patches occurs, open the document cover, and clean the flatbed glass and flatbed sheet using it, the alcohol will also become dirty. KV-SS03) is left opened for cleaning the outside of time before using the accessory roller cleaning paper.
... paper (Model No. For supplies and accessories: Call 1-866-823-0002 (U.S.A. Please use thinner, benzine, or cleaners containing abrasives or surfactants, for a long period of scanner. ≥ Clean the unit at least once a week or when 20,000 sheets have been scanned, whichever comes first. ≥ Clean the rollers, sensors and... dots or white patches occurs, open the document cover, and clean the flatbed glass and flatbed sheet using it, the alcohol will also become dirty. KV-SS03) is left opened for cleaning the outside of time before using the accessory roller cleaning paper.

Operation Manual
Page 36
... cleaning paper (KVSS03) to remove the dirt from one end to the other in the direction of the 6 free rollers. ≥ When wiping off the scanner. Cleaning the Unit ∫ Cleaning the drive rollers, free rollers, and exit rollers 1 Turn off the dirt on the roller surfaces, hold the rollers to...
... cleaning paper (KVSS03) to remove the dirt from one end to the other in the direction of the 6 free rollers. ≥ When wiping off the scanner. Cleaning the Unit ∫ Cleaning the drive rollers, free rollers, and exit rollers 1 Turn off the dirt on the roller surfaces, hold the rollers to...

Operation Manual
Page 37
... reference plate (F) with the roller cleaning paper (KV-SS03). 5 Close the exit door. ≥ When you close the exit door, close it securely until it is locked. Cleaning the Unit ∫ Cleaning the reference plates and ADF glasses 1 Turn off the scanner. 2 Pull the exit door release to open ...the exit door. 3 Clean the ADF glass (F) and reference plate (B) with the roller cleaning paper (KV-SS03). 5 Close the exit door. ≥ When you close the exit door,...
... reference plate (F) with the roller cleaning paper (KV-SS03). 5 Close the exit door. ≥ When you close the exit door, close it securely until it is locked. Cleaning the Unit ∫ Cleaning the reference plates and ADF glasses 1 Turn off the scanner. 2 Pull the exit door release to open ...the exit door. 3 Clean the ADF glass (F) and reference plate (B) with the roller cleaning paper (KV-SS03). 5 Close the exit door. ≥ When you close the exit door,...

Operation Manual
Page 38
... dirt on the surface of the reflector sheet for waiting sensor Paper sensor 5 Blow off the dirt from the accessory blower and blow off the scanner. 2 Push the ADF door release to clean sensors (detectors) and reflectors. Waiting sensor Reflector sheet for the waiting sensor with the accessory blower. Double feed...
... dirt on the surface of the reflector sheet for waiting sensor Paper sensor 5 Blow off the dirt from the accessory blower and blow off the scanner. 2 Push the ADF door release to clean sensors (detectors) and reflectors. Waiting sensor Reflector sheet for the waiting sensor with the accessory blower. Double feed...

Operation Manual
Page 39
... sensor Reflector sheet for skew (L) sensor Reflector sheet for the starting , skew (L), skew (R), and ending sensors with the blower. Blower Sensor (detector) 1 Turn off the scanner. 2 Pull the exit door release to clean sensors (detectors) and reflectors. Ending sensor Skew (R) sensor Skew (L) sensor Starting sensor 4 And blow off the dirt on...
... sensor Reflector sheet for skew (L) sensor Reflector sheet for the starting , skew (L), skew (R), and ending sensors with the blower. Blower Sensor (detector) 1 Turn off the scanner. 2 Pull the exit door release to clean sensors (detectors) and reflectors. Ending sensor Skew (R) sensor Skew (L) sensor Starting sensor 4 And blow off the dirt on...

Operation Manual
Page 40
... tray Document cover 4 Clean up the surface of the flatbed sheet, as required.) 5 Blow off the dirt from the accessory blower and blow off the scanner. 2 Fold the hopper tray in the direction of flatbed glass with the blower. Remove the brush from the document cover detector. 6 Close the document cover...
... tray Document cover 4 Clean up the surface of the flatbed sheet, as required.) 5 Blow off the dirt from the accessory blower and blow off the scanner. 2 Fold the hopper tray in the direction of flatbed glass with the blower. Remove the brush from the document cover detector. 6 Close the document cover...
Operation Manual
Page 45
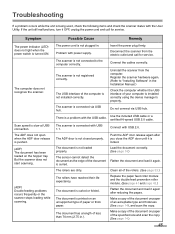
...The power indicator (LED) does not light when the power switch is connected with the User Utility. Connect the cables correctly. Uninstall the scanner from the electric outlet and call for service. Do not connect via USB hub. Push the ADF door release again after reducing the ...document is curled. The document has a length of the rollers. (See page 33.) The rollers have reached their life expectancy. Disconnect the scanner from the computer. Load the document correctly. (See page 14.) The sensor cannot detect the document as the edge of the computer is ...
...The power indicator (LED) does not light when the power switch is connected with the User Utility. Connect the cables correctly. Uninstall the scanner from the electric outlet and call for service. Do not connect via USB hub. Push the ADF door release again after reducing the ...document is curled. The document has a length of the rollers. (See page 33.) The rollers have reached their life expectancy. Disconnect the scanner from the computer. Load the document correctly. (See page 14.) The sensor cannot detect the document as the edge of the computer is ...


