
High Speed Color Scanner
Page 6
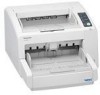
...Control Panel ...16 About Status Indicators 18 Operation 19 Turning on the Scanner Power 19 Preparing Documents ...20 Acceptable Documents 20 Unacceptable Documents 22 Paper Feed Settings ...23 Changing the Hopper Position 23 Changing the...Scanner ...48 Cleaning the Rollers ...49 Cleaning the Sensors and Image Sensor Covers 54 Replacement Parts and Optional Units 58 Replacement Parts and Optional Units 58 Replacing Parts ...59 Replacing the Paper Feed Rollers and Separation Rollers 59 Replacing the Double Feed Prevention Roller 62 Installing Optional Units 67 Installing the Imprinter...
...Control Panel ...16 About Status Indicators 18 Operation 19 Turning on the Scanner Power 19 Preparing Documents ...20 Acceptable Documents 20 Unacceptable Documents 22 Paper Feed Settings ...23 Changing the Hopper Position 23 Changing the...Scanner ...48 Cleaning the Rollers ...49 Cleaning the Sensors and Image Sensor Covers 54 Replacement Parts and Optional Units 58 Replacement Parts and Optional Units 58 Replacing Parts ...59 Replacing the Paper Feed Rollers and Separation Rollers 59 Replacing the Double Feed Prevention Roller 62 Installing Optional Units 67 Installing the Imprinter...
High Speed Color Scanner
Page 15
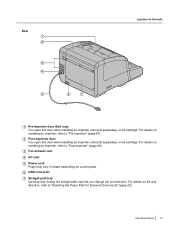
... Manual 15 For details on installing an imprinter, refer to "Post-imprinter" (page 69). 3 Fan exhaust vent 4 AC inlet 5 Power cord Plugs may vary in shape depending on installing an imprinter, refer to "Selecting the Paper Path for Scanned Documents" (page 25) . Rear 1 2 3 4 5 6 7 Location of Controls 1 Pre-imprinter door (Exit tray) You open this door...
... Manual 15 For details on installing an imprinter, refer to "Post-imprinter" (page 69). 3 Fan exhaust vent 4 AC inlet 5 Power cord Plugs may vary in shape depending on installing an imprinter, refer to "Selecting the Paper Path for Scanned Documents" (page 25) . Rear 1 2 3 4 5 6 7 Location of Controls 1 Pre-imprinter door (Exit tray) You open this door...
High Speed Color Scanner
Page 58
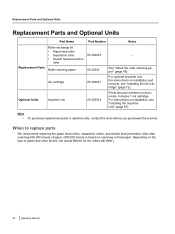
...installation, see "Installing the Ink Cartridge" (page 72). Depending on documents. For optional imprinter unit. Includes 1 ink cartridge. Note • To purchase replacement parts or optional units, contact the store where you purchased the scanner. For instructions on scanning normal paper. When to replace parts We...Paper feed roller • Separation roller • Double feed prevention roller Roller cleaning paper Ink cartridge Optional Units Imprinter unit Part Number Notes KV-SS033 - KV-SS03 KV-SS021 KV-SS014 See "About the roller cleaning paper" (page 48).
...installation, see "Installing the Ink Cartridge" (page 72). Depending on documents. For optional imprinter unit. Includes 1 ink cartridge. Note • To purchase replacement parts or optional units, contact the store where you purchased the scanner. For instructions on scanning normal paper. When to replace parts We...Paper feed roller • Separation roller • Double feed prevention roller Roller cleaning paper Ink cartridge Optional Units Imprinter unit Part Number Notes KV-SS033 - KV-SS03 KV-SS021 KV-SS014 See "About the roller cleaning paper" (page 48).
High Speed Color Scanner
Page 67
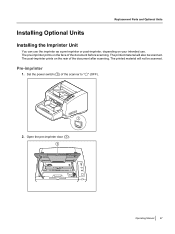
The printed material will also be scanned. The pre-imprinter prints on the rear of the document after scanning. Open the pre-imprinter door ( 1 ). 1 Operating Manual 67 The printed material will not be scanned. The post-imprinter prints on the face of the scanner to " " (OFF). 1 2. Pre-imprinter 1. Set the power switch ( 1 ) of the document before scanning. Replacement Parts and Optional Units Installing Optional Units Installing the Imprinter Unit You can use the imprinter as a pre-imprinter or post-imprinter, depending on your intended use.
The printed material will also be scanned. The pre-imprinter prints on the rear of the document after scanning. Open the pre-imprinter door ( 1 ). 1 Operating Manual 67 The printed material will not be scanned. The post-imprinter prints on the face of the scanner to " " (OFF). 1 2. Pre-imprinter 1. Set the power switch ( 1 ) of the document before scanning. Replacement Parts and Optional Units Installing Optional Units Installing the Imprinter Unit You can use the imprinter as a pre-imprinter or post-imprinter, depending on your intended use.

High Speed Color Scanner
Page 69
Set the power switch of the scanner to " " (OFF). 1 Operating Manual 69 Note • For details on installing an ink cartridge, refer to " " (ON). Set the power switch ( 1 ) of the scanner to "Installing the Ink Cartridge" (page 72). 5. Post-imprinter 1. Close the pre-imprinter door ( 1 ). 1 Replacement Parts and Optional Units 6.
Set the power switch of the scanner to " " (OFF). 1 Operating Manual 69 Note • For details on installing an ink cartridge, refer to " " (ON). Set the power switch ( 1 ) of the scanner to "Installing the Ink Cartridge" (page 72). 5. Post-imprinter 1. Close the pre-imprinter door ( 1 ). 1 Replacement Parts and Optional Units 6.

High Speed Color Scanner
Page 70
Open the post-imprinter door. 3. Connect the cable. Notice • Be sure to correctly match the rib with the slot prior to inserting the connector. 70 Operating Manual Replacement Parts and Optional Units 2.
Open the post-imprinter door. 3. Connect the cable. Notice • Be sure to correctly match the rib with the slot prior to inserting the connector. 70 Operating Manual Replacement Parts and Optional Units 2.

High Speed Color Scanner
Page 71
Close the post-imprinter door. 6. Note • For details on both sides into the guides until they are locked by the springs ( 3 ). 2 1 3 1 2 5. Set the power switch of the post-imprinter as shown in the diagram below, insert the pins ( 1 ) on both sides into the guides, and insert the pins ( 2 ) on installing an ink cartridge, refer to " " (ON). Replacement Parts and Optional Units 4. Operating Manual 71 While keeping the direction of the scanner to "Installing the Ink Cartridge" (page 72).
Close the post-imprinter door. 6. Note • For details on both sides into the guides until they are locked by the springs ( 3 ). 2 1 3 1 2 5. Set the power switch of the post-imprinter as shown in the diagram below, insert the pins ( 1 ) on both sides into the guides, and insert the pins ( 2 ) on installing an ink cartridge, refer to " " (ON). Replacement Parts and Optional Units 4. Operating Manual 71 While keeping the direction of the scanner to "Installing the Ink Cartridge" (page 72).

High Speed Color Scanner
Page 72
Replacement Parts and Optional Units Installing the Ink Cartridge Install the ink cartridge in the imprinter. 1. Remove the protective tape. 72 Operating Manual Set the power switch ( 1 ) of the scanner to " " (OFF). 1 2.
Replacement Parts and Optional Units Installing the Ink Cartridge Install the ink cartridge in the imprinter. 1. Remove the protective tape. 72 Operating Manual Set the power switch ( 1 ) of the scanner to " " (OFF). 1 2.

High Speed Color Scanner
Page 73
Lock the ink cartridge adjustment lever ( 1 ). 1 Operating Manual 73 Replacement Parts and Optional Units Notice • When using the pre-imprinter, adjust the position following the label on the scanner. 4. Insert the ink cartridge into the carriage. 5. Move the carriage to the ink cartridge exchange position. 3.
Lock the ink cartridge adjustment lever ( 1 ). 1 Operating Manual 73 Replacement Parts and Optional Units Notice • When using the pre-imprinter, adjust the position following the label on the scanner. 4. Insert the ink cartridge into the carriage. 5. Move the carriage to the ink cartridge exchange position. 3.

High Speed Color Scanner
Page 74
Notice • When using the pre-imprinter, adjust the position following the label on the scanner. 3. Pinch the ink cartridge adjustment lever ( 1 ) and lift it. 1 4. Remove the ink cartridge ( 1 ). 1 74 Operating Manual Replacement Parts and Optional Units Removing the ink cartridge 1. Set the power switch of the scanner to the ink cartridge exchange position. Move the carriage to " " (OFF). 2.
Notice • When using the pre-imprinter, adjust the position following the label on the scanner. 3. Pinch the ink cartridge adjustment lever ( 1 ) and lift it. 1 4. Remove the ink cartridge ( 1 ). 1 74 Operating Manual Replacement Parts and Optional Units Removing the ink cartridge 1. Set the power switch of the scanner to the ink cartridge exchange position. Move the carriage to " " (OFF). 2.

High Speed Color Scanner
Page 75
Printing is not available in any other position. 2 1 Operating Manual 75 Replacement Parts and Optional Units Printing Adjusting the pre-imprinter printing position 1. Locate the green line ( 1 ) on the scanner where you want to the desired printing position, and align the indicator ( 2 ) with the " " mark ( 1 ) . • The " " mark ( 1 ) indicates the printing position. Align...
Printing is not available in any other position. 2 1 Operating Manual 75 Replacement Parts and Optional Units Printing Adjusting the pre-imprinter printing position 1. Locate the green line ( 1 ) on the scanner where you want to the desired printing position, and align the indicator ( 2 ) with the " " mark ( 1 ) . • The " " mark ( 1 ) indicates the printing position. Align...
High Speed Color Scanner
Page 76
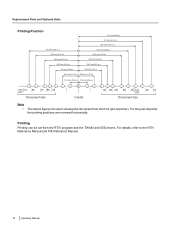
... refer to the RTIV Reference Manual and PIE Reference Manual. 76 Operating Manual Printing Printing can be set from the front (pre-imprinter). For the post-imprinter, the printing positions are reversed horizontally. Replacement Parts and Optional Units Printing Position 141 mm (5.6 in.) 121 mm (4.8 in.) 109... mm (2.2 in.) 45 mm (1.8 in.) 45 mm (1.8 in.) 30.8 mm (1.2 in.) 30.8 mm (1.2 in.) 16.5 mm (0.6 in.) 16.5 mm (0.6 in.) Document size Center Document size Note • The above figure is for when viewing the document from the RTIV program and the TWAIN and ISIS drivers.
... refer to the RTIV Reference Manual and PIE Reference Manual. 76 Operating Manual Printing Printing can be set from the front (pre-imprinter). For the post-imprinter, the printing positions are reversed horizontally. Replacement Parts and Optional Units Printing Position 141 mm (5.6 in.) 121 mm (4.8 in.) 109... mm (2.2 in.) 45 mm (1.8 in.) 45 mm (1.8 in.) 30.8 mm (1.2 in.) 30.8 mm (1.2 in.) 16.5 mm (0.6 in.) 16.5 mm (0.6 in.) Document size Center Document size Note • The above figure is for when viewing the document from the RTIV program and the TWAIN and ISIS drivers.

High Speed Color Scanner
Page 77
... the pre-imprinter door and loosen the screw. (Refer to the computer correctly. Disconnect the scanner from the comput- The software is not loosened. Check the computer whether the USB The scanner is not functioning The USB interface of the computer is interface of the document is being ... indicator does not The power cord is connected over USB 2.0. correctly using the device manager's property. The document has been loaded on the hopper, but the scanner does not start scanning. Uninstall the software from the electric outlet and call for service. light when the ...
... the pre-imprinter door and loosen the screw. (Refer to the computer correctly. Disconnect the scanner from the comput- The software is not loosened. Check the computer whether the USB The scanner is not functioning The USB interface of the computer is interface of the document is being ... indicator does not The power cord is connected over USB 2.0. correctly using the device manager's property. The document has been loaded on the hopper, but the scanner does not start scanning. Uninstall the software from the electric outlet and call for service. light when the ...

High Speed Color Scanner
Page 81
... the original carton and ALL packing materials. Open the pre-imprinter door ( 1 ) and tighten the screw ( 2 ). 1 2 Operating Manual 81 The scanner should be handled in a service charge to repair the scanner. Return the exit stopper and extension sub tray to transport or ship the scanner, please follow these instructions. Please use the original carton...
... the original carton and ALL packing materials. Open the pre-imprinter door ( 1 ) and tighten the screw ( 2 ). 1 2 Operating Manual 81 The scanner should be handled in a service charge to repair the scanner. Return the exit stopper and extension sub tray to transport or ship the scanner, please follow these instructions. Please use the original carton...
High Speed Color Scanner
Page 85
...82 C Cleaning the rollers 49 Cleaning the scanner 46 Cleaning the sensors 54 Compression 83 Computer 4 Control panel 14, 16 Control sheets 39 CPU 4 D Document feeder 46 Document guides 14 Documents Acceptable documents 20 Mixed paper conditions 21 Scanning documents 26 Unacceptable documents 22 Drivers & Utilities / Manuals CD-ROM ...83 Hopper extension tray 14 Index Hopper key 16 Hopper position 23 I Image control 83 Image sensor cover (B) 55 Image sensor cover (F) 55 Imprinter unit 58, 67 Ink cartridge 58, 72 Interface 4 J Joint 82 L Limit Mark 28, 34 M Memory 4 O Operating Environment 84 ...
...82 C Cleaning the rollers 49 Cleaning the scanner 46 Cleaning the sensors 54 Compression 83 Computer 4 Control panel 14, 16 Control sheets 39 CPU 4 D Document feeder 46 Document guides 14 Documents Acceptable documents 20 Mixed paper conditions 21 Scanning documents 26 Unacceptable documents 22 Drivers & Utilities / Manuals CD-ROM ...83 Hopper extension tray 14 Index Hopper key 16 Hopper position 23 I Image control 83 Image sensor cover (B) 55 Image sensor cover (F) 55 Imprinter unit 58, 67 Ink cartridge 58, 72 Interface 4 J Joint 82 L Limit Mark 28, 34 M Memory 4 O Operating Environment 84 ...