Brochure
Page 2
... 1.9" x 2.75" Max 11.7" x 17" VRS VirtualReScan® Certified Panasonic Digital Document Company Unit of Panasonic Corporation of Matsushita Electric Industrial Co., Ltd. PDF directly Long paper Scanning Up to 132 ppm 230 ipm KV-S3105C Up to use "clam-shell" design and stainless steel construction, the KV-S3105C/KV-S3085 is installed. MultiStream®, ISIS® and ISIS...
... 1.9" x 2.75" Max 11.7" x 17" VRS VirtualReScan® Certified Panasonic Digital Document Company Unit of Panasonic Corporation of Matsushita Electric Industrial Co., Ltd. PDF directly Long paper Scanning Up to 132 ppm 230 ipm KV-S3105C Up to use "clam-shell" design and stainless steel construction, the KV-S3105C/KV-S3085 is installed. MultiStream®, ISIS® and ISIS...

Operating Instructions
Page 2
... marks.) ≥ Microsoft, Windows and Windows NT are as follows. As an ENERGY STAR® Partner, Panasonic has determined that the SCSI board vender provides. § Use USB 2.0 interface because scanning speed of USB 1.1 interface is slow. § If you for purchasing... a Panasonic "High Speed Color Scanner" or "High Speed Scanner." ≥ Panasonic supports your original document. ∫ System requirements When using the scanner, the required host computer conditions are either registered trademarks or trademarks of ...
... marks.) ≥ Microsoft, Windows and Windows NT are as follows. As an ENERGY STAR® Partner, Panasonic has determined that the SCSI board vender provides. § Use USB 2.0 interface because scanning speed of USB 1.1 interface is slow. § If you for purchasing... a Panasonic "High Speed Color Scanner" or "High Speed Scanner." ≥ Panasonic supports your original document. ∫ System requirements When using the scanner, the required host computer conditions are either registered trademarks or trademarks of ...

Operating Instructions
Page 3
... 29 Paper Feed Settings 32 ≥ Selecting the paper path for scanned document 32 ≥ Setting the ADF selector 32 Others 33 ≥ How to use the control sheet and separation sheet 33 Changing the Reference Plate Setting 34 Care and Maintenance Clearing Paper Jams 36 ≥ Removing paper jams from...
... 29 Paper Feed Settings 32 ≥ Selecting the paper path for scanned document 32 ≥ Setting the ADF selector 32 Others 33 ≥ How to use the control sheet and separation sheet 33 Changing the Reference Plate Setting 34 Care and Maintenance Clearing Paper Jams 36 ≥ Removing paper jams from...

Operating Instructions
Page 4
...; (220-240 V equipment) A certified power supply cord has to the Material Safety Data Sheet (MSDS). • Please ask your Panasonic sales company about the roller cleaning paper, please refer to be harmful to provide reasonable protection against harmful interference when the equipment is operated ...15 of the FCC Rules. THE SOCKET-OUTLET MUST BE NEAR THIS EQUIPMENT AND MUST BE EASILY ACCESSIBLE. Roller cleaning paper precautions Before using the roller cleaning paper, please read these instructions for a Class A digital device, pursuant to correct the interference at his own ...
...; (220-240 V equipment) A certified power supply cord has to the Material Safety Data Sheet (MSDS). • Please ask your Panasonic sales company about the roller cleaning paper, please refer to be harmful to provide reasonable protection against harmful interference when the equipment is operated ...15 of the FCC Rules. THE SOCKET-OUTLET MUST BE NEAR THIS EQUIPMENT AND MUST BE EASILY ACCESSIBLE. Roller cleaning paper precautions Before using the roller cleaning paper, please read these instructions for a Class A digital device, pursuant to correct the interference at his own ...

Operating Instructions
Page 5
... The wire which is coloured Brown must be removed and the plug cut off and disposed of this plug. A 5 amp. If you must be used until a replacement cover is replaced. WARNING: This appliance must ensure that it is refitted when the fuse is obtained. A replacement fuse cover can be...with the letter E or by ASTA or BSI to BS1362. socket. This appliance is marked with the following text carefully. If in your local Panasonic Dealer. IMPORTANT: The wires in this mains lead are coloured in this appliance may not correspond with a moulded three pin mains plug for your ...
... The wire which is coloured Brown must be removed and the plug cut off and disposed of this plug. A 5 amp. If you must be used until a replacement cover is replaced. WARNING: This appliance must ensure that it is refitted when the fuse is obtained. A replacement fuse cover can be...with the letter E or by ASTA or BSI to BS1362. socket. This appliance is marked with the following text carefully. If in your local Panasonic Dealer. IMPORTANT: The wires in this mains lead are coloured in this appliance may not correspond with a moulded three pin mains plug for your ...

Operating Instructions
Page 7
... that if the scanner has to be moved, scanner. Immediately unplug the power cord and call for service. at least two people carry it is used for an extended period. Precautions The following precautions are recommended to extend the life of the unit: Prior to protect the unit if it . ≥...; Special care should be taken to scanning, remove all staples and paper clips from pages. This will not be used in an area where there is a lot of Do not leave the power cord plugged into the AC outlet smoke, dust, chemical fumes or vibration...
... that if the scanner has to be moved, scanner. Immediately unplug the power cord and call for service. at least two people carry it is used for an extended period. Precautions The following precautions are recommended to extend the life of the unit: Prior to protect the unit if it . ≥...; Special care should be taken to scanning, remove all staples and paper clips from pages. This will not be used in an area where there is a lot of Do not leave the power cord plugged into the AC outlet smoke, dust, chemical fumes or vibration...

Operating Instructions
Page 8
...unit in direct sunlight or in a room with erate large electrical noise. The roller cleaning paper may cause a fire. ≥Power Source ≥ Use a voltage level that does not vary more than d10% from the voltage level marked on the nameplate (located on a carpet. (Static electricity can... cause the unit to sensitive skin. This may be connected to a grounded outlet. ≥ Do not use an extension cord. ≥ This scanner should be harmful to malfunction.) Do not drink or inhale the included roller cleaning paper fluid. Do not ...
...unit in direct sunlight or in a room with erate large electrical noise. The roller cleaning paper may cause a fire. ≥Power Source ≥ Use a voltage level that does not vary more than d10% from the voltage level marked on the nameplate (located on a carpet. (Static electricity can... cause the unit to sensitive skin. This may be connected to a grounded outlet. ≥ Do not use an extension cord. ≥ This scanner should be harmful to malfunction.) Do not drink or inhale the included roller cleaning paper fluid. Do not ...

Operating Instructions
Page 10
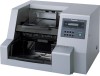
... documents path direction (front exit or straight pass). (See page 32.) Power switch [ : on position ≤ : off position Post-Imprinter (Top) door Used for attaching the postimprinter unit. ADF selector To prevent double feeding, adjust the lever to feed the scanning documents properly. (See page 32.) Paper path...display the scanning conditions, etc. Back door release Back door Open this door if a paper jam occurs Fan exhaust vent Connectors Used to connect the scanner unit to the host computer. Component Identification Exit tray stopper Front door Document guide Hopper Hopper extension tray ...
... documents path direction (front exit or straight pass). (See page 32.) Power switch [ : on position ≤ : off position Post-Imprinter (Top) door Used for attaching the postimprinter unit. ADF selector To prevent double feeding, adjust the lever to feed the scanning documents properly. (See page 32.) Paper path...display the scanning conditions, etc. Back door release Back door Open this door if a paper jam occurs Fan exhaust vent Connectors Used to connect the scanner unit to the host computer. Component Identification Exit tray stopper Front door Document guide Hopper Hopper extension tray ...

Operating Instructions
Page 11
... sheets HOPPER 2: 200 sheets HOPPER 3: 1 sheet Press to exit from the setting section HOME : and return to start or stop scanning a document. 11 STOP / START : Used to the ready status. Display Panel Instructions The required settings must be displayed during scanning or setting. : Press to advance to the next mode in...
... sheets HOPPER 2: 200 sheets HOPPER 3: 1 sheet Press to exit from the setting section HOME : and return to start or stop scanning a document. 11 STOP / START : Used to the ready status. Display Panel Instructions The required settings must be displayed during scanning or setting. : Press to advance to the next mode in...

Operating Instructions
Page 12
... complete, "Ready" appears on the LCD. The hopper position is changeable only when "Ready" is complete, "Ready" appears on the LCD, release the HOME key. 2 Use the 2 key or the 1 key to be ready. ≥ This setting will remain until it is complete, "Ready" appears on the LCD. Be r e i t ∫ Setting...
... complete, "Ready" appears on the LCD. The hopper position is changeable only when "Ready" is complete, "Ready" appears on the LCD, release the HOME key. 2 Use the 2 key or the 1 key to be ready. ≥ This setting will remain until it is complete, "Ready" appears on the LCD. Be r e i t ∫ Setting...

Operating Instructions
Page 13
...) size. 19 14 Double feed detection Selection to choose to detect double feeding function. If the application software provides these features, it will be customized using the scanner's various setting modes. Drop Out Color selection for emphasis when scanning the back side of a document. 19 08 Back side image emphasis B. Image...
...) size. 19 14 Double feed detection Selection to choose to detect double feeding function. If the application software provides these features, it will be customized using the scanner's various setting modes. Drop Out Color selection for emphasis when scanning the back side of a document. 19 08 Back side image emphasis B. Image...

Operating Instructions
Page 15
...the page number of the scanned document will print on the host computer as well. If a host computer is required. The post-imprinter option (KV-SS028) is connected, there may be printed. The imprinter will be settings required on the reverse side of the 23 document after scanned. 12 Setting... the postimprinter position Post Position Allows for the selection of the printing position using a post-imprinter. 23 13 Setting the postimprinter font style Post Font Allows for the selection of the printing font style...
...the page number of the scanned document will print on the host computer as well. If a host computer is required. The post-imprinter option (KV-SS028) is connected, there may be printed. The imprinter will be settings required on the reverse side of the 23 document after scanned. 12 Setting... the postimprinter position Post Position Allows for the selection of the printing position using a post-imprinter. 23 13 Setting the postimprinter font style Post Font Allows for the selection of the printing font style...

Operating Instructions
Page 16
...the "Clean Roller Warning ≤≤%" display. 25 Checking the roller Replace modules replacement Roller warning 07 Warning The alarm tells you are using. Warning ≤≤%" display. 26 08 Setting the product ID Product ID Selects the product ID. if the computer has failed to ...correctly, one short beep will not be displayed. 02 Setting the buzzer Buzzer Selects whether the buzzer is time to emulate other 26 Panasonic scanners. 09 Setting the sleep mode Sleep Mode Sets the time until sleep mode turns ON. 26 16 Clearing the roller modules replacement...
...the "Clean Roller Warning ≤≤%" display. 25 Checking the roller Replace modules replacement Roller warning 07 Warning The alarm tells you are using. Warning ≤≤%" display. 26 08 Setting the product ID Product ID Selects the product ID. if the computer has failed to ...correctly, one short beep will not be displayed. 02 Setting the buzzer Buzzer Selects whether the buzzer is time to emulate other 26 Panasonic scanners. 09 Setting the sleep mode Sleep Mode Sets the time until sleep mode turns ON. 26 16 Clearing the roller modules replacement...

Operating Instructions
Page 17
.... Con t r a s t ≥ The display on the right is displayed. ≥ The SCAN, COUNTER, IMPRINT and OTHERS keys are used as a menu key. ≥ When pressing the SCAN key, the display will appear as shown at the right is pressed by pressing the desired menu...key is pressed: Read y When the COUNTER key is an example of L - - ✽ - SCAN) 01 . Con t r a s t L - - - -i- - - -H Ho s t 3 Use the 1 key or the 2 key to another menu key: 01 . F .Dr op Ou t Ho s t 2 Use the 3 key or the 4 key to select the desired item. ≥ The display at the right. (Ex. D i s p l a y Coun...
.... Con t r a s t ≥ The display on the right is displayed. ≥ The SCAN, COUNTER, IMPRINT and OTHERS keys are used as a menu key. ≥ When pressing the SCAN key, the display will appear as shown at the right is pressed by pressing the desired menu...key is pressed: Read y When the COUNTER key is an example of L - - ✽ - SCAN) 01 . Con t r a s t L - - - -i- - - -H Ho s t 3 Use the 1 key or the 2 key to another menu key: 01 . F .Dr op Ou t Ho s t 2 Use the 3 key or the 4 key to select the desired item. ≥ The display at the right. (Ex. D i s p l a y Coun...

Operating Instructions
Page 21
...ng Memo r y 1 Host Slow Normal Slow: The scanner scans at the "Slow" speed. However, depending on , and will remain valid. • If "Default" is used they will be displayed after saving. 19 Load scanning setting 19 . Load Se t t i ng De f au l t Default Memory 1 Memory 2 • If you ...)". If other scanning items have been saved in the range of the left side display.) • Scanning settings 01-17 must be saved using setting "18 Save scanning settings (Execution)". "Slow" speed is turned off and on the scanning conditions, effective ranges may slightly differ. ...
...ng Memo r y 1 Host Slow Normal Slow: The scanner scans at the "Slow" speed. However, depending on , and will remain valid. • If "Default" is used they will be displayed after saving. 19 Load scanning setting 19 . Load Se t t i ng De f au l t Default Memory 1 Memory 2 • If you ...)". If other scanning items have been saved in the range of the left side display.) • Scanning settings 01-17 must be saved using setting "18 Save scanning settings (Execution)". "Slow" speed is turned off and on the scanning conditions, effective ranges may slightly differ. ...

Operating Instructions
Page 26
... be displayed. 08 Setting the product ID 08 .Pr oduc t ID KV-S3 1 0 5C KV-S3105C KV-S3105C KV-SS905C KV-SS855 08 .Pr oduc t I D KV-S3 0 8 5 KV-S3085 KV-S3085 (KV-SS905C)* KV-SS855 The applications for the scanner which are given for 15 minutes. The scanner is made to use a function which have been set with ENERGY STAR requirement. Disable •...
... be displayed. 08 Setting the product ID 08 .Pr oduc t ID KV-S3 1 0 5C KV-S3105C KV-S3105C KV-SS905C KV-SS855 08 .Pr oduc t I D KV-S3 0 8 5 KV-S3085 KV-S3085 (KV-SS905C)* KV-SS855 The applications for the scanner which are given for 15 minutes. The scanner is made to use a function which have been set with ENERGY STAR requirement. Disable •...
Operating Instructions
Page 28
... on the hopper correctly. ≥ When scanning thin documents [less than 60 g/m2 (16 lbs.)] or small document (less than A6 size), be sure to use less than 500 sheets. ≥ The height of the document should be reordered for optimum performance. Be sure to be scanned by manual feeding. ≥...
... on the hopper correctly. ≥ When scanning thin documents [less than 60 g/m2 (16 lbs.)] or small document (less than A6 size), be sure to use less than 500 sheets. ≥ The height of the document should be reordered for optimum performance. Be sure to be scanned by manual feeding. ≥...

Operating Instructions
Page 31
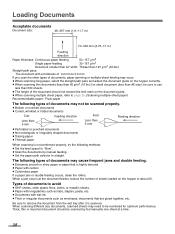
Exit tray stopper Hopper extension tray ≥ When scanning short length documents, please install the exit stopper. Scanning direction Document Exit stopper 31 Loading Documents Exit document guides A Document guide 6 When using paper longer than letter size, pull out the hopper extension tray from the hopper and the exit tray stopper from the front door as shown in the diagram at the right. Adjust the exit document guides to the size of the document to be scanned. 5 Adjust the document guides to the size of the document to be output, if required.
Exit tray stopper Hopper extension tray ≥ When scanning short length documents, please install the exit stopper. Scanning direction Document Exit stopper 31 Loading Documents Exit document guides A Document guide 6 When using paper longer than letter size, pull out the hopper extension tray from the hopper and the exit tray stopper from the front door as shown in the diagram at the right. Adjust the exit document guides to the size of the document to be scanned. 5 Adjust the document guides to the size of the document to be output, if required.

Operating Instructions
Page 33
... the copy. ≥ Be careful not to get the control sheet dirty. Also, copy the control sheet so that is selected previously. B Cautions: ≥ Use the same size control sheet as the scanning document. ≥ When printing the control sheet, if the pattern falls in the area from the provided... CD- Do not fold or crease the control sheet. Scanning will not be used , the documents under the control sheet are scanned in accordance with the code on the control A sheet regardless of scanning condition that the pattern ...
... the copy. ≥ Be careful not to get the control sheet dirty. Also, copy the control sheet so that is selected previously. B Cautions: ≥ Use the same size control sheet as the scanning document. ≥ When printing the control sheet, if the pattern falls in the area from the provided... CD- Do not fold or crease the control sheet. Scanning will not be used , the documents under the control sheet are scanned in accordance with the code on the control A sheet regardless of scanning condition that the pattern ...

Operating Instructions
Page 34
...8805; Confirm that the reference plate does not rotate after turning it . The refrence plate (B) and reference plate (F) setting must be changed simultaneously. 1 Using your finger, slide the lower reference plate to the right (1) and turn it over (2), then release it over. Then open the front door completely.... ≥ The front door now opens slowly. 2 Using your hand, pull the front door release towards you. Changing the Reference Plate Setting You can choose a background color to be scanned from factory ...
...8805; Confirm that the reference plate does not rotate after turning it . The refrence plate (B) and reference plate (F) setting must be changed simultaneously. 1 Using your finger, slide the lower reference plate to the right (1) and turn it over (2), then release it over. Then open the front door completely.... ≥ The front door now opens slowly. 2 Using your hand, pull the front door release towards you. Changing the Reference Plate Setting You can choose a background color to be scanned from factory ...


