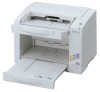

Operating Instructions
Page 3
Table of Contents Page Notice ...4 Precautions ...10 Before You Start Component Identification ...13 ≥ KV-S2025C / KV-S2025CU ...≥ KV-S2045C / KV-S2045CU ...≥ Power turn-on sequence ...≥ About LED ...≥ About the SCSI setting... 13 14 15 15 16 ... Replacing the retard roller module ...30 How to re-attach the sensor rollers ...32 ≥ Re-attach the sensor roller for back scanning to the ADF door ...32 ≥ Re-attach the sensor roller for front scanning ...32 Repacking Instructions ...33 Appendix ≥ KV-S2025C / KV-S2025CU ...33 ≥ KV-S2045C / KV...
Table of Contents Page Notice ...4 Precautions ...10 Before You Start Component Identification ...13 ≥ KV-S2025C / KV-S2025CU ...≥ KV-S2045C / KV-S2045CU ...≥ Power turn-on sequence ...≥ About LED ...≥ About the SCSI setting... 13 14 15 15 16 ... Replacing the retard roller module ...30 How to re-attach the sensor rollers ...32 ≥ Re-attach the sensor roller for back scanning to the ADF door ...32 ≥ Re-attach the sensor roller for front scanning ...32 Repacking Instructions ...33 Appendix ≥ KV-S2025C / KV-S2025CU ...33 ≥ KV-S2045C / KV...

Operating Instructions
Page 6
...please read the following code. Notice (For United Kingdom only) For your local Panasonic Dealer. If in your plug, proceed as shown below. The wire which is coloured Green-and-Yellow must ensure that the replacement fuse has a rating of this appliance may not correspond with the coloured markings... disposed of the fuse. IMPORTANT: The wires in your safety and convenience. Check for your home then the fuse should be connected to replace the fuse : Open the fuse compartment with the following text carefully. How to the terminal in the plug which is fitted in this ...
...please read the following code. Notice (For United Kingdom only) For your local Panasonic Dealer. If in your plug, proceed as shown below. The wire which is coloured Green-and-Yellow must ensure that the replacement fuse has a rating of this appliance may not correspond with the coloured markings... disposed of the fuse. IMPORTANT: The wires in your safety and convenience. Check for your home then the fuse should be connected to replace the fuse : Open the fuse compartment with the following text carefully. How to the terminal in the plug which is fitted in this ...

Operating Instructions
Page 15
... scanner as follows: LED light Green Green (flashing) Orange Orange (flashing) Red Status Ready to scan or scanning Sleep mode Ready to be cleaned or replaced.
... scanner as follows: LED light Green Green (flashing) Orange Orange (flashing) Red Status Ready to scan or scanning Sleep mode Ready to be cleaned or replaced.

Operating Instructions
Page 27
Otherwise the levers may break. 27 Replacing Consumables ∫ Replacing the paper feed roller module 1 Turn the power off. 2 Push the ADF door release to open the ADF door. 3 Push the two green levers down at both ends of the paper feed roller module to unlock the paper feed rollers. ≥ When moving the green levers, do not apply pressure in any other direction other than in the direction shown by the arrows.
Otherwise the levers may break. 27 Replacing Consumables ∫ Replacing the paper feed roller module 1 Turn the power off. 2 Push the ADF door release to open the ADF door. 3 Push the two green levers down at both ends of the paper feed roller module to unlock the paper feed rollers. ≥ When moving the green levers, do not apply pressure in any other direction other than in the direction shown by the arrows.

Operating Instructions
Page 28
Replacing Consumables 4 Remove the paper feed roller module straightly, holding up the paper feed case along the groove of the feed cover. 3 Attach the bearings at ...
Replacing Consumables 4 Remove the paper feed roller module straightly, holding up the paper feed case along the groove of the feed cover. 3 Attach the bearings at ...

Operating Instructions
Page 29
Replacing Consumables 6 Push up the green levers at both ends in the direction of the arrows until they click into place. ≥ After installing the paper feed roller module, confirm that the feed rollers can be moved lightly in vertical direction. 7 Close the ADF door. ≥ When you close the ADF door, close it securely until the door is locked. 29
Replacing Consumables 6 Push up the green levers at both ends in the direction of the arrows until they click into place. ≥ After installing the paper feed roller module, confirm that the feed rollers can be moved lightly in vertical direction. 7 Close the ADF door. ≥ When you close the ADF door, close it securely until the door is locked. 29

Operating Instructions
Page 30
Retard roller cover 4 Remove the retard roller module in the direction of the arrow. Retard roller module 30 Replacing Consumables ∫ Replacing the retard roller module 1 Turn the power off. 2 Push the ADF door release to open the ADF door. 3 Open the retard roller cover.
Retard roller cover 4 Remove the retard roller module in the direction of the arrow. Retard roller module 30 Replacing Consumables ∫ Replacing the retard roller module 1 Turn the power off. 2 Push the ADF door release to open the ADF door. 3 Open the retard roller cover.

Operating Instructions
Page 31
Make sure that both ends of the shaft reach the springs of the holder. Wider groove Metal holder 6 Close the retard roller cover. 7 Close the ADF door. ≥ When you close the ADF door, close it securely until the door is locked. the roller replacing counter with 8 Clear User Utility. ≥ Click [Clear Counter] button for [After Replace Roller] with the groove of the metal holder. Replacing Consumables 5 Install the new retard roller module by matching the groove of its shaft with User Utility. 31
Make sure that both ends of the shaft reach the springs of the holder. Wider groove Metal holder 6 Close the retard roller cover. 7 Close the ADF door. ≥ When you close the ADF door, close it securely until the door is locked. the roller replacing counter with 8 Clear User Utility. ≥ Click [Clear Counter] button for [After Replace Roller] with the groove of the metal holder. Replacing Consumables 5 Install the new retard roller module by matching the groove of its shaft with User Utility. 31

Operating Instructions
Page 38
... reached their life expectancy. The scanning density is curled or folded. The document is uneven. The document has a length of the rollers. (See page 23.) Replace the paper feed roller module and the retard roller module. (See page 27 and page 30.) Flatten the document and load it again after reducing...
... reached their life expectancy. The scanning density is curled or folded. The document is uneven. The document has a length of the rollers. (See page 23.) Replace the paper feed roller module and the retard roller module. (See page 27 and page 30.) Flatten the document and load it again after reducing...
Operating Instructions
Page 39
... tray ...13, 14, 18 Exit stopper...13, 14 Exit tray...13 External dimensions ...36 R Radiation vent ...13, 14, 22 Reflector sheets ...24 Repacking ...33 Replacing consumables...27 Replacing the retard roller module...30 Resolution ...35 Retard roller ...24 Retard roller cover ...30 Retard roller module ...30 Roller cleaning paper ...8, 23, 26 F Feed...
... tray ...13, 14, 18 Exit stopper...13, 14 Exit tray...13 External dimensions ...36 R Radiation vent ...13, 14, 22 Reflector sheets ...24 Repacking ...33 Replacing consumables...27 Replacing the retard roller module...30 Resolution ...35 Retard roller ...24 Retard roller cover ...30 Retard roller module ...30 Roller cleaning paper ...8, 23, 26 F Feed...

Maintenance Manual
Page 1
...the "Precautions" item in the diagram on the next page. Replacing the paper feed roller module, retard roller module and Black Sensor Roller or White Sensor Roller To ensure long performance, Panasonic recommends changing the paper feed roller module and retard roller module ... once a month. only) or your scanner. To maintain proper scanning, clean the scanner parts frequently. KV-S2025C/KV-S2025CU/KV-S2026C/KV-S2026CU/KV-S2026CA KV-S2045C/KV-S2045CU/KV-S2046C/KV-S2046CU/KV-S2046CA rCleaning the unit Please refer to the Operating Instructions (CD-ROM) for [After Clean Roller] with...
...the "Precautions" item in the diagram on the next page. Replacing the paper feed roller module, retard roller module and Black Sensor Roller or White Sensor Roller To ensure long performance, Panasonic recommends changing the paper feed roller module and retard roller module ... once a month. only) or your scanner. To maintain proper scanning, clean the scanner parts frequently. KV-S2025C/KV-S2025CU/KV-S2026C/KV-S2026CU/KV-S2026CA KV-S2045C/KV-S2045CU/KV-S2046C/KV-S2046CU/KV-S2046CA rCleaning the unit Please refer to the Operating Instructions (CD-ROM) for [After Clean Roller] with...


