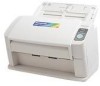
Scanner
Page 1
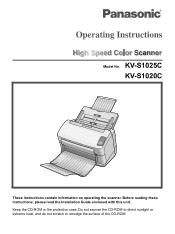
Do not expose the CD-ROM to direct sunlight or extreme heat, and do not scratch or smudge the surface of the CD-ROM. Keep the CD-ROM in the protective case. Before reading these instructions, please read the Installation Guide enclosed with this unit. KV-S1025C KV-S1020C These instructions contain information on operating the scanner. Model No.
Do not expose the CD-ROM to direct sunlight or extreme heat, and do not scratch or smudge the surface of the CD-ROM. Keep the CD-ROM in the protective case. Before reading these instructions, please read the Installation Guide enclosed with this unit. KV-S1025C KV-S1020C These instructions contain information on operating the scanner. Model No.
Scanner
Page 2
..., and QuickScan Pro are registered trademarks or trademarks of EMC Corporation. • Adobe and Reader are examples of certain documents. Screen shot(s) reprinted with a reliable and easy to use document scanner. • Panasonic has developed Panasonic Image Enhancement Technology to improve the quality of your scanned images even beyond the quality of doubt, contact your...
..., and QuickScan Pro are registered trademarks or trademarks of EMC Corporation. • Adobe and Reader are examples of certain documents. Screen shot(s) reprinted with a reliable and easy to use document scanner. • Panasonic has developed Panasonic Image Enhancement Technology to improve the quality of your scanned images even beyond the quality of doubt, contact your...
Scanner
Page 3
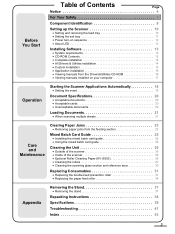
... Viewing manuals installed on your computer 17 Operation Starting the Scanner Applications Automatically 18 • Setting the event 18 Document Specifications 20 • Acceptable documents 20 • Acceptable cards 20 • Unacceptable documents 20 Loading Documents 21 • When scanning multiple sheets 21 Care and...Using the mixed batch card guide 25 Cleaning the Unit 26 • Outside of the scanner 26 • Inside of the scanner 26 • Optional Roller Cleaning Paper (KV-SS03 26 • Cleaning the rollers 27 • Cleaning the scanning glass section and...
... Viewing manuals installed on your computer 17 Operation Starting the Scanner Applications Automatically 18 • Setting the event 18 Document Specifications 20 • Acceptable documents 20 • Acceptable cards 20 • Unacceptable documents 20 Loading Documents 21 • When scanning multiple sheets 21 Care and...Using the mixed batch card guide 25 Cleaning the Unit 26 • Outside of the scanner 26 • Inside of the scanner 26 • Optional Roller Cleaning Paper (KV-SS03 26 • Cleaning the rollers 27 • Cleaning the scanning glass section and...
Scanner
Page 8
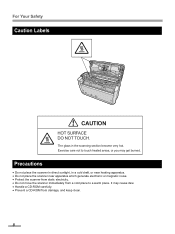
... Precautions • Do not place the scanner in direct sunlight, in the scanning section become very hot. Exercise care not to a warm place. The glass in a cold draft, or near heating apparatus. • Do not place the scanner near apparatus which generate electronic or magnetic ...noise. • Protect the scanner from static electricity. • Do not move the scanner immediately from damage, and keep clean. 8 It may cause dew. • Handle ...
... Precautions • Do not place the scanner in direct sunlight, in the scanning section become very hot. Exercise care not to a warm place. The glass in a cold draft, or near heating apparatus. • Do not place the scanner near apparatus which generate electronic or magnetic ...noise. • Protect the scanner from static electricity. • Do not move the scanner immediately from damage, and keep clean. 8 It may cause dew. • Handle ...
Scanner
Page 9
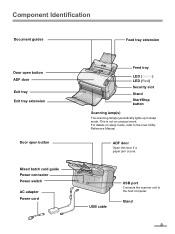
USB cable USB port Connects the scanner unit to the User Utility Reference Manual. For details on sleep mode, refer to the host computer. ADF door Open this door if a paper jam occurs. This is not an unusual event. Stand 9 Component Identification Document guides Feed tray extension Door open button ADF door Exit tray Exit tray extension Door open button Mixed batch card guide Power connector Power switch AC adaptor Power cord Feed tray LED (Green) LED (Red) Security slot Stand Start/Stop button Scanning lamp(s) The scanning lamp(s) periodically lights up in sleep mode.
USB cable USB port Connects the scanner unit to the User Utility Reference Manual. For details on sleep mode, refer to the host computer. ADF door Open this door if a paper jam occurs. This is not an unusual event. Stand 9 Component Identification Document guides Feed tray extension Door open button ADF door Exit tray Exit tray extension Door open button Mixed batch card guide Power connector Power switch AC adaptor Power cord Feed tray LED (Green) LED (Red) Security slot Stand Start/Stop button Scanning lamp(s) The scanning lamp(s) periodically lights up in sleep mode.
Scanner
Page 10
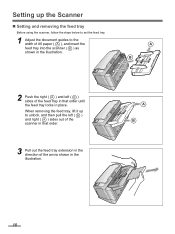
...right ( A ) sides out of the scanner in that order until the feed tray locks in the illustration. Setting up to the width of A5 paper ( A ), and insert the feed tray into the scanner ( B ) as shown in place. When removing the feed tray, lift it up the Scanner „ Setting and removing the feed... tray Before using the scanner, follow the steps below to set the feed tray. 1 Adjust the document guides to unlock, and then pull the left ( B ) sides of the feed tray in that order. 3 ...
...right ( A ) sides out of the scanner in that order until the feed tray locks in the illustration. Setting up to the width of A5 paper ( A ), and insert the feed tray into the scanner ( B ) as shown in place. When removing the feed tray, lift it up the Scanner „ Setting and removing the feed... tray Before using the scanner, follow the steps below to set the feed tray. 1 Adjust the document guides to unlock, and then pull the left ( B ) sides of the feed tray in that order. 3 ...
Scanner
Page 11
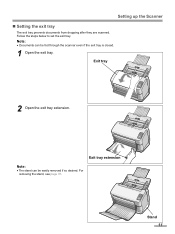
Exit tray extension Note: • The stand can be easily removed if so desired. For removing the stand, see page 37. Follow the steps below to set the exit tray. Exit tray 2 Open the exit tray extension. Stand 11 Setting up the Scanner „ Setting the exit tray The exit tray prevents documents from dropping after they are scanned. Note: • Documents can be fed through the scanner even if the exit tray is closed. 1 Open the exit tray.
Exit tray extension Note: • The stand can be easily removed if so desired. For removing the stand, see page 37. Follow the steps below to set the exit tray. Exit tray 2 Open the exit tray extension. Stand 11 Setting up the Scanner „ Setting the exit tray The exit tray prevents documents from dropping after they are scanned. Note: • Documents can be fed through the scanner even if the exit tray is closed. 1 Open the exit tray.
Scanner
Page 12
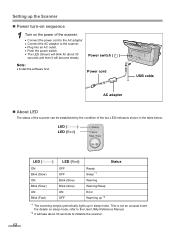
... Blink (Fast) OFF OFF Blink (Slow) Blink (Slow) ON OFF Ready Sleep *1 Warning Warning/Sleep Error Warming up *2 *1 The scanning lamp(s) periodically lights up the Scanner „ Power turn-on sequence 1 Turn on sleep mode, refer to the User Utility Reference Manual. *2 It will take about 30 seconds to the... scanner. • Plug into an AC outlet. • Push the power switch. • The LED (Green) will blink for about 30 seconds and then it will ...
... Blink (Fast) OFF OFF Blink (Slow) Blink (Slow) ON OFF Ready Sleep *1 Warning Warning/Sleep Error Warming up *2 *1 The scanning lamp(s) periodically lights up the Scanner „ Power turn-on sequence 1 Turn on sleep mode, refer to the User Utility Reference Manual. *2 It will take about 30 seconds to the... scanner. • Plug into an AC outlet. • Push the power switch. • The LED (Green) will blink for about 30 seconds and then it will ...
Scanner
Page 13
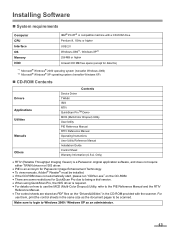
...being a trial version. • When using QuickScan Pro, the ISIS driver is an acronym for Panasonic Image Enhancement Technology. • To view manuals, Adobe® Reader® must be scanned. ...requirements Computer CPU Interface OS Memory HDD IBM® PC/AT® or compatible machine with the scanner. For use the MCD (Multi-Color Dropout) Utility, refer to be installed. • If...Sheet Warranty Information (U.S.A. Make sure to login to Windows 2000 / Windows XP as the document pages to the PIE Reference Manual and the RTIV Reference Manual. • The control sheets...
...being a trial version. • When using QuickScan Pro, the ISIS driver is an acronym for Panasonic Image Enhancement Technology. • To view manuals, Adobe® Reader® must be scanned. ...requirements Computer CPU Interface OS Memory HDD IBM® PC/AT® or compatible machine with the scanner. For use the MCD (Multi-Color Dropout) Utility, refer to be installed. • If...Sheet Warranty Information (U.S.A. Make sure to login to Windows 2000 / Windows XP as the document pages to the PIE Reference Manual and the RTIV Reference Manual. • The control sheets...
Scanner
Page 14
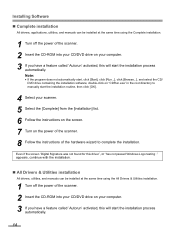
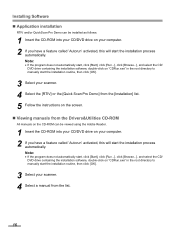
...All drivers, utilities, and manuals can be installed at the same time using the All Drivers & Utilities installation. 1 Turn off the power of the scanner. 2 Insert the CD-ROM into your CD/DVD drive on your computer. 3 If you have a feature called 'Autorun' activated, this will ... installation All drivers, applications, utilities, and manuals can be installed at the same time using the Complete installation. 1 Turn off the power of the scanner. 2 Insert the CD-ROM into your CD/DVD drive on your computer. 3 If you have a feature called 'Autorun' activated, this will start...
...All drivers, utilities, and manuals can be installed at the same time using the All Drivers & Utilities installation. 1 Turn off the power of the scanner. 2 Insert the CD-ROM into your CD/DVD drive on your computer. 3 If you have a feature called 'Autorun' activated, this will ... installation All drivers, applications, utilities, and manuals can be installed at the same time using the Complete installation. 1 Turn off the power of the scanner. 2 Insert the CD-ROM into your CD/DVD drive on your computer. 3 If you have a feature called 'Autorun' activated, this will start...
Scanner
Page 15
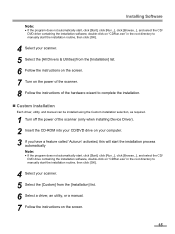
... software, double-click on "CDRun.exe" in the root directory to manually start the installation routine, then click [OK]. 4 Select your scanner. 5 Select the [All Drivers & Utilities] from the [Installation] list. 6 Follow the instructions on the screen. 7 Turn on the power of the... „ Custom installation Each driver, utility, and manual can be installed using the Custom installation selection, as required. 1 Turn off the power of the scanner (only when installing Device Driver). 2 Insert the CD-ROM into your CD/DVD drive on your computer. 3 If you have a feature called 'Autorun' ...
... software, double-click on "CDRun.exe" in the root directory to manually start the installation routine, then click [OK]. 4 Select your scanner. 5 Select the [All Drivers & Utilities] from the [Installation] list. 6 Follow the instructions on the screen. 7 Turn on the power of the... „ Custom installation Each driver, utility, and manual can be installed using the Custom installation selection, as required. 1 Turn off the power of the scanner (only when installing Device Driver). 2 Insert the CD-ROM into your CD/DVD drive on your computer. 3 If you have a feature called 'Autorun' ...
Scanner
Page 16
...the installation software, double-click on "CDRun.exe" in the root directory to manually start the installation routine, then click [OK]. 3 Select your scanner. 4 Select a manual from the Drivers&Utilities CD-ROM All manuals on the CD-ROM can be viewed using the Adobe Reader. 1 Insert ... containing the installation software, double-click on "CDRun.exe" in the root directory to manually start the installation routine, then click [OK]. 3 Select your scanner. 4 Select the [RTIV] or the [Quick Scan Pro Demo] from the [Installation] list. 5 Follow the instructions on the screen. „ Viewing...
...the installation software, double-click on "CDRun.exe" in the root directory to manually start the installation routine, then click [OK]. 3 Select your scanner. 4 Select a manual from the Drivers&Utilities CD-ROM All manuals on the CD-ROM can be viewed using the Adobe Reader. 1 Insert ... containing the installation software, double-click on "CDRun.exe" in the root directory to manually start the installation routine, then click [OK]. 3 Select your scanner. 4 Select the [RTIV] or the [Quick Scan Pro Demo] from the [Installation] list. 5 Follow the instructions on the screen. „ Viewing...
Scanner
Page 17
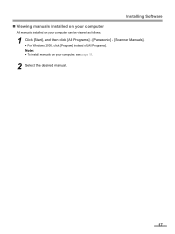
Note: • To install manuals on your computer, see page 15. 2 Select the desired manual. 17 Installing Software „ Viewing manuals installed on your computer All manuals installed on your computer can be viewed as follows. 1 Click [Start], and then click [All Programs] - [Panasonic] - [Scanner Manuals]. • For Windows 2000, click [Program] instead of [All Programs].
Note: • To install manuals on your computer, see page 15. 2 Select the desired manual. 17 Installing Software „ Viewing manuals installed on your computer All manuals installed on your computer can be viewed as follows. 1 Click [Start], and then click [All Programs] - [Panasonic] - [Scanner Manuals]. • For Windows 2000, click [Program] instead of [All Programs].
Scanner
Page 18
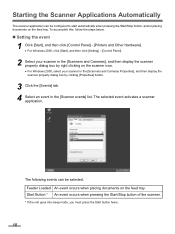
... can be selected. The selected event activates a scanner application. Feeder Loaded An event occurs when placing documents on the scanner icon. • For Windows 2000, select your scanner in the [Scanners and Cameras Properties], and then display the scanner property dialog box by clicking [Properties] button....[Events] tab. 4 Select an event in the [Scanner events] list. Starting the Scanner Applications Automatically The scanner application can be configured to start automatically when pressing the Start/Stop button, and/or placing documents on the feed tray. Start Button * An event ...
... can be selected. The selected event activates a scanner application. Feeder Loaded An event occurs when placing documents on the scanner icon. • For Windows 2000, select your scanner in the [Scanners and Cameras Properties], and then display the scanner property dialog box by clicking [Properties] button....[Events] tab. 4 Select an event in the [Scanner events] list. Starting the Scanner Applications Automatically The scanner application can be configured to start automatically when pressing the Start/Stop button, and/or placing documents on the feed tray. Start Button * An event ...

Scanner
Page 19
...] list. • To disable the automatic activation of the scanner applications, set the [Disable device events] check box to select an application in the [Send to this application] list, the [Choose Application] dialog box will display, prompting you to on device: KV-S1025C] dialog box will be launched automatically. After an application has...
...] list. • To disable the automatic activation of the scanner applications, set the [Disable device events] check box to select an application in the [Send to this application] list, the [Choose Application] dialog box will display, prompting you to on device: KV-S1025C] dialog box will be launched automatically. After an application has...
Scanner
Page 26
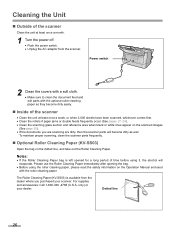
...the AC adaptor from the dealer where you are scanning are dirty, then the scanner parts will evaporate. Dotted line 26 To maintain proper scanning, clean the scanner parts frequently. „ Optional Roller Cleaning Paper (KV-SS03) Open the bag on the dotted line, and take out the Roller ...Clean the scanning glass section and reference area when black or white lines appear on the scanned images (See page 30). • If the documents you purchased your dealer. Please use the Roller Cleaning Paper immediately after opening the bag. • Before using it, the alcohol will become...
...the AC adaptor from the dealer where you are scanning are dirty, then the scanner parts will evaporate. Dotted line 26 To maintain proper scanning, clean the scanner parts frequently. „ Optional Roller Cleaning Paper (KV-SS03) Open the bag on the dotted line, and take out the Roller ...Clean the scanning glass section and reference area when black or white lines appear on the scanned images (See page 30). • If the documents you purchased your dealer. Please use the Roller Cleaning Paper immediately after opening the bag. • Before using it, the alcohol will become...
Scanner
Page 27
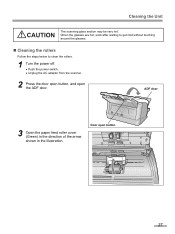
Cleaning the Unit CAUTION The scanning glass section may be very hot. Door open the ADF door. ADF door 3 Open the paper feed roller cover (Green) in the direction of the arrow shown in the illustration. When the glasses are hot, work after waiting to get cold without touching around the glasses. „ Cleaning the rollers Follow the steps below to clean the rollers. 1 Turn the power off. • Push the power switch. • Unplug the AC adaptor from the scanner. 2 Press the door open button, and open button 27
Cleaning the Unit CAUTION The scanning glass section may be very hot. Door open the ADF door. ADF door 3 Open the paper feed roller cover (Green) in the direction of the arrow shown in the illustration. When the glasses are hot, work after waiting to get cold without touching around the glasses. „ Cleaning the rollers Follow the steps below to clean the rollers. 1 Turn the power off. • Push the power switch. • Unplug the AC adaptor from the scanner. 2 Press the door open button, and open button 27
Scanner
Page 30
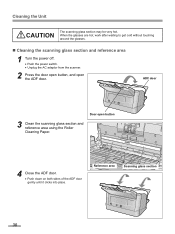
.... „ Cleaning the scanning glass section and reference area 1 Turn the power off. • Push the power switch. • Unplug the AC adaptor from the scanner. 2 Press the door open button, and open button 4 Close the ADF door. • Push down on both sides of the ADF door gently until it...
.... „ Cleaning the scanning glass section and reference area 1 Turn the power off. • Push the power switch. • Unplug the AC adaptor from the scanner. 2 Press the door open button, and open button 4 Close the ADF door. • Push down on both sides of the ADF door gently until it...
Scanner
Page 31
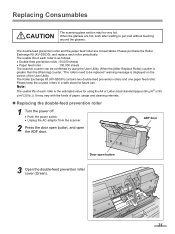
.... „ Replacing the double-feed prevention roller 1 Turn the power off. • Push the power switch. • Unplug the AC adaptor from the scanner. 2 Press the door open button, and open button 3 Open the double-feed prevention roller cover (Green). 31 It may be replaced" warning message is...roller and the paper feed roller are hot, work after waiting to be very hot. When the glasses are consumables. The Roller Exchange Kit (KV-SS030) contains two double-feed prevention rollers and one paper feed roller. Please keep the unused rollers in a safe place for using the ...
.... „ Replacing the double-feed prevention roller 1 Turn the power off. • Push the power switch. • Unplug the AC adaptor from the scanner. 2 Press the door open button, and open button 3 Open the double-feed prevention roller cover (Green). 31 It may be replaced" warning message is...roller and the paper feed roller are hot, work after waiting to be very hot. When the glasses are consumables. The Roller Exchange Kit (KV-SS030) contains two double-feed prevention rollers and one paper feed roller. Please keep the unused rollers in a safe place for using the ...
Scanner
Page 34
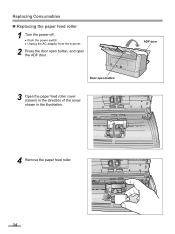
Door open the ADF door. Replacing Consumables „ Replacing the paper feed roller 1 Turn the power off. • Push the power switch. • Unplug the AC adaptor from the scanner. 2 Press the door open button, and open button 3 Open the paper feed roller cover (Green) in the direction of the arrow shown in the illustration. ADF door 4 Remove the paper feed roller. 34
Door open the ADF door. Replacing Consumables „ Replacing the paper feed roller 1 Turn the power off. • Push the power switch. • Unplug the AC adaptor from the scanner. 2 Press the door open button, and open button 3 Open the paper feed roller cover (Green) in the direction of the arrow shown in the illustration. ADF door 4 Remove the paper feed roller. 34


