

User Manual
Page 52
SETUP 1 RECORDING MENU 3 2 EXPOSURE P 1 3 SUBJECT TRACKING 2 DIGITAL ZOOM 3 1 WIND CUT 2 AUTO REVIEW 3 SHORTCUTS 4 1 5 6 ENTER 7 52 VQT3P45
SETUP 1 RECORDING MENU 3 2 EXPOSURE P 1 3 SUBJECT TRACKING 2 DIGITAL ZOOM 3 1 WIND CUT 2 AUTO REVIEW 3 SHORTCUTS 4 1 5 6 ENTER 7 52 VQT3P45
User Manual
Page 53
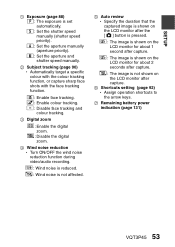
.... 4 Wind noise reduction h Turn ON/OFF the wind noise reduction function during video/audio recording. : Wind noise is reduced. : Wind noise is not affected. 5 Auto review h Specify the duration that the captured image is shown on the LCD monitor after the [O] button is pressed. : The image is shown on the LCD...
.... 4 Wind noise reduction h Turn ON/OFF the wind noise reduction function during video/audio recording. : Wind noise is reduced. : Wind noise is not affected. 5 Auto review h Specify the duration that the captured image is shown on the LCD monitor after the [O] button is pressed. : The image is shown on the LCD...

User Manual
Page 105
... point of the extract. h A screen appears for you to select either to delete the original video and replace it . The original video remains unchanged. REVIEW CLIP: Play back the edited video before saving it with the edited video. SAVE h Each time [J] is set, and the screen to be saved. ... portion to specify the end point appears. SAVE AS NEW: The edited video will be saved as a new file. SPLIT SAVE AS NEW OVERWRITE REVIEW CLIP SET ENTER VQT3P45 105 ADVANCED OPERATION/PLAYBACK 5 Press [I]. The frame following the same procedure as a new (separate) file, or to save are ...
... point of the extract. h A screen appears for you to select either to delete the original video and replace it . The original video remains unchanged. REVIEW CLIP: Play back the edited video before saving it with the edited video. SAVE h Each time [J] is set, and the screen to be saved. ... portion to specify the end point appears. SAVE AS NEW: The edited video will be saved as a new file. SPLIT SAVE AS NEW OVERWRITE REVIEW CLIP SET ENTER VQT3P45 105 ADVANCED OPERATION/PLAYBACK 5 Press [I]. The frame following the same procedure as a new (separate) file, or to save are ...

User Manual
Page 108
... video clip will be deleted. Only the joined video will be saved as doing so may erase the original video. SPLICE SAVE AS NEW OVERWRITE REVIEW CLIP SET ENTER 5 Select the desired option, and press the SET button. h When editing videos, do not turn off the camera, as a new file. h A screen... appears for you are returned to delete the original videos and replace them with the joined video. The original videos remain unchanged. h Editing starts. REVIEW CLIP: Play back the spliced video before saving it. ADVANCED OPERATION/PLAYBACK 4 Press the [O] button or [@] button.
... video clip will be deleted. Only the joined video will be saved as doing so may erase the original video. SPLICE SAVE AS NEW OVERWRITE REVIEW CLIP SET ENTER 5 Select the desired option, and press the SET button. h When editing videos, do not turn off the camera, as a new file. h A screen... appears for you are returned to delete the original videos and replace them with the joined video. The original videos remain unchanged. h Editing starts. REVIEW CLIP: Play back the spliced video before saving it. ADVANCED OPERATION/PLAYBACK 4 Press the [O] button or [@] button.