
Operating Instructions Multi-lingual
Page 2
.... 6. Except when charging, always unplug this appliance from the electrical outlet immediately after using this appliance only for use an extension cord with damaged shaving blades and/or foil, as described in shower. 3. Use this appliance. Do not use this appliance with this appliance. Always attach plug to appliance first, then...
.... 6. Except when charging, always unplug this appliance from the electrical outlet immediately after using this appliance only for use an extension cord with damaged shaving blades and/or foil, as described in shower. 3. Use this appliance. Do not use this appliance with this appliance. Always attach plug to appliance first, then...
Operating Instructions Multi-lingual
Page 3
...do not use salt water or hot water. Brush or wash with reduced physical, sensory or mental capabilities, or lack of Wet shaver. Your Panasonic WET/DRY shaver requires a little time to get used in water. However, this may cause a malfunction. Charging the shaver Do not... designed for dry shaving. Persons using a course that they have been given supervision or instruction concerning use of time. Keep both the inner blades inserted. A heater is intended to because your skin. Do not use and charging. The supply cord cannot be used to be correctly oriented...
...do not use salt water or hot water. Brush or wash with reduced physical, sensory or mental capabilities, or lack of Wet shaver. Your Panasonic WET/DRY shaver requires a little time to get used in water. However, this may cause a malfunction. Charging the shaver Do not... designed for dry shaving. Persons using a course that they have been given supervision or instruction concerning use of time. Keep both the inner blades inserted. A heater is intended to because your skin. Do not use and charging. The supply cord cannot be used to be correctly oriented...
Operating Instructions Multi-lingual
Page 4
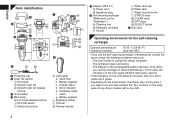
Foil/blade check f. Charge status d. In this case, the indicators on the LCD panel will blink twice every second. • If the indicators on the environment, the ...; A Protective cap B Outer foil section 1 Foil frame 2 System outer foil 3 System outer foil release buttons C Inner blades D Main body 4 Foil frame release buttons 5 OFF/ON switch 6 Switch lock button 7 LCD panel a. Used time b. Battery capacity c. Sonic vibration e.
Foil/blade check f. Charge status d. In this case, the indicators on the LCD panel will blink twice every second. • If the indicators on the environment, the ...; A Protective cap B Outer foil section 1 Foil frame 2 System outer foil 3 System outer foil release buttons C Inner blades D Main body 4 Foil frame release buttons 5 OFF/ON switch 6 Switch lock button 7 LCD panel a. Used time b. Battery capacity c. Sonic vibration e.
Operating Instructions Multi-lingual
Page 7
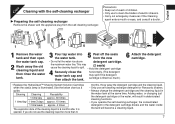
...plug from the new • Do not let the water rise above detergent cartridge. This may (2 seals) cause the cleaning liquid to clean the blades of the cleaning liquid is 6 months after it is illuminated. Shaving Cleaning Reusability 1 time/day approx. 30 times 1 time/day 1 time/3...Use the below chart as a guide. Precautions • Keep out of reach of children. • Only use self-cleaning recharger detergent for Panasonic shavers. • Always change the detergent cartridge and the cleaning liquid in deteriorated cleaning functions. • If you do not use the cleaning...
...plug from the new • Do not let the water rise above detergent cartridge. This may (2 seals) cause the cleaning liquid to clean the blades of the cleaning liquid is 6 months after it is illuminated. Shaving Cleaning Reusability 1 time/day approx. 30 times 1 time/day 1 time/3...Use the below chart as a guide. Precautions • Keep out of reach of children. • Only use self-cleaning recharger detergent for Panasonic shavers. • Always change the detergent cartridge and the cleaning liquid in deteriorated cleaning functions. • If you do not use the cleaning...
Operating Instructions Multi-lingual
Page 9
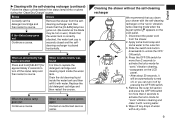
.../ON switch for approximately 2 seconds to turn it will be hot or wet.) Check that the [CLEAN] lamp has gone out. (Be careful as the blade may be automatically turned off by pressing the OFF/ON switch. 5.
.../ON switch for approximately 2 seconds to turn it will be hot or wet.) Check that the [CLEAN] lamp has gone out. (Be careful as the blade may be automatically turned off by pressing the OFF/ON switch. 5.
Operating Instructions Multi-lingual
Page 10
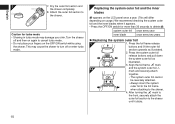
...the shaver. 4. This may damage your fingers on usage.) We recommend checking the system outer foil and the inner blades when it clicks. 10 system outer foil once every year inner blade once every two years Replacing the system outer foil 1. Align the foil frame mark and the system outer...the foil frame when attaching to the shaver. Dry the outer foil section and the shaver completely. 8. Replacing the system outer foil and the inner blades appears on the LCD panel once a year. (This will differ depending on the OFF/ON switch while using the shaver. Caution for more than...
...the shaver. 4. This may damage your fingers on usage.) We recommend checking the system outer foil and the inner blades when it clicks. 10 system outer foil once every year inner blade once every two years Replacing the system outer foil 1. Align the foil frame mark and the system outer...the foil frame when attaching to the shaver. Dry the outer foil section and the shaver completely. 8. Replacing the system outer foil and the inner blades appears on the LCD panel once a year. (This will differ depending on the OFF/ON switch while using the shaver. Caution for more than...
Operating Instructions Multi-lingual
Page 11
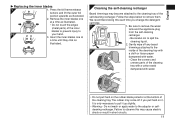
...) of the self-cleaning recharger. We recommend doing this may become attached to the cleaning tray of the inner blades to prevent injury to 23 your hand. 3. Insert the inner blades one at a time until they click as illustrated. It is only necessary to the adaptor or selfcleaning recharger. ... careful not to remove them. The rubber may come off any beard trimmings attached to observe this each time you pull hard on the rubber blade protector at the bottom of the cleaning tray with a cotton swab dampened with water. • Do not pull hard on it up slightly. &#...
...) of the self-cleaning recharger. We recommend doing this may become attached to the cleaning tray of the inner blades to prevent injury to 23 your hand. 3. Insert the inner blades one at a time until they click as illustrated. It is only necessary to the adaptor or selfcleaning recharger. ... careful not to remove them. The rubber may come off any beard trimmings attached to observe this each time you pull hard on the rubber blade protector at the bottom of the cleaning tray with a cotton swab dampened with water. • Do not pull hard on it up slightly. &#...
