

CT20SL13 User Guide
Page 3
... 18 Note: The warranty and service center information is located in the back of Contents Congratulations 2 Customer Record 2 Care and Cleaning 2 Specifications 2 Feature Chart 2 Installation 3 Television Location 3 Optional Cable Connections 3 AC Power Supply Cord 3 Cable / Antenna Connection 3 Important Information Regarding The Use Of Video Games, Computers, Or Other Fixed Image Displays...
... 18 Note: The warranty and service center information is located in the back of Contents Congratulations 2 Customer Record 2 Care and Cleaning 2 Specifications 2 Feature Chart 2 Installation 3 Television Location 3 Optional Cable Connections 3 AC Power Supply Cord 3 Cable / Antenna Connection 3 Important Information Regarding The Use Of Video Games, Computers, Or Other Fixed Image Displays...
CT20SL13 User Guide
Page 7
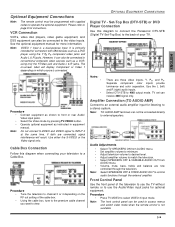
... inputs. Note: TO AUDIO AMP terminals can be connected to control audio functions through the television. The on-screen label will result. Cable Box Connection Follow this diagram to connect the Panasonic DTV-STB (Digital TV-Set-Top Box) to the back of the cable box. &#...such as a DVD player using only the Y/Video jack and Audio L & R jacks. Procedure • Connect equipment as instructed in equipment manual. Use either the S-VIDEO or the Video signal only. OPTIONAL EQUIPMENT CONNECTIONS Digital TV - Separate component color inputs provide luminance and color separation...
... inputs. Note: TO AUDIO AMP terminals can be connected to control audio functions through the television. The on-screen label will result. Cable Box Connection Follow this diagram to connect the Panasonic DTV-STB (Digital TV-Set-Top Box) to the back of the cable box. &#...such as a DVD player using only the Y/Video jack and Audio L & R jacks. Procedure • Connect equipment as instructed in equipment manual. Use either the S-VIDEO or the Video signal only. OPTIONAL EQUIPMENT CONNECTIONS Digital TV - Separate component color inputs provide luminance and color separation...
CT20SL13 User Guide
Page 13
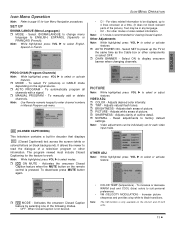
...select TV (antenna) or CABLE mode depending on the remote control is recommended for each video input mode. To manually add or delete channels. CC (CLOSED CAPTIONING) This television contains a built-in any language. • C2 - It allows the viewer to read the dialogue of picture.... r CC ON MUTE - Adjusts desired color intensity. Adjusts dark areas of a television program or other information. r NORMAL - Activates the onscreen Closed Caption feature by selecting one of video related information. VM (VELOCITY MODULATION) -...
...select TV (antenna) or CABLE mode depending on the remote control is recommended for each video input mode. To manually add or delete channels. CC (CLOSED CAPTIONING) This television contains a built-in any language. • C2 - It allows the viewer to read the dialogue of picture.... r CC ON MUTE - Adjusts desired color intensity. Adjusts dark areas of a television program or other information. r NORMAL - Activates the onscreen Closed Caption feature by selecting one of video related information. VM (VELOCITY MODULATION) -...
CT20SL13 User Guide
Page 14
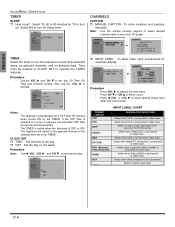
... r How Long? - To enter numbers and captions manually. To label video input connections for TV to operate the TIMER features. Select when CABLE box is connected to delete input label. 12 l Notes: • The television automatically turns OFF after 90 minutes will switch to set...Use the VOL u and CH q to set -top-box is connected to video input. The television will becancelled. • The TIMER is active when the television is connected to turn the television on selected days. Select when DVD is connected to activate. Set the day of the day....
... r How Long? - To enter numbers and captions manually. To label video input connections for TV to operate the TIMER features. Select when CABLE box is connected to delete input label. 12 l Notes: • The television automatically turns OFF after 90 minutes will switch to set...Use the VOL u and CH q to set -top-box is connected to video input. The television will becancelled. • The TIMER is active when the television is connected to turn the television on selected days. Select when DVD is connected to activate. Set the day of the day....
CT20SL13 User Guide
Page 20
... Icon Menu Operation 11 Idioma/langue 4, 11 Input Label 12 Initial Set Up Menu 4 Input Label Chart 12 Installation 3 L Lock 13 Lock Set 13 M Manual Caption 12 Manual Program 11 Menu Languages 11 Mode 11 Mono 13 N Normal 11, 13 O On Mute 11 Operating a Cable Box 7 Operating a DBS 7 Operating a DVD 7 Operating a...Computers, Or Other Fixed Image Displays 3 Remote Control Operation 6 S SAP 13 Set Up 11 Sharpness 11 Sleep 12 Speakers 13 Specifications 2 Stereo 13 Surround 13 T Television Location 3 Tilt Correction 4 Time 12 Timer 11, 12 Tint 11 Treble 13 Troubleshooting Chart 17 TV or Cable 4 U U.S.
... Icon Menu Operation 11 Idioma/langue 4, 11 Input Label 12 Initial Set Up Menu 4 Input Label Chart 12 Installation 3 L Lock 13 Lock Set 13 M Manual Caption 12 Manual Program 11 Menu Languages 11 Mode 11 Mono 13 N Normal 11, 13 O On Mute 11 Operating a Cable Box 7 Operating a DBS 7 Operating a DVD 7 Operating a...Computers, Or Other Fixed Image Displays 3 Remote Control Operation 6 S SAP 13 Set Up 11 Sharpness 11 Sleep 12 Speakers 13 Specifications 2 Stereo 13 Surround 13 T Television Location 3 Tilt Correction 4 Time 12 Timer 11, 12 Tint 11 Treble 13 Troubleshooting Chart 17 TV or Cable 4 U U.S.
CT20SL13 User Guide
Page 73
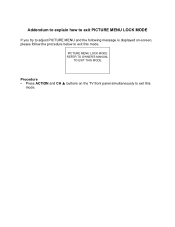
PICTURE MENU LOCK MODE REFER TO OWNER'S MANUAL TO EXIT THIS MODE Procedure • Press ACTION and CH S buttons on -screen, please follow the procedure below to exit this mode. Addendum to explain how to exit PICTURE MENU LOCK MODE If you try to adjust PICTURE MENU and the following message is displayed on the TV front panel simultaneously to exit this mode.
PICTURE MENU LOCK MODE REFER TO OWNER'S MANUAL TO EXIT THIS MODE Procedure • Press ACTION and CH S buttons on -screen, please follow the procedure below to exit this mode. Addendum to explain how to exit PICTURE MENU LOCK MODE If you try to adjust PICTURE MENU and the following message is displayed on the TV front panel simultaneously to exit this mode.
