Notebook Computer
Page 14
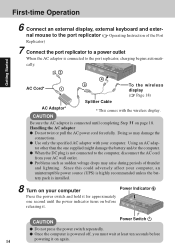
... of the Port Replicator) 7 Connect the port replicator to a power outlet When the AC adaptor is installed. 8 Turn on page 18. CAUTION Power Switch Do not press the power switch repeatedly. Using an AC adaptor other than the one second until completing Step 11 ...or the computer. Problems such as sudden voltage drops may damage the connections. cally. 2 AC Cord* 1 4 3 To the wireless display ( Page 18) AC Adaptor* CAUTION Splitter Cable * This comes with your AC wall outlet. Since this could adversely affect your computer, an uninterruptible power source (UPS...
... of the Port Replicator) 7 Connect the port replicator to a power outlet When the AC adaptor is installed. 8 Turn on page 18. CAUTION Power Switch Do not press the power switch repeatedly. Using an AC adaptor other than the one second until completing Step 11 ...or the computer. Problems such as sudden voltage drops may damage the connections. cally. 2 AC Cord* 1 4 3 To the wireless display ( Page 18) AC Adaptor* CAUTION Splitter Cable * This comes with your AC wall outlet. Since this could adversely affect your computer, an uninterruptible power source (UPS...
Notebook Computer
Page 18
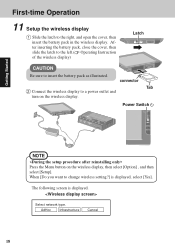
... displayed. Select network type. First-time Operation 11 Setup the wireless display 1 Slide the latch to insert the battery pack as illustrated. AdHoc Infrastructure Cancel 18 After inserting the battery pack, close the cover, then slide the latch to the left.( Operating Instruction of the wireless display) Latch CAUTION Be sure...
... displayed. Select network type. First-time Operation 11 Setup the wireless display 1 Slide the latch to insert the battery pack as illustrated. AdHoc Infrastructure Cancel 18 After inserting the battery pack, close the cover, then slide the latch to the left.( Operating Instruction of the wireless display) Latch CAUTION Be sure...

Notebook Computer
Page 22
... the screen. The following screen is displayed. The following screen is a sample. 19 Select on the taskbar, select [Password]. This screen is a sample. Getting Started 18 Set the necessary items, select [Next]. First-time Operation 17 Input [wdsp], then select [OK]. This screen is displayed.
... the screen. The following screen is displayed. The following screen is a sample. 19 Select on the taskbar, select [Password]. This screen is a sample. Getting Started 18 Set the necessary items, select [Next]. First-time Operation 17 Input [wdsp], then select [OK]. This screen is displayed.

Wireless Display
Page 18
D Open and remove the battery cover. G Slide the battery cover latch. C Pull the tab of the battery pack and remove it from the wireless display. 18 F Fit the battery cover into (A), and then close the battery cover. B Open the battery cover as in step D (Î above ). E Firmly attach the battery pack to the connector. H Attach the hand strap. I Attach the hand strap cover. „ To remove the battery pack A Slide the battery cover latch as in step C (Î above ). First-time Operation C Slide the battery cover latch.
D Open and remove the battery cover. G Slide the battery cover latch. C Pull the tab of the battery pack and remove it from the wireless display. 18 F Fit the battery cover into (A), and then close the battery cover. B Open the battery cover as in step D (Î above ). E Firmly attach the battery pack to the connector. H Attach the hand strap. I Attach the hand strap cover. „ To remove the battery pack A Slide the battery cover latch as in step C (Î above ). First-time Operation C Slide the battery cover latch.
