English
Page 3
...or tripped over unintentionally. TSSTTVMNDG_IB.qxd:Layout 1 12/14/09 5:53 PM Page 3 IMPORTANT SAFEGUARDS SAVE AND READ THESE INSTRUCTIONS When using toaster oven, pull the unit out a minimum of 6 inches away from the wall outlet. Pieces can be inserted in use and before cleaning. Return... appliance to cool before cleaning, unplug the toaster oven from walls on top of the appliance when in or taking off before unplugging. • To protect against risk of electrical shock, do...
...or tripped over unintentionally. TSSTTVMNDG_IB.qxd:Layout 1 12/14/09 5:53 PM Page 3 IMPORTANT SAFEGUARDS SAVE AND READ THESE INSTRUCTIONS When using toaster oven, pull the unit out a minimum of 6 inches away from the wall outlet. Pieces can be inserted in use and before cleaning. Return... appliance to cool before cleaning, unplug the toaster oven from walls on top of the appliance when in or taking off before unplugging. • To protect against risk of electrical shock, do...
English
Page 4
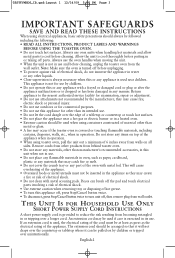
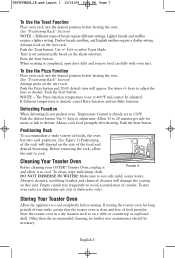
... fit, contact a qualified electrician. Features of Your Toaster Oven (See Figure 1) 1. Pizza - Starts baking/cooking process. Interior Light 3. Two Rack Positions 6. External Removable Crumb Tray 9. Select to bake 9-12" pizza. Sets the Oven Clock. Removable Wire Rack 9 2. Control Buttons 5.... INSTRUCTIONS Welcome Congratulations on Interior Light. Defrost - Easy Clean Interior Walls 7. Clock - Turns on your OSTER® Counter Top Oven, do not return to place of purchase. Start - Time Display 4. This plug fits a polarized outlet...
... fit, contact a qualified electrician. Features of Your Toaster Oven (See Figure 1) 1. Pizza - Starts baking/cooking process. Interior Light 3. Two Rack Positions 6. External Removable Crumb Tray 9. Select to bake 9-12" pizza. Sets the Oven Clock. Removable Wire Rack 9 2. Control Buttons 5.... INSTRUCTIONS Welcome Congratulations on Interior Light. Defrost - Easy Clean Interior Walls 7. Clock - Turns on your OSTER® Counter Top Oven, do not return to place of purchase. Start - Time Display 4. This plug fits a polarized outlet...
English
Page 5
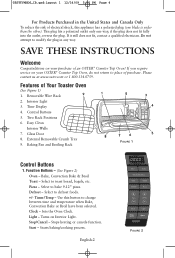
... the first time, please be sure to set desired temperature. Select a location for the toaster oven. The clock will reach an outlet. Use the timer (-) keys to : Remove any stickers from inside the toaster oven. button to set the minutes. Push the Timer +/- key to set time. Interior light turns on ... the First Time If you are using . Clean the rack, tray, and pan with oven mitt. DO NOT IMMERSE THE BODY OF THE UNIT IN WATER. Plug the toaster oven into the desired position before heating the oven. (See "Positioning Rack" Section) Push bake button once. You may not see the ...
... the first time, please be sure to set desired temperature. Select a location for the toaster oven. The clock will reach an outlet. Use the timer (-) keys to : Remove any stickers from inside the toaster oven. button to set the minutes. Push the Timer +/- key to set time. Interior light turns on ... the First Time If you are using . Clean the rack, tray, and pan with oven mitt. DO NOT IMMERSE THE BODY OF THE UNIT IN WATER. Plug the toaster oven into the desired position before heating the oven. (See "Positioning Rack" Section) Push bake button once. You may not see the ...
English
Page 6
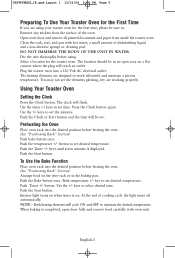
... to the first notch, leaving approximately a 3 inch gap at top. Push the Start button. How do I N G : DO NOT LEAVE TOASTER OVEN UNATTENDED. It is suggested to go with a shorter cooking time to make broiler pan. What are the best foods to cook evenly and faster. ... automatically. WA R N I adjust the time for Convection? Close the door to select desired temperature. Push the Broil button. N O T E - Answer: In your Countertop Oven there is needed. Push the Start button. When broiling is completed, open door fully and remove food carefully with and then add time if it...
... to the first notch, leaving approximately a 3 inch gap at top. Push the Start button. How do I N G : DO NOT LEAVE TOASTER OVEN UNATTENDED. It is suggested to go with a shorter cooking time to make broiler pan. What are the best foods to cook evenly and faster. ... automatically. WA R N I adjust the time for Convection? Close the door to select desired temperature. Push the Broil button. N O T E - Answer: In your Countertop Oven there is needed. Push the Start button. When broiling is completed, open door fully and remove food carefully with and then add time if it...
English
Page 7
... set automatically based on the shade selection. Use +/- Allow 15 to cool. Always cook food promptly after thawing. Cleaning Your Toaster Oven Before cleaning your OSTER® Toaster Oven, unplug it FIGURE 3 and allow the unit to 20 minutes per side for long periods of food particles. Abrasive cleaners, scrubbing brushes and chemical cleaners ...
... set automatically based on the shade selection. Use +/- Allow 15 to cool. Always cook food promptly after thawing. Cleaning Your Toaster Oven Before cleaning your OSTER® Toaster Oven, unplug it FIGURE 3 and allow the unit to 20 minutes per side for long periods of food particles. Abrasive cleaners, scrubbing brushes and chemical cleaners ...
English
Page 8
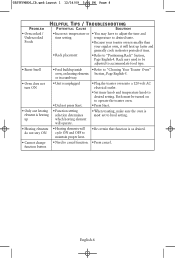
... must be adjusted to accommodate food type. • Burnt Smell • Food build-up inside • Refer to "Cleaning Your Toaster Oven" oven, on to operate the toaster oven. • Press Start. • Only one heating element is heating up • Function setting selection determines which heating element will ..., Page English-5. Rack may have to adjust the time and time setting temperature to desired taste. • Because your toaster oven is smaller than your regular oven, it will cycle ON and OFF to maintain proper heat. • Need to cancel function. • Be certain...
... must be adjusted to accommodate food type. • Burnt Smell • Food build-up inside • Refer to "Cleaning Your Toaster Oven" oven, on to operate the toaster oven. • Press Start. • Only one heating element is heating up • Function setting selection determines which heating element will ..., Page English-5. Rack may have to adjust the time and time setting temperature to desired taste. • Because your toaster oven is smaller than your regular oven, it will cycle ON and OFF to maintain proper heat. • Need to cancel function. • Be certain...


