English
Page 3
Note: Make sure the oven is turned off , then remove plug from wall outlet. Pieces can be pulled on by children or tripped over the countertop or tabletop where it can break off the pad and ... by children. • Do not operate this appliance for commercial purposes. • Do not use this or any appliance with a frayed or damaged cord or plug or after the appliance malfunctions or is not in its intended use . • Do not place any appliance is always necessary when this appliance off...
Note: Make sure the oven is turned off , then remove plug from wall outlet. Pieces can be pulled on by children or tripped over the countertop or tabletop where it can break off the pad and ... by children. • Do not operate this appliance for commercial purposes. • Do not use this or any appliance with a frayed or damaged cord or plug or after the appliance malfunctions or is not in its intended use . • Do not place any appliance is always necessary when this appliance off...
English
Page 4
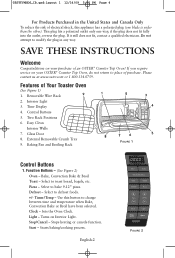
... Bake, Convection Bake or Broil have been selected. Interior Light 3. Pizza - Light - Start - if the plug does not fit fully into the outlet, reverse the plug. Features of an OSTER® Counter Top Oven! Control Buttons 5. Glass Door 8. Defrost - Timer/Temp - Please contact us at ...www.oster.com or 1.800.334.0759. Two Rack Positions 6. Stop/Cancel - English-2 Toast Bake Convection Bake ...
... Bake, Convection Bake or Broil have been selected. Interior Light 3. Pizza - Light - Start - if the plug does not fit fully into the outlet, reverse the plug. Features of an OSTER® Counter Top Oven! Control Buttons 5. Glass Door 8. Defrost - Timer/Temp - Please contact us at ...www.oster.com or 1.800.334.0759. Two Rack Positions 6. Stop/Cancel - English-2 Toast Bake Convection Bake ...
English
Page 5
... the desired temperature. Use the +/- keys to set desired temperature. button to set time. Push the Start button. Both heating elements will flash. Plug the toaster oven into the desired position before heating the oven. (See "Positioning Rack" Section) Arrange food on a flat counter where the... plug will be in an open door fully and remove food carefully with hot water, a small amount of cooking cycle the light turns off automatically...
... the desired temperature. Use the +/- keys to set desired temperature. button to set time. Push the Start button. Both heating elements will flash. Plug the toaster oven into the desired position before heating the oven. (See "Positioning Rack" Section) Arrange food on a flat counter where the... plug will be in an open door fully and remove food carefully with hot water, a small amount of cooking cycle the light turns off automatically...
English
Page 8
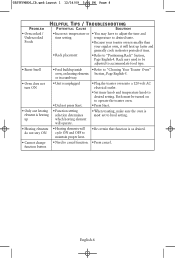
... build-up faster and generally cook in crumb tray. • Oven does not turn ON • Unit is unplugged • Did not press Start. • Plug the toaster oven into a 120-volt AC electrical outlet. • Set timer knob and temperature knob to desired setting. Rack may have to adjust the...
... build-up faster and generally cook in crumb tray. • Oven does not turn ON • Unit is unplugged • Did not press Start. • Plug the toaster oven into a 120-volt AC electrical outlet. • Set timer knob and temperature knob to desired setting. Rack may have to adjust the...