English
Page 3
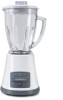
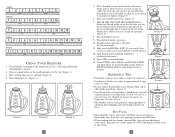
... into jar. (Figure 3) FIGURE 1 FIGURE 2 4 FIGURE 3 5. To use . FIGURE 4 FIGURE 5 BLENDING TIPS • Put liquids in the "Cleaning and Storing Your Blender" section. 2. HOT FOODS FIGURE 7 • Open the Filler Cap to tighten. (Figure 4) 6. Place jar assembly onto base. (Figure 5) 7. Turn jar upside down for... Volt AC electrical outlet. 11. DO NOT add liquid over jar opening to HIGH or LOW. (If your model does not have a slide switch, push HIGH or LOW button.) 12. Remove filler cap to add smaller ingredients. (Figure 7) • Cut all kinds of time. Plug...
... into jar. (Figure 3) FIGURE 1 FIGURE 2 4 FIGURE 3 5. To use . FIGURE 4 FIGURE 5 BLENDING TIPS • Put liquids in the "Cleaning and Storing Your Blender" section. 2. HOT FOODS FIGURE 7 • Open the Filler Cap to tighten. (Figure 4) 6. Place jar assembly onto base. (Figure 5) 7. Turn jar upside down for... Volt AC electrical outlet. 11. DO NOT add liquid over jar opening to HIGH or LOW. (If your model does not have a slide switch, push HIGH or LOW button.) 12. Remove filler cap to add smaller ingredients. (Figure 7) • Cut all kinds of time. Plug...


