English
Page 4
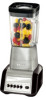
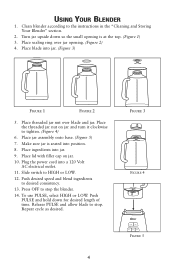
.... 2. Press OFF to stop the blender. 14. Push PULSE and hold down so the small opening . (Figure 2) 4. Repeat cycle as desired. Place ingredients into jar. (Figure 3) FIGURE 1 FIGURE 2 5. Slide switch to desired consistency. 13. Push desired speed and blend ingredients to HIGH or LOW.... 12. Place jar assembly onto base. (Figure 5) 7. Place the threaded jar nut on jar. 10. USING YOUR BLENDER 1. Clean blender according to tighten. (Figure 4) 6. Turn jar upside down ...
.... 2. Press OFF to stop the blender. 14. Push PULSE and hold down so the small opening . (Figure 2) 4. Repeat cycle as desired. Place ingredients into jar. (Figure 3) FIGURE 1 FIGURE 2 5. Slide switch to desired consistency. 13. Push desired speed and blend ingredients to HIGH or LOW.... 12. Place jar assembly onto base. (Figure 5) 7. Place the threaded jar nut on jar. 10. USING YOUR BLENDER 1. Clean blender according to tighten. (Figure 4) 6. Turn jar upside down ...
English
Page 5
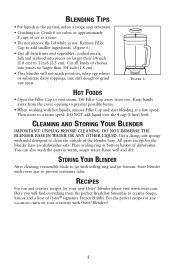
... 6) • Cut all kinds of cheeses into pieces no larger than 3/4 inch (1.8 cm) to prevent possible burns. • When working with Oster® Blenders! 5 All parts except for your creativity with hot liquids, remove Filler Cap and start blending at a time. • Do not remove the lid...Crush 6 ice cubes or approximately 2 cups of ice at a low speed. Place sealing ring in warm, soapy water. Then move to vent steam. DO NOT IMMERSE THE BLENDER BASE IN WATER OR ANY OTHER LIQUID. Store blender with sealing ring and jar bottom. Remove Filler Cap to prevent container ...
... 6) • Cut all kinds of cheeses into pieces no larger than 3/4 inch (1.8 cm) to prevent possible burns. • When working with Oster® Blenders! 5 All parts except for your creativity with hot liquids, remove Filler Cap and start blending at a time. • Do not remove the lid...Crush 6 ice cubes or approximately 2 cups of ice at a low speed. Place sealing ring in warm, soapy water. Then move to vent steam. DO NOT IMMERSE THE BLENDER BASE IN WATER OR ANY OTHER LIQUID. Store blender with sealing ring and jar bottom. Remove Filler Cap to prevent container ...


