English
Page 2
...; Unplug from wall outlet. • Do not use . • Periodically check the handle for other liquids. • Close supervision is necessary when Deep Fryer is used when moving fryer containing hot oil. Allow to cool before putting on or taking off parts, and before cleaning appliance. • Do not operate any appliance... hot pads. • Always attach plug to return for examination, repair, or electrical or mechanical adjustment. • The use of accessory attachments not recommended by Oster® may result in water or other than intended use appliance for looseness.
...; Unplug from wall outlet. • Do not use . • Periodically check the handle for other liquids. • Close supervision is necessary when Deep Fryer is used when moving fryer containing hot oil. Allow to cool before putting on or taking off parts, and before cleaning appliance. • Do not operate any appliance... hot pads. • Always attach plug to return for examination, repair, or electrical or mechanical adjustment. • The use of accessory attachments not recommended by Oster® may result in water or other than intended use appliance for looseness.
English
Page 3
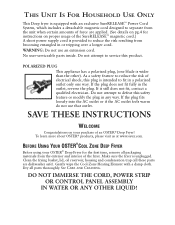
... not fit fully in a polarized outlet only one blade is wider than the other). SAVE THESE INSTRUCTIONS WELCOME Congratulations on your OSTER® Deep Fryer for instructions on pg.4 for the first time, remove all packaging materials from becoming entangled in any way. Gently wipe the ...SureRELEASE™ magnetic cord.) A short power supply cord is provided to reduce the risk resulting from the exterior and interior of an OSTER® Deep Fryer! Do not attempt to defeat this product. Clean the frying basket, lid, oil reservoir, housing and condensation trap (all parts thoroughly....
... not fit fully in a polarized outlet only one blade is wider than the other). SAVE THESE INSTRUCTIONS WELCOME Congratulations on your OSTER® Deep Fryer for instructions on pg.4 for the first time, remove all packaging materials from becoming entangled in any way. Gently wipe the ...SureRELEASE™ magnetic cord.) A short power supply cord is provided to reduce the risk resulting from the exterior and interior of an OSTER® Deep Fryer! Do not attempt to defeat this product. Clean the frying basket, lid, oil reservoir, housing and condensation trap (all parts thoroughly....
English
Page 4
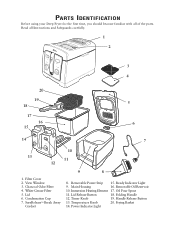
... 4. Frying Basket 14. Condensation Cup 7. Filter Cover 2. Lid Release Button 18. Main Housing 16. Read all of the parts. PARTS IDENTIFICATION Before using your Deep Fryer for the first time, you should become familiar with all Instructions and Safeguards carefully. 1 2 3 4 20 19 5 18 17 16 6 15 14 7 10 13 11 12...
... 4. Frying Basket 14. Condensation Cup 7. Filter Cover 2. Lid Release Button 18. Main Housing 16. Read all of the parts. PARTS IDENTIFICATION Before using your Deep Fryer for the first time, you should become familiar with all Instructions and Safeguards carefully. 1 2 3 4 20 19 5 18 17 16 6 15 14 7 10 13 11 12...

English
Page 5
... the handle release button. WARNING: DO NOT USE SureRELEASE™ POWER CORD SYSTEM TO DISCONNECT THE FRYER. ALWAYS DISCONNECT PLUG FROM WALL OUTLET FIRST TO DISCONNECT FRYER. USING YOUR OSTER® DEEP FRYER NOTE: Never turn on the fryer with paper towels before immersing food in Frying Basket at least 10-20 seconds. DO NOT...
... the handle release button. WARNING: DO NOT USE SureRELEASE™ POWER CORD SYSTEM TO DISCONNECT THE FRYER. ALWAYS DISCONNECT PLUG FROM WALL OUTLET FIRST TO DISCONNECT FRYER. USING YOUR OSTER® DEEP FRYER NOTE: Never turn on the fryer with paper towels before immersing food in Frying Basket at least 10-20 seconds. DO NOT...
English
Page 7
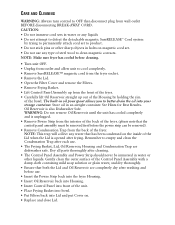
... cleaning. • Turn unit OFF. • Unplug from outlet and allow unit to cool completely. • Remove SureRELEASE™ magnetic cord from the fryer socket. • Remove the Lid. • Open the Filter Cover and remove the Filters. • Remove Frying Basket. • Lift Control Panel ... dry thoroughly. • Ensure that the control panel assembly must be removed first before use. • Insert the Power Strip back into the fryer Housing. • Insert Oil Reservoir back into Housing. • Insert Control Panel into front of the bowl. NOTE: This trap will collect any...
... cleaning. • Turn unit OFF. • Unplug from outlet and allow unit to cool completely. • Remove SureRELEASE™ magnetic cord from the fryer socket. • Remove the Lid. • Open the Filter Cover and remove the Filters. • Remove Frying Basket. • Lift Control Panel ... dry thoroughly. • Ensure that the control panel assembly must be removed first before use. • Insert the Power Strip back into the fryer Housing. • Insert Oil Reservoir back into Housing. • Insert Control Panel into front of the bowl. NOTE: This trap will collect any...
English
Page 8
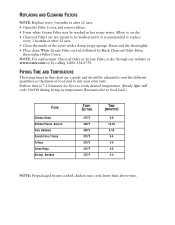
...Grease Filter on Lid, followed by calling 1-800-334-0759. NOTE: For replacement Charcoal Odor or Grease Filter, order through our website at www.oster.com or by Black Charcoal Odor Filter, then replace Filter Cover. FRYING TIME AND TEMPERATURE The frying times in hot soapy water. REPLACING AND ... suit your own taste. Allow to air dry. • Charcoal Filters are a guide and should be washed and it is 7-10 minutes for fryer to reach desired temperature. (Ready light will cycle On/Off during frying as temperature fluctuates due to food load.) FOOD Chicken Strips Chicken Pieces, Bone...
...Grease Filter on Lid, followed by calling 1-800-334-0759. NOTE: For replacement Charcoal Odor or Grease Filter, order through our website at www.oster.com or by Black Charcoal Odor Filter, then replace Filter Cover. FRYING TIME AND TEMPERATURE The frying times in hot soapy water. REPLACING AND ... suit your own taste. Allow to air dry. • Charcoal Filters are a guide and should be washed and it is 7-10 minutes for fryer to reach desired temperature. (Ready light will cycle On/Off during frying as temperature fluctuates due to food load.) FOOD Chicken Strips Chicken Pieces, Bone...
English
Page 9
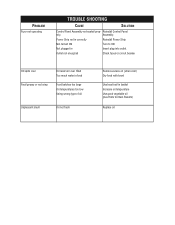
PROBLEM Fryer not operating TROUBLE SHOOTING CAUSE SOLUTION Control Panel Assembly not seated prop- Power Strip not in correctly Reinstall Power Strip Not turned ON Turn to ...
PROBLEM Fryer not operating TROUBLE SHOOTING CAUSE SOLUTION Control Panel Assembly not seated prop- Power Strip not in correctly Reinstall Power Strip Not turned ON Turn to ...
English
Page 10
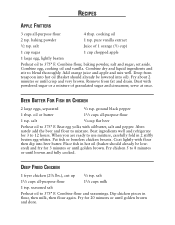
... flour then dip into hot oil (Basket should already be lowered into oil). Alternately add the beer and flour to blend thoroughly. DEEP FRIED CHICKEN 1 fryer chicken (21/2 lbs.), cut up 1/4 tsp. Combine dry and liquid ingredients and stir to mixture. BEER BATTER FOR FISH OR CHICKEN 2 large eggs, separated 1/4 tsp...
... flour then dip into hot oil (Basket should already be lowered into oil). Alternately add the beer and flour to blend thoroughly. DEEP FRIED CHICKEN 1 fryer chicken (21/2 lbs.), cut up 1/4 tsp. Combine dry and liquid ingredients and stir to mixture. BEER BATTER FOR FISH OR CHICKEN 2 large eggs, separated 1/4 tsp...


