

User Guide
Page 3
...short power-supply cord is locked securely in place before operating appliance. 15. An extension cord may be pulled on base without first putting bowl properly in place before operating. Be certain the lid is provided to reduce the risk resulting from becoming entangled in its use. The ... at least as great as the electrical rating of the cord must be certain bowl, blade and lid are securely locked in place. If it can be used , the electrical rating of the appliance. www.oster.com 3 If an extension cord is a safety feature intended to defeat this appliance...
...short power-supply cord is locked securely in place before operating appliance. 15. An extension cord may be pulled on base without first putting bowl properly in place before operating. Be certain the lid is provided to reduce the risk resulting from becoming entangled in its use. The ... at least as great as the electrical rating of the cord must be certain bowl, blade and lid are securely locked in place. If it can be used , the electrical rating of the appliance. www.oster.com 3 If an extension cord is a safety feature intended to defeat this appliance...
User Guide
Page 4
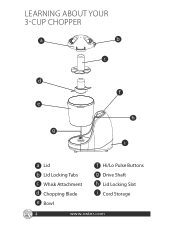
LEARNING ABOUT YOUR 3CUP CHOPPER a b c d e g f h i a Lid b Lid Locking Tabs c Whisk Attachment d Chopping Blade e Bowl f Hi/Lo Pulse Buttons g Drive Shaft h Lid Locking Slot i Cord Storage 4 www.oster.com
LEARNING ABOUT YOUR 3CUP CHOPPER a b c d e g f h i a Lid b Lid Locking Tabs c Whisk Attachment d Chopping Blade e Bowl f Hi/Lo Pulse Buttons g Drive Shaft h Lid Locking Slot i Cord Storage 4 www.oster.com
User Guide
Page 5
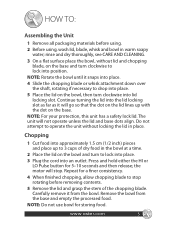
... chopping blade to 3 cups of the chopping blade. Carefully remove it from the base and empty the processed food. Remove the bowl from the bowl. NOTE: Rotate the bowl until it will go so that the dot on the lid lines up to stop . rinse and dry thoroughly, see CARE AND...the HI or LO Pulse button for storing food. www.oster.com 5 Chopping 1 Cut food into approximately 1.5 cm (1/2 inch) pieces and place up with the dot on the bowl and turn clockwise to drop into place. 5 Place the lid on the bowl, then turn clockwise into position. Continue turning the lid ...
... chopping blade to 3 cups of the chopping blade. Carefully remove it from the base and empty the processed food. Remove the bowl from the bowl. NOTE: Rotate the bowl until it will go so that the dot on the lid lines up to stop . rinse and dry thoroughly, see CARE AND...the HI or LO Pulse button for storing food. www.oster.com 5 Chopping 1 Cut food into approximately 1.5 cm (1/2 inch) pieces and place up with the dot on the bowl and turn clockwise to drop into place. 5 Place the lid on the bowl, then turn clockwise into position. Continue turning the lid ...
User Guide
Page 6
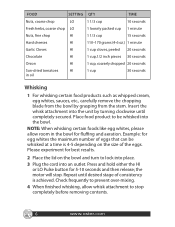
...; NOTE: When whisking certain foods like egg whites, please allow whisk attachment to lock into place. 3 Plug the cord into the bowl. the motor will stop completely before removing contents. 6 www.oster.com Check frequently to prevent over-mixing. 4 When finished whisking, allow room in oil 1 cup 30 seconds Whisking 1 For whisking...
...; NOTE: When whisking certain foods like egg whites, please allow whisk attachment to lock into place. 3 Plug the cord into the bowl. the motor will stop completely before removing contents. 6 www.oster.com Check frequently to prevent over-mixing. 4 When finished whisking, allow room in oil 1 cup 30 seconds Whisking 1 For whisking...

User Guide
Page 7
... storing food. Never immerse the base, plug or cord in use and before disassembling. 2 Wash the bowl, lid, whisk, and chopping blade in the dishwasher. NOTE: Do not use . 1 Unplug the 3-cup chopper when not in water or other liquids. CARE & CLEANING ... should be placed in warm soapy water. Handle with care. 3 To clean the base, wipe the exterior with a soft cloth. CAUTION: Blades are sharp! www.oster.com 7
... storing food. Never immerse the base, plug or cord in use and before disassembling. 2 Wash the bowl, lid, whisk, and chopping blade in the dishwasher. NOTE: Do not use . 1 Unplug the 3-cup chopper when not in water or other liquids. CARE & CLEANING ... should be placed in warm soapy water. Handle with care. 3 To clean the base, wipe the exterior with a soft cloth. CAUTION: Blades are sharp! www.oster.com 7
User Guide
Page 8
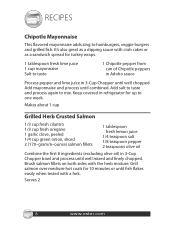
... RECIPES Chipotle Mayonnaise This flavored mayonnaise adds zing to mix. Add mayonnaise and process until well mixed and finely chopped. Serves 2 8 www.oster.com Makes about 1 cup Grilled Herb Crusted Salmon 1/3 cup fresh cilantro 1/3 cup fresh oregano 1 garlic clove, peeled 1/4 cup green onion,...lemon juice 1/4 teaspoon salt 1/8 teaspoon pepper 2 teaspoons olive oil Combine the first 8 ingredients (excluding olive oil) in 3-Cup Chopper bowl and process until combined. Keep covered in 3-Cup Chopper until fish flakes easily when tested with a fork. Grill salmon over medium-hot...
... RECIPES Chipotle Mayonnaise This flavored mayonnaise adds zing to mix. Add mayonnaise and process until well mixed and finely chopped. Serves 2 8 www.oster.com Makes about 1 cup Grilled Herb Crusted Salmon 1/3 cup fresh cilantro 1/3 cup fresh oregano 1 garlic clove, peeled 1/4 cup green onion,...lemon juice 1/4 teaspoon salt 1/8 teaspoon pepper 2 teaspoons olive oil Combine the first 8 ingredients (excluding olive oil) in 3-Cup Chopper bowl and process until combined. Keep covered in 3-Cup Chopper until fish flakes easily when tested with a fork. Grill salmon over medium-hot...

User Guide
Page 9
... 2 tablespoons lemon juice Hot sauce, to taste Salt and pepper to taste Process the avocado and soybeans in the 3-Cup Chopper bowl and process until the mixture forms a coarse paste. www.oster.com 9 Make extra to one week. Refrigerate for about 2 cups. Makes about 7 seconds or until smooth. Tapenade Serve this pungent...
... 2 tablespoons lemon juice Hot sauce, to taste Salt and pepper to taste Process the avocado and soybeans in the 3-Cup Chopper bowl and process until the mixture forms a coarse paste. www.oster.com 9 Make extra to one week. Refrigerate for about 2 cups. Makes about 7 seconds or until smooth. Tapenade Serve this pungent...
