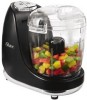

User Guide
Page 2
The use outdoors. 10. The blade is not intended to prepare large quantities of food at ...or damaged cord, or plug, or after the appliance malfunctions, or has been damaged in heated oven. 2 www.oster.com Unplug from outlet when not in use, before putting on or near children. 4. DO NOT operate any appliance... nearest authorized service facility for examination, repair, or electrical or mechanical adjustment. 8. Take appliance to an Authorized Oster® Service Center for immediate consumption. DO NOT place on or taking off parts, and before using electrical appliances...
The use outdoors. 10. The blade is not intended to prepare large quantities of food at ...or damaged cord, or plug, or after the appliance malfunctions, or has been damaged in heated oven. 2 www.oster.com Unplug from outlet when not in use, before putting on or near children. 4. DO NOT operate any appliance... nearest authorized service facility for examination, repair, or electrical or mechanical adjustment. 8. Take appliance to an Authorized Oster® Service Center for immediate consumption. DO NOT place on or taking off parts, and before using electrical appliances...

User Guide
Page 3
... into the outlet, reverse the plug. SHORT POWER SUPPLY CORD INSTRUCTIONS A short power-supply cord is locked securely in place before operating. www.oster.com 3 14. Keep hands and utensils away from wall outlet. 16. If it can be at least as great as the electrical rating ...of the cord must be pulled on base without first putting bowl properly in place. This plug fits a polarized outlet only one blade is a safety feature intended to defeat the lid safety lock mechanism. 19. Check bowl for anything other ). An extension cord may be used ...
... into the outlet, reverse the plug. SHORT POWER SUPPLY CORD INSTRUCTIONS A short power-supply cord is locked securely in place before operating. www.oster.com 3 14. Keep hands and utensils away from wall outlet. 16. If it can be at least as great as the electrical rating ...of the cord must be pulled on base without first putting bowl properly in place. This plug fits a polarized outlet only one blade is a safety feature intended to defeat the lid safety lock mechanism. 19. Check bowl for anything other ). An extension cord may be used ...
User Guide
Page 4
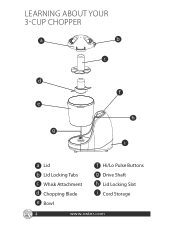
LEARNING ABOUT YOUR 3CUP CHOPPER a b c d e g f h i a Lid b Lid Locking Tabs c Whisk Attachment d Chopping Blade e Bowl f Hi/Lo Pulse Buttons g Drive Shaft h Lid Locking Slot i Cord Storage 4 www.oster.com
LEARNING ABOUT YOUR 3CUP CHOPPER a b c d e g f h i a Lid b Lid Locking Tabs c Whisk Attachment d Chopping Blade e Bowl f Hi/Lo Pulse Buttons g Drive Shaft h Lid Locking Slot i Cord Storage 4 www.oster.com
User Guide
Page 5
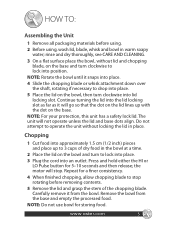
...place. 5 Place the lid on the base and turn to operate the unit without lid and chopping blade, on the bowl, then turn clockwise into an outlet. Do not attempt to lock into place. 3...lid lines up to stop . The unit will stop rotating before using. 2 Before using, wash lid, blade, whisk and bowl in warm soapy water; NOTE: For your protection, this unit has a safety lock...and empty the processed food. NOTE: Do not use bowl for 5-10 seconds and then release; www.oster.com 5 HOW TO: Assembling the Unit 1 Remove all packaging materials before removing contents. 5 Remove the...
...place. 5 Place the lid on the base and turn to operate the unit without lid and chopping blade, on the bowl, then turn clockwise into an outlet. Do not attempt to lock into place. 3...lid lines up to stop . The unit will stop rotating before using. 2 Before using, wash lid, blade, whisk and bowl in warm soapy water; NOTE: For your protection, this unit has a safety lock...and empty the processed food. NOTE: Do not use bowl for 5-10 seconds and then release; www.oster.com 5 HOW TO: Assembling the Unit 1 Remove all packaging materials before removing contents. 5 Remove the...
User Guide
Page 6
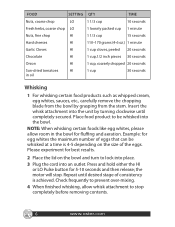
...oil 1 cup 30 seconds Whisking 1 For whisking certain food products such as whipped cream, egg whites, sauces, etc., carefully remove the chopping blade from the bowl by turning clockwise until desired stage of consistency is 4-5 depending on the bowl and turn to lock into place. 3 Plug the... like egg whites, please allow whisk attachment to be whisked at a time is achieved. the motor will stop completely before removing contents. 6 www.oster.com Example: for egg whites the maximum number of the eggs. Place food product to stop . FOOD SETTING QTY TIME Nuts, coarse chop LO...
...oil 1 cup 30 seconds Whisking 1 For whisking certain food products such as whipped cream, egg whites, sauces, etc., carefully remove the chopping blade from the bowl by turning clockwise until desired stage of consistency is 4-5 depending on the bowl and turn to lock into place. 3 Plug the... like egg whites, please allow whisk attachment to be whisked at a time is achieved. the motor will stop completely before removing contents. 6 www.oster.com Example: for egg whites the maximum number of the eggs. Place food product to stop . FOOD SETTING QTY TIME Nuts, coarse chop LO...

User Guide
Page 7
...dishwasher. Handle with care. 3 To clean the base, wipe the exterior with a soft cloth. Allow the chopping blade to stop rotating before cleaning. Rinse and dry thoroughly. CAUTION: Blades are sharp! 5 Remove the lid and carefully remove the whisk attachment from the base and empty the processed food...the 3-cup chopper when not in water or other liquids. Never immerse the base, plug or cord in use bowl for storing food. www.oster.com 7 CARE & CLEANING This appliance should be placed in warm soapy water. Dry thoroughly with a damp cloth or sponge. Remove the bowl ...
...dishwasher. Handle with care. 3 To clean the base, wipe the exterior with a soft cloth. Allow the chopping blade to stop rotating before cleaning. Rinse and dry thoroughly. CAUTION: Blades are sharp! 5 Remove the lid and carefully remove the whisk attachment from the base and empty the processed food...the 3-cup chopper when not in water or other liquids. Never immerse the base, plug or cord in use bowl for storing food. www.oster.com 7 CARE & CLEANING This appliance should be placed in warm soapy water. Dry thoroughly with a damp cloth or sponge. Remove the bowl ...

