
User Manual
Page 1
EN EasyPlus Talk o'Clock MODEL: EC101 USER MANUAL About Oregon Scientific 7 EU Declaration of conformity 7 FCC Statement 8 INDEX Overview 2 Front view 2 Bottom view 2 Back view 3 LCD display 3 Getting started 3 Main unit installation 3 Clock 4 Clock reception 4 Manually set clock 4 Alarm 5 Radio 5 Projection 6 Audible time function 6 Display brightness 6 Reset 6 Specifications 6 Precautions 6 1
EN EasyPlus Talk o'Clock MODEL: EC101 USER MANUAL About Oregon Scientific 7 EU Declaration of conformity 7 FCC Statement 8 INDEX Overview 2 Front view 2 Bottom view 2 Back view 3 LCD display 3 Getting started 3 Main unit installation 3 Clock 4 Clock reception 4 Manually set clock 4 Alarm 5 Radio 5 Projection 6 Audible time function 6 Display brightness 6 Reset 6 Specifications 6 Precautions 6 1
User Manual
Page 2
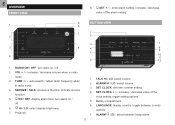
... function 5. ON / OFF: display alarm time; Battery compartment 6. LANGUAGE: display country; VOL + / -: increase / decrease volume when in radio mode 4. TALK HI / LO: select volume 2. ALARM / : select between country options 7. SNOOZE / TALK: announce the time; SET CLOCK + / -: increase / decrease value of the alarm setting 5 BOTTOM view 1 6 2 7 1 2 3 7 3 8 4 8 9 5 4 10 11 6 12 1. toggle between beep alarm...
... function 5. ON / OFF: display alarm time; Battery compartment 6. LANGUAGE: display country; VOL + / -: increase / decrease volume when in radio mode 4. TALK HI / LO: select volume 2. ALARM / : select between country options 7. SNOOZE / TALK: announce the time; SET CLOCK + / -: increase / decrease value of the alarm setting 5 BOTTOM view 1 6 2 7 1 2 3 7 3 8 4 8 9 5 4 10 11 6 12 1. toggle between beep alarm...

User Manual
Page 3
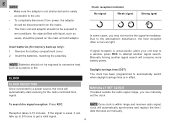
... projection on Getting started MAIN UNIT INSTALLATION 1. FOCUS wheel: adjust projection focus 2. RCC: enable / disable clock reception 3 5 BACK view 6 7 1 1. FLIP: flip projection 180° 9. RESET: reset unit to select nearest radio signal (if applicable). 2. Adaptor socket 1. : radio controlled clock reception icon 2. Calendar 6. : main unit batteries low / no battery 7. : daily alarm is on / off 1 10...
... projection on Getting started MAIN UNIT INSTALLATION 1. FOCUS wheel: adjust projection focus 2. RCC: enable / disable clock reception 3 5 BACK view 6 7 1 1. FLIP: flip projection 180° 9. RESET: reset unit to select nearest radio signal (if applicable). 2. Adaptor socket 1. : radio controlled clock reception icon 2. Calendar 6. : main unit batteries low / no battery 7. : daily alarm is on / off 1 10...
User Manual
Page 4
... disturbance, the best reception often occurs at night. take up only): 1. NOTE Once clock is within range and receives radio signal, clock will automatically start scanning for the radio-controlled time signal. EN NOTE • Make sure the adaptor is not obstructed and ...or fire. Insert the batteries, matching the polarities. Clock Clock reception Once connected to a power source, the clock will automatically synchronise and replace the time / Reception takes 2-10 minutes. Manually set clock If located outside the radio signal range, you may not receive the signal ...
... disturbance, the best reception often occurs at night. take up only): 1. NOTE Once clock is within range and receives radio signal, clock will automatically start scanning for the radio-controlled time signal. EN NOTE • Make sure the adaptor is not obstructed and ...or fire. Insert the batteries, matching the polarities. Clock Clock reception Once connected to a power source, the clock will automatically synchronise and replace the time / Reception takes 2-10 minutes. Manually set clock If located outside the radio signal range, you may not receive the signal ...
User Manual
Page 5
... activate it for 5 seconds. To save setting, do not press any key to silence it again after 24 hours. ALARM To set the clock to: 0 Pacific time +1 Mountain time +2 Central time +3 Easter time Select language to display weekday: Press LANGUAGE repeatedly to select. Press ... do not press any key for 5 seconds. to rapidly change value, press and hold TUNE + / - Press SET CLOCK to select. To silence the alarm: • Press SNOOZE / TALK to turn radio on . To rapidly change values. 3. The settings order is on . 1. Select between ENG / FRE / GER / ...
... activate it for 5 seconds. To save setting, do not press any key to silence it again after 24 hours. ALARM To set the clock to: 0 Pacific time +1 Mountain time +2 Central time +3 Easter time Select language to display weekday: Press LANGUAGE repeatedly to select. Press ... do not press any key for 5 seconds. to rapidly change value, press and hold TUNE + / - Press SET CLOCK to select. To silence the alarm: • Press SNOOZE / TALK to turn radio on . To rapidly change values. 3. The settings order is on . 1. Select between ENG / FRE / GER / ...
User Manual
Page 8
... residential installation. Please call our customer service number (listed on our website at www.oregonscientific.com), or on request via our Oregon Scientific Customer Service. WARNING Changes or modifications not expressly approved by one or more of Conformity is not to be determined by turning the...This equipment has been tested and found to Part 15 of the FCC Rules. EN o'Clock (Model: EC101) is in a particular installation. Operation is connected. • Consult the dealer or an experienced radio / TV technician for all inquiries instead. to comply with Part 15 of the FCC ...
... residential installation. Please call our customer service number (listed on our website at www.oregonscientific.com), or on request via our Oregon Scientific Customer Service. WARNING Changes or modifications not expressly approved by one or more of Conformity is not to be determined by turning the...This equipment has been tested and found to Part 15 of the FCC Rules. EN o'Clock (Model: EC101) is in a particular installation. Operation is connected. • Consult the dealer or an experienced radio / TV technician for all inquiries instead. to comply with Part 15 of the FCC ...


