
Owners Guide
Page 2
...stationary position for any opening blocked; To unplug, grasp the plug, not the cord. • Do not handle plug or appliance with wet hands. • Do not put any object into the power outlet only one blade wider than the other). This plug will fit into openings...followed, including the following: READ ALL INSTRUCTIONS BEFORE USING THIS VACUUM CLEANER WARNING To reduce the risk of time. This is equipped with damaged cord or plug. Do not defeat the purpose of Contents, Important Safety Instructions page 2 Maintenance, Customer Service, Warranty, and Accessories page 3 Assembly...
...stationary position for any opening blocked; To unplug, grasp the plug, not the cord. • Do not handle plug or appliance with wet hands. • Do not put any object into the power outlet only one blade wider than the other). This plug will fit into openings...followed, including the following: READ ALL INSTRUCTIONS BEFORE USING THIS VACUUM CLEANER WARNING To reduce the risk of time. This is equipped with damaged cord or plug. Do not defeat the purpose of Contents, Important Safety Instructions page 2 Maintenance, Customer Service, Warranty, and Accessories page 3 Assembly...

Owners Guide
Page 4
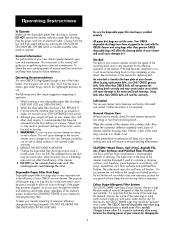
... numbered 9 as follows: 1 Handle section, upper 1 2 Tube, lower 3 Power head 4 Outer bag 5 Paper filter dust bag 5 4 12 6 Power cord 13 6 7 Retaining spring 2 8 Bag tension bar 9 Zip fastener 10 On/off switch 11 Cord hook 7 15 14 12 Plastic loop/cable clamp 8 13 Connector assembly 14 Fan... assembly (13). Slide the cardboard collar onto bag dock door until it snaps. 4 Wrap power cord (6) around cord wrap (11) and cord wrap (13) and secure to "U" shaped part on cord assembly into loop. Dust seal will close automatically BAG INSTALLATION : 1. Assembly To assist you in...
... numbered 9 as follows: 1 Handle section, upper 1 2 Tube, lower 3 Power head 4 Outer bag 5 Paper filter dust bag 5 4 12 6 Power cord 13 6 7 Retaining spring 2 8 Bag tension bar 9 Zip fastener 10 On/off switch 11 Cord hook 7 15 14 12 Plastic loop/cable clamp 8 13 Connector assembly 14 Fan... assembly (13). Slide the cardboard collar onto bag dock door until it snaps. 4 Wrap power cord (6) around cord wrap (11) and cord wrap (13) and secure to "U" shaped part on cord assembly into loop. Dust seal will close automatically BAG INSTALLATION : 1. Assembly To assist you in...
Owners Guide
Page 5
... bag is dust in place. Operating Instructions To Operate Make sure the disposable paper filter dust bag is installed properly. Plug the power cord into an electrical outlet. To obtain the most satisfying years of service read the instructions and keep your cleaner operating at any period... basic care and maintenance. General Information The performance of your new cleaner greatly depends upon care and maintenance. Belts other than genuine ORECK disposable bags will void the warranty. DO NOT FILL ABOVE THE LINE INDICATED ON THE DUST BAG. Be sure the disposable paper ...
... bag is dust in place. Operating Instructions To Operate Make sure the disposable paper filter dust bag is installed properly. Plug the power cord into an electrical outlet. To obtain the most satisfying years of service read the instructions and keep your cleaner operating at any period... basic care and maintenance. General Information The performance of your new cleaner greatly depends upon care and maintenance. Belts other than genuine ORECK disposable bags will void the warranty. DO NOT FILL ABOVE THE LINE INDICATED ON THE DUST BAG. Be sure the disposable paper ...

Owners Guide
Page 6
.... Place the opposite end of the belt on the pulley, ensuring that the belt encircles the entire circumference of the housing. WARNING: Unplug cord from the storage channel. Then, remove the belt and brush roll from electrical outlet before servicing. When rotating bearings, make sure both bearing ...belt from the brush roll pulley and the motor drive shaft. Slide the door forward by sliding it into the groove at each end of power head. If brush bristles do not extend beyond base plate, brush should be in the new position. Using your machine. When rotating, ...
.... Place the opposite end of the belt on the pulley, ensuring that the belt encircles the entire circumference of the housing. WARNING: Unplug cord from the storage channel. Then, remove the belt and brush roll from electrical outlet before servicing. When rotating bearings, make sure both bearing ...belt from the brush roll pulley and the motor drive shaft. Slide the door forward by sliding it into the groove at each end of power head. If brush bristles do not extend beyond base plate, brush should be in the new position. Using your machine. When rotating, ...


