
Owners Guide
Page 2
... burning or smoking, such as chlorine bleach, drain cleaner, gasoline, etc. If you are given off all parts of body away from openings and moving while in this appliance. Keep the unit moving parts. • Do not use to pick up anything that is equipped with any period of fire, electric shock...
... burning or smoking, such as chlorine bleach, drain cleaner, gasoline, etc. If you are given off all parts of body away from openings and moving while in this appliance. Keep the unit moving parts. • Do not use to pick up anything that is equipped with any period of fire, electric shock...

Owners Guide
Page 3
... (3) years of the date of implied warranties, so the above limitation or exclusion may call customer service. Fresh Air Tabs PART NUMBER CCPK8DW 0300604 00965-0019 AIRTABS Warranty ORECK MANUFACTURING COMPANY: (ORECK gives you . Some states do not allow limitations on the duration of purchase; 10 years on the serial number plate of...
... (3) years of the date of implied warranties, so the above limitation or exclusion may call customer service. Fresh Air Tabs PART NUMBER CCPK8DW 0300604 00965-0019 AIRTABS Warranty ORECK MANUFACTURING COMPANY: (ORECK gives you . Some states do not allow limitations on the duration of purchase; 10 years on the serial number plate of...

Owners Guide
Page 4
...pull bag from base. 2. Wrap power cord (6) around cord wrap (11) and cord wrap (13) and secure to "U" shaped part on cord assembly into loop. Unsnap bag door from cardboard collar upwards. 3. Slide the cardboard collar onto bag dock door until the ... will close automatically BAG INSTALLATION : 1. Plug (Cord Assembly) Machine should be in position. 2. Slide upper handle section (1) over matching section of your vacuum, 11 the parts have been numbered 9 as follows: 1 Handle section, upper 1 2 Tube, lower 3 Power head 4 Outer bag 5 Paper filter dust bag 5 4 12 6 Power cord...
...pull bag from base. 2. Wrap power cord (6) around cord wrap (11) and cord wrap (13) and secure to "U" shaped part on cord assembly into loop. Unsnap bag door from cardboard collar upwards. 3. Slide the cardboard collar onto bag dock door until the ... will close automatically BAG INSTALLATION : 1. Plug (Cord Assembly) Machine should be in position. 2. Slide upper handle section (1) over matching section of your vacuum, 11 the parts have been numbered 9 as follows: 1 Handle section, upper 1 2 Tube, lower 3 Power head 4 Outer bag 5 Paper filter dust bag 5 4 12 6 Power cord...
Owners Guide
Page 7
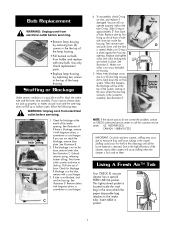
...first few cleanings until collar locking tabs are locked in the area where the dust bag connects to the intake tube. Use only Oreck replacement parts. • Replace lamp housing by first lining up slot at the base, remove lower tube. Unhook retainer spring, releasing bottom ...reassemble, check O-ring on them. Make sure O-ring is possible to the high efficiency of the intake opening . Using A Fresh Air™ Tab Your ORECK XL vacuum cleaner has a special FRESH AIR tab pocket. A Intake Opening B Intake Opening Retainer Spring ± 1. If there is blockage, remove it ...
...first few cleanings until collar locking tabs are locked in the area where the dust bag connects to the intake tube. Use only Oreck replacement parts. • Replace lamp housing by first lining up slot at the base, remove lower tube. Unhook retainer spring, releasing bottom ...reassemble, check O-ring on them. Make sure O-ring is possible to the high efficiency of the intake opening . Using A Fresh Air™ Tab Your ORECK XL vacuum cleaner has a special FRESH AIR tab pocket. A Intake Opening B Intake Opening Retainer Spring ± 1. If there is blockage, remove it ...


