
STYLUS-7010 Instruction Manual (English)
Page 1
... manual in this manual. ● The screen and camera illustrations shown in a safe place for purchasing an Olympus digital camera. Unless otherwise specified, the explanation about these instructions carefully to use your camera before taking important photographs. ● In the interest of... continually improving products, Olympus reserves the right to update or modify information contained in this manual were produced...
... manual in this manual. ● The screen and camera illustrations shown in a safe place for purchasing an Olympus digital camera. Unless otherwise specified, the explanation about these instructions carefully to use your camera before taking important photographs. ● In the interest of... continually improving products, Olympus reserves the right to update or modify information contained in this manual were produced...
STYLUS-7010 Instruction Manual (English)
Page 2
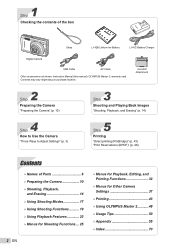
... ¾ Using Playback Features 23 ¾ Menus for Shooting Functions.... 25 2 EN ¾ Menus for Playback, Editing, and Printing Functions 32 ¾ Menus for Other Camera Settings 37 ¾ Printing 43 ¾ Using OLYMPUS Master 2 48 ¾ Usage Tips 50 ¾ Appendix 55 ¾ Index 70 microSD Attachment 2 Step Preparing the...
... ¾ Using Playback Features 23 ¾ Menus for Shooting Functions.... 25 2 EN ¾ Menus for Playback, Editing, and Printing Functions 32 ¾ Menus for Other Camera Settings 37 ¾ Printing 43 ¾ Using OLYMPUS Master 2 48 ¾ Usage Tips 50 ¾ Appendix 55 ¾ Index 70 microSD Attachment 2 Step Preparing the...

STYLUS-7010 Instruction Manual (English)
Page 3
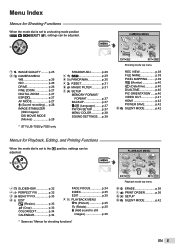
...can be accessed through the menus, including functions used during shooting and playback and the date/time and screen display. "Menu Settings" (p. 25 to 42) CAMERA MENU 1 WB 2 ISO DRIVE FINE ZOOM DIGITAL ZOOM EXIT MENU AUTO AUTO o OFF ON SET OK 6 Press the m button to select the desired ...submenu 1, and press the E button. There may not be additional operations. CAMERA MENU 1 WB 2 ISO DRIVE FINE ZOOM DIGITAL ZOOM EXIT MENU AUTO AUTO o OFF OFF SET OK Submenu 1 4 Use kl to complete the setting. The...
...can be accessed through the menus, including functions used during shooting and playback and the date/time and screen display. "Menu Settings" (p. 25 to 42) CAMERA MENU 1 WB 2 ISO DRIVE FINE ZOOM DIGITAL ZOOM EXIT MENU AUTO AUTO o OFF ON SET OK 6 Press the m button to select the desired ...submenu 1, and press the E button. There may not be additional operations. CAMERA MENU 1 WB 2 ISO DRIVE FINE ZOOM DIGITAL ZOOM EXIT MENU AUTO AUTO o OFF OFF SET OK Submenu 1 4 Use kl to complete the setting. The...
STYLUS-7010 Instruction Manual (English)
Page 5
... J s p.29 4 G PANORAMA p.30 5 D RESET p.31 6 Q MAGIC FILTER p.31 7 E SETUP MEMORY FORMAT/ FORMAT p.37 BACKUP p.37 W (Language)........ p.38 CAMERA MENU 6 1 5 2 7 4 3 8 EXIT MENU SET OK Shooting mode top menu REC VIEW p.38 FILE NAME p.39 PIXEL MAPPING......... p.40 VIDEO OUT p.41 HDMI p....p.36 8 E SETUP* 9 F SILENT MODE p.42 EN 5 p.39 s (Monitor p.40 X (Date/time p.40 DUALTIME p.40 PIC ORIENTATION*..... p.25 2 B CAMERA MENU WB p.26 ISO p.26 DRIVE p.26 FINE ZOOM p.27 DIGITAL ZOOM p.27 ESP/n p.27 AF MODE p.27 R (Sound recording).... p.37 PW ON SETUP p.37...
... J s p.29 4 G PANORAMA p.30 5 D RESET p.31 6 Q MAGIC FILTER p.31 7 E SETUP MEMORY FORMAT/ FORMAT p.37 BACKUP p.37 W (Language)........ p.38 CAMERA MENU 6 1 5 2 7 4 3 8 EXIT MENU SET OK Shooting mode top menu REC VIEW p.38 FILE NAME p.39 PIXEL MAPPING......... p.40 VIDEO OUT p.41 HDMI p....p.36 8 E SETUP* 9 F SILENT MODE p.42 EN 5 p.39 s (Monitor p.40 X (Date/time p.40 DUALTIME p.40 PIC ORIENTATION*..... p.25 2 B CAMERA MENU WB p.26 ISO p.26 DRIVE p.26 FINE ZOOM p.27 DIGITAL ZOOM p.27 ESP/n p.27 AF MODE p.27 R (Sound recording).... p.37 PW ON SETUP p.37...

STYLUS-7010 Instruction Manual (English)
Page 6
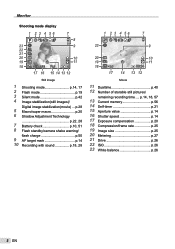
Names of Parts Camera unit 1 7 2 8 3 9 4 5 10 6 11 STYLUS-7010/μ-7010 2 10 4 6 11 1 Connector cover p.41, 43, 48 2 Multi-connector p.41, 43, 48 3 HDMI mini connector p.41 4 Strap eyelet p.10 5 Flash p.19 6 Battery/card compartment cover p.11, 51 * STYLUS-7020/μ-7020 only 7 Self-timer lamp p.21 8 Microphone p.28, 36 9 Lens p.55 10 Tripod socket 11 Speaker 6 EN
Names of Parts Camera unit 1 7 2 8 3 9 4 5 10 6 11 STYLUS-7010/μ-7010 2 10 4 6 11 1 Connector cover p.41, 43, 48 2 Multi-connector p.41, 43, 48 3 HDMI mini connector p.41 4 Strap eyelet p.10 5 Flash p.19 6 Battery/card compartment cover p.11, 51 * STYLUS-7020/μ-7020 only 7 Self-timer lamp p.21 8 Microphone p.28, 36 9 Lens p.55 10 Tripod socket 11 Speaker 6 EN
STYLUS-7010 Instruction Manual (English)
Page 8
p.28 5 Macro/super macro p.20 6 Shadow Adjustment Technology p.22, 28 7 Battery check p.10, 51 8 Flash standby/camera shake warning/ flash charge p.50 9 AF target mark p.14 10 Recording with sound p.18, 28 1 2 3 4 56 7 23 9 20 19 VGA 18 15 +2.0 10 11 ...
p.28 5 Macro/super macro p.20 6 Shadow Adjustment Technology p.22, 28 7 Battery check p.10, 51 8 Flash standby/camera shake warning/ flash charge p.50 9 AF target mark p.14 10 Recording with sound p.18, 28 1 2 3 4 56 7 23 9 20 19 VGA 18 15 +2.0 10 11 ...

STYLUS-7010 Instruction Manual (English)
Page 10
... a plug-in type) differs depending on the battery and the charger, see "Battery and charger" (p. 55). When to 2 hours). If you purchased the camera. Preparing the Camera Attaching the camera strap Pull the strap tight so that it blinks, the battery may not be inserted correctly or the battery or the charger may...
... a plug-in type) differs depending on the battery and the charger, see "Battery and charger" (p. 55). When to 2 hours). If you purchased the camera. Preparing the Camera Attaching the camera strap Pull the strap tight so that it blinks, the battery may not be inserted correctly or the battery or the charger may...
STYLUS-7010 Instruction Manual (English)
Page 11
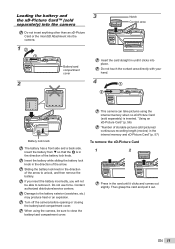
... Press in the card until it out. Do not use force. When using the internal memory when no xD-Picture Card (sold separately) into the camera Do not insert anything other than an xD-Picture Card or the microSD Attachment into place. "Using an xD-Picture Card" (p. 56) "Number of... of the arrow. EN 11 Damage to remove it clicks and comes out slightly. Then grasp the card and pull it clicks into the camera. 1 Notch Contact area Battery/card compartment cover Insert the card straight in until it . Contact authorized distributors/service centers. Insert the battery ...
... Press in the card until it out. Do not use force. When using the internal memory when no xD-Picture Card (sold separately) into the camera Do not insert anything other than an xD-Picture Card or the microSD Attachment into place. "Using an xD-Picture Card" (p. 56) "Number of... of the arrow. EN 11 Damage to remove it clicks and comes out slightly. Then grasp the card and pull it clicks into the camera. 1 Notch Contact area Battery/card compartment cover Insert the card straight in until it . Contact authorized distributors/service centers. Insert the battery ...
STYLUS-7010 Instruction Manual (English)
Page 12
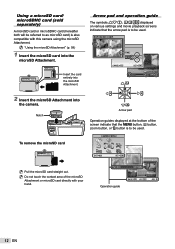
...14 /00:34 / 1 4 3 2 Arrow pad Operation guides displayed at the bottom of the microSD Attachment or microSD card directly with this camera using the microSD Attachment. Do not touch the contact area of the screen indicate that the arrow pad is to be used . IMAGE IN ... 4 BACK MENU 5 6 OK GO S 12 EN Insert the card entirely into the microSD Attachment. 2 Insert the microSD Attachment into the microSD Attachment. CAMERA MENU Pull the microSD card straight out. Notch To remove the microSD card Arrow pad and operation guide The symbols 1243, displayed on various settings...
...14 /00:34 / 1 4 3 2 Arrow pad Operation guides displayed at the bottom of the microSD Attachment or microSD card directly with this camera using the microSD Attachment. Do not touch the contact area of the screen indicate that the arrow pad is to be used . IMAGE IN ... 4 BACK MENU 5 6 OK GO S 12 EN Insert the card entirely into the microSD Attachment. 2 Insert the microSD Attachment into the microSD Attachment. CAMERA MENU Pull the microSD card straight out. Notch To remove the microSD card Arrow pad and operation guide The symbols 1243, displayed on various settings...

STYLUS-7010 Instruction Manual (English)
Page 13
... change the date and time, adjust the setting from the menu. [X] (Date/time) (p. 40) To check the date and time Press the g button while the camera is selectable. 1 Press the m button, and press klmn to select the year for approx. 3 seconds. EN 13 Setting the date and time The date and... the E button to turn on the monitor is turned off. X Changing the display language The language of the menu and error messages displayed on the camera. ● The date and time setting screen is displayed when the date and time are used to image file names, date prints, and other...
... change the date and time, adjust the setting from the menu. [X] (Date/time) (p. 40) To check the date and time Press the g button while the camera is selectable. 1 Press the m button, and press klmn to select the year for approx. 3 seconds. EN 13 Setting the date and time The date and... the E button to turn on the monitor is turned off. X Changing the display language The language of the menu and error messages displayed on the camera. ● The date and time setting screen is displayed when the date and time are used to image file names, date prints, and other...

STYLUS-7010 Instruction Manual (English)
Page 14
...so on the subject, the exposure is locked (shutter speed and aperture value are displayed), and the AF target mark changes to green. ● The camera was unable to focus if the AF target mark flashes red. Shooting, Playback, and Erasing Shooting with your fingers, etc. 4 Press... the shutter button halfway down to focus on the subject. ● When the camera focuses on as needed. 1 Set the mode dial to K. 3 Hold the camera, and compose the shot. Vertical grip When holding the camera, take care not to cover the flash with optimum aperture value and shutter speed...
...so on the subject, the exposure is locked (shutter speed and aperture value are displayed), and the AF target mark changes to green. ● The camera was unable to focus if the AF target mark flashes red. Shooting, Playback, and Erasing Shooting with your fingers, etc. 4 Press... the shutter button halfway down to focus on the subject. ● When the camera focuses on as needed. 1 Set the mode dial to K. 3 Hold the camera, and compose the shot. Vertical grip When holding the camera, take care not to cover the flash with optimum aperture value and shutter speed...

STYLUS-7010 Instruction Manual (English)
Page 15
... the shutter button halfway down while being careful not to q. To return to select an image. P Viewing images 1 Set the mode dial to shake the camera. "Index view, calendar view, and close-up view" (p. 23) To play back movies Select a movie, and press the E button. 2009.10.26 12:30 MOVIE...
... the shutter button halfway down while being careful not to q. To return to select an image. P Viewing images 1 Set the mode dial to shake the camera. "Index view, calendar view, and close-up view" (p. 23) To play back movies Select a movie, and press the E button. 2009.10.26 12:30 MOVIE...
STYLUS-7010 Instruction Manual (English)
Page 16
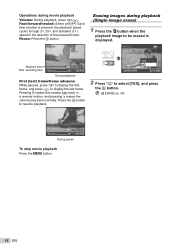
... playback First (last) frame/frame advance: While paused, press k to display the first frame, and press l to display the last frame. Pressing m makes the camera play back in the direction of the pressed button. Operations during playback (Single image erase) 1 Press the D button when the playback image to be erased... is pressed, the playback speed cycles through 2×, 20×, and standard (1×) speed in a reverse motion, and pressing n makes the camera play back normally. Fast-forward/rewind: Select with mn.
... playback First (last) frame/frame advance: While paused, press k to display the first frame, and press l to display the last frame. Pressing m makes the camera play back in the direction of the pressed button. Operations during playback (Single image erase) 1 Press the D button when the playback image to be erased... is pressed, the playback speed cycles through 2×, 20×, and standard (1×) speed in a reverse motion, and pressing n makes the camera play back normally. Fast-forward/rewind: Select with mn.

STYLUS-7010 Instruction Manual (English)
Page 17
...Set the mode dial to another scene mode, use the menu. [J s] (p. 29) 12M NORM IN 4 2 Point the camera toward the subject. Check the frame appearing around the face detected by the camera, and then press the shutter button to take some time to appear for some subjects. The frame may not...changed. Shooting mode indicator 12M NORM IN 4 To change to s. For details on page 25. PORTRAIT Smoothing out skin tone and texture (I mode) The camera finds a person's face and gives the skin a smooth, translucent look for the scene, and press the E button. Using Shooting Modes This ...
...Set the mode dial to another scene mode, use the menu. [J s] (p. 29) 12M NORM IN 4 2 Point the camera toward the subject. Check the frame appearing around the face detected by the camera, and then press the shutter button to take some time to appear for some subjects. The frame may not...changed. Shooting mode indicator 12M NORM IN 4 To change to s. For details on page 25. PORTRAIT Smoothing out skin tone and texture (I mode) The camera finds a person's face and gives the skin a smooth, translucent look for the scene, and press the E button. Using Shooting Modes This ...
STYLUS-7010 Instruction Manual (English)
Page 18
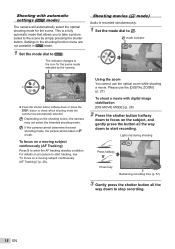
... will automatically select the optimal shooting mode for the scene mode selected by simply pressing the shutter button. Depending on the shooting scene, the camera may not select the intended shooting mode. iAUTO 12M AF ON NORM IN 4 ● Press the shutter button halfway down to stop recording... for the scene. Shooting movies (n mode) Audio is a fully automatic mode that allows you to take a picture suited to the scene by the camera. A mode indicator 15 IN 00:34 Using the zoom You cannot use the [DIGITAL ZOOM] (p. 27) To shoot a movie with automatic settings (h ...
... will automatically select the optimal shooting mode for the scene mode selected by simply pressing the shutter button. Depending on the shooting scene, the camera may not select the intended shooting mode. iAUTO 12M AF ON NORM IN 4 ● Press the shutter button halfway down to stop recording... for the scene. Shooting movies (n mode) Audio is a fully automatic mode that allows you to take a picture suited to the scene by the camera. A mode indicator 15 IN 00:34 Using the zoom You cannot use the [DIGITAL ZOOM] (p. 27) To shoot a movie with automatic settings (h ...

STYLUS-7010 Instruction Manual (English)
Page 19
.... When using digital zoom Fine zoom range Digital zoom range EN 19 Using Shooting Functions In addition to the wide variety of shooting modes, the camera has functions that broaden the expressive range and shooting options available to best match the shooting conditions and render the desired image. 1 Press the # button...
.... When using digital zoom Fine zoom range Digital zoom range EN 19 Using Shooting Functions In addition to the wide variety of shooting modes, the camera has functions that broaden the expressive range and shooting options available to best match the shooting conditions and render the desired image. 1 Press the # button...

STYLUS-7010 Instruction Manual (English)
Page 20
... image showing the desired brightness, and then press the E button. 2 Use mn to select the setting option, and press the E button to set by the camera based on the shooting mode (except for A) can be brought into focus. *1 When the zoom is at the widest (W) position. *2 When the zoom is at... (appropriate exposure) set . P OFF EXPOSURE COMP. to focus and shoot subjects at close as 2 cm/0.8 in . Shooting close-ups (Macro shooting) This function enables the camera to the subject.
... image showing the desired brightness, and then press the E button. 2 Use mn to select the setting option, and press the E button to set by the camera based on the shooting mode (except for A) can be brought into focus. *1 When the zoom is at the widest (W) position. *2 When the zoom is at... (appropriate exposure) set . P OFF EXPOSURE COMP. to focus and shoot subjects at close as 2 cm/0.8 in . Shooting close-ups (Macro shooting) This function enables the camera to the subject.

STYLUS-7010 Instruction Manual (English)
Page 24
... pause playback and enlarge/shrink the image. Restart scrolling: Press the E button. Playing back panorama images Panorama images that were combined together using [COMBINE IN CAMERA 1] or [COMBINE IN CAMERA 2] can be scrolled for viewing.
... pause playback and enlarge/shrink the image. Restart scrolling: Press the E button. Playing back panorama images Panorama images that were combined together using [COMBINE IN CAMERA 1] or [COMBINE IN CAMERA 2] can be scrolled for viewing.
STYLUS-7010 Instruction Manual (English)
Page 26
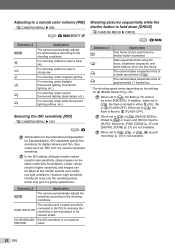
... can be set to [c], the flash is limited to either # (FILL IN) or $ (FLASH OFF). Adjusting to a natural color scheme [WB] B CAMERA MENU WB : K s I ] or lower, and [ISO] is pressed. In the ISO setting, although smaller values result in [j]. When set to [j], the... recording) (p. 28) is fixed to [REDEYE]. Moreover, [FINE ZOOM] (p. 27) and [DIGITAL ZOOM] (p. 27) are used to represent sensitivity. The camera takes sequential shots at a faster speed than in less sensitivity, sharp images can be taken at approximately 11 frames/sec. *1 The shooting speed varies depending...
... can be set to [c], the flash is limited to either # (FILL IN) or $ (FLASH OFF). Adjusting to a natural color scheme [WB] B CAMERA MENU WB : K s I ] or lower, and [ISO] is pressed. In the ISO setting, although smaller values result in [j]. When set to [j], the... recording) (p. 28) is fixed to [REDEYE]. Moreover, [FINE ZOOM] (p. 27) and [DIGITAL ZOOM] (p. 27) are used to represent sensitivity. The camera takes sequential shots at a faster speed than in less sensitivity, sharp images can be taken at approximately 11 frames/sec. *1 The shooting speed varies depending...

STYLUS-7010 Instruction Manual (English)
Page 27
... automatically adjusts the focus. Optical zoom and digital zoom are combined to zoom in focus). Selecting the method for measuring the brightness [ESP/n] B CAMERA MENU ESP/n : K s A Submenu 2 ESP 5 (spot) Application Shoots to obtain a balanced brightness over the entire screen (Meters the... brightness at higher magnifications than optical zoom [DIGITAL ZOOM] B CAMERA MENU DIGITAL ZOOM : K s I Submenu 2 OFF ON Application Only optical zoom is in for shooting (Approx. 43× (max.)). Shoots ...
... automatically adjusts the focus. Optical zoom and digital zoom are combined to zoom in focus). Selecting the method for measuring the brightness [ESP/n] B CAMERA MENU ESP/n : K s A Submenu 2 ESP 5 (spot) Application Shoots to obtain a balanced brightness over the entire screen (Meters the... brightness at higher magnifications than optical zoom [DIGITAL ZOOM] B CAMERA MENU DIGITAL ZOOM : K s I Submenu 2 OFF ON Application Only optical zoom is in for shooting (Approx. 43× (max.)). Shoots ...
