

English Manual
Page 2
...Fi Alliance. 2 Google Maps is a registered trademark of Google Inc. Note: The decal(s) may not be shown at actual size. NORDICTRACK is missing or illegible, see the front cover of the warning decal(s). Apply the decal in the location shown. The BLUETOOTH® ... TABLE OF CONTENTS WARNING DECAL PLACEMENT 2 IMPORTANT PRECAUTIONS 3 BEFORE YOU BEGIN 7 PART IDENTIFICATION CHART 8 ASSEMBLY 9 HOW TO CONNECT THE DIGITAL TV 14 HOW TO USE THE ELLIPTICAL 16 MAINTENANCE AND TROUBLESHOOTING 36 FCC INFORMATION 37 EXERCISE GUIDELINES 38 PART LIST 39 EXPLODED DRAWING 41 ORDERING ...
...Fi Alliance. 2 Google Maps is a registered trademark of Google Inc. Note: The decal(s) may not be shown at actual size. NORDICTRACK is missing or illegible, see the front cover of the warning decal(s). Apply the decal in the location shown. The BLUETOOTH® ... TABLE OF CONTENTS WARNING DECAL PLACEMENT 2 IMPORTANT PRECAUTIONS 3 BEFORE YOU BEGIN 7 PART IDENTIFICATION CHART 8 ASSEMBLY 9 HOW TO CONNECT THE DIGITAL TV 14 HOW TO USE THE ELLIPTICAL 16 MAINTENANCE AND TROUBLESHOOTING 36 FCC INFORMATION 37 EXERCISE GUIDELINES 38 PART LIST 39 EXPLODED DRAWING 41 ORDERING ...

English Manual
Page 8
The number in the hardware kit, check to identify the small parts needed for assembly. Note: If a part is the key number of the part, from the PART LIST near the end of this manual. Extra parts may be included. M10(9L9o)-c4knut SMcr4ewx (1160m4m)-8 SMcr8ewx 3(101m5)m-4 SMcr1e0w x(12404m)-m12 MBo1l0t (x14453m)-m4 M10 x 70mm Screw (139)-2 M10 x 75mm Screw (142)-2 8 The number following the key number is the quantity needed for assembly. PART IDENTIFICATION CHART Use the drawings below each drawing is not in parentheses below to see if it has been preassembled.
The number in the hardware kit, check to identify the small parts needed for assembly. Note: If a part is the key number of the part, from the PART LIST near the end of this manual. Extra parts may be included. M10(9L9o)-c4knut SMcr4ewx (1160m4m)-8 SMcr8ewx 3(101m5)m-4 SMcr1e0w x(12404m)-m12 MBo1l0t (x14453m)-m4 M10 x 70mm Screw (139)-2 M10 x 75mm Screw (142)-2 8 The number following the key number is the quantity needed for assembly. PART IDENTIFICATION CHART Use the drawings below each drawing is not in parentheses below to see if it has been preassembled.

English Manual
Page 9
...time if you ever need to contact Customer Care • allows us to the included tool(s), assembly requires the following benefits: • activates your product. Attach one adjustable wrench Assembly may be easier if you do not use power tools. 1. Registration provides the following tools: ... materials (not shown) under the Frame (1). 5 144 144 1 5 9 Go to the Frame (1) with three M10 x 20mm Screws (144); ASSEMBLY • Assembly requires two persons. • Place all parts in the same way. To avoid damaging parts, do not have your product. 2. start all three ...
...time if you ever need to contact Customer Care • allows us to the included tool(s), assembly requires the following benefits: • activates your product. Attach one adjustable wrench Assembly may be easier if you do not use power tools. 1. Registration provides the following tools: ... materials (not shown) under the Frame (1). 5 144 144 1 5 9 Go to the Frame (1) with three M10 x 20mm Screws (144); ASSEMBLY • Assembly requires two persons. • Place all parts in the same way. To avoid damaging parts, do not have your product. 2. start all three ...
English Manual
Page 12
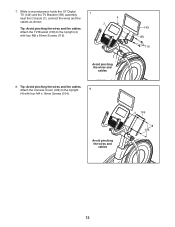
Attach the TV Bracket (150) to the Upright 8 (4) with four M8 x 30mm Screws (115). 149 150 115 Avoid pinching the wires and cables 8. Attach the Console Cover (109) to the Upright (4) with four M4 x 16mm Screws (104). While a second person holds the 15" Digital TV (149) and the TV Bracket (150) assembly 7 near the Console (7), connect the wires and the 4 cables as shown. 7 Tip: Avoid pinching the wires and the cables. Tip: Avoid pinching the wires and the cables. Avoid pinching the wires and cables 4 109 104 12 7.
Attach the TV Bracket (150) to the Upright 8 (4) with four M8 x 30mm Screws (115). 149 150 115 Avoid pinching the wires and cables 8. Attach the Console Cover (109) to the Upright (4) with four M4 x 16mm Screws (104). While a second person holds the 15" Digital TV (149) and the TV Bracket (150) assembly 7 near the Console (7), connect the wires and the 4 cables as shown. 7 Tip: Avoid pinching the wires and the cables. Tip: Avoid pinching the wires and the cables. Avoid pinching the wires and cables 4 109 104 12 7.

English Manual
Page 40
... M8 Washer M4 x 12mm Flat Head Screw M8 Small Washer M4 x 22mm Screw 15" Digital TV TV Bracket TV Cover M4 x 12mm Screw User's Manual Assembly Tool Grease Packet PTFE Grease Packet Lift Motor Wire Resistance Motor Wire Blue Wire Green Wire White Wire TV Power Supply Long TV Wire Short...
... M8 Washer M4 x 12mm Flat Head Screw M8 Small Washer M4 x 22mm Screw 15" Digital TV TV Bracket TV Cover M4 x 12mm Screw User's Manual Assembly Tool Grease Packet PTFE Grease Packet Lift Motor Wire Resistance Motor Wire Blue Wire Green Wire White Wire TV Power Supply Long TV Wire Short...


