
Instruction Manual
Page 1
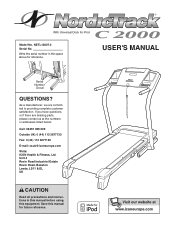
... Leeds, LS11 8JG, UK CAUTION Read all precautions and instructions in the space above for iPod Model No. Write the serial number in this manual before using this manual for future reference. Save this equipment. NETL12807.0 Serial No. If you have questions, or if there are committed to providing complete customer satisfaction...
... Leeds, LS11 8JG, UK CAUTION Read all precautions and instructions in the space above for iPod Model No. Write the serial number in this manual before using this manual for future reference. Save this equipment. NETL12807.0 Serial No. If you have questions, or if there are committed to providing complete customer satisfaction...
Instruction Manual
Page 2
NordicTrack is a registered trademark of this manual and request a free replacement decal. and other countries. 2 iPod is missing or illegible, call the telephone number on the front cover of ICON IP, Inc. ...
NordicTrack is a registered trademark of this manual and request a free replacement decal. and other countries. 2 iPod is missing or illegible, call the telephone number on the front cover of ICON IP, Inc. ...

Instruction Manual
Page 3
... 300 lbs. (136 kg) or less. 9. Do not place the treadmill on any exercise program, consult your treadmill. Do not put the treadmill in this manual and all warnings on page 22 if the treadmill is turned off. A 13 amp fuse should be used. 12. Do not operate the treadmill if...
... 300 lbs. (136 kg) or less. 9. Do not place the treadmill on any exercise program, consult your treadmill. Do not put the treadmill in this manual and all warnings on page 22 if the treadmill is turned off. A 13 amp fuse should be used. 12. Do not operate the treadmill if...
Instruction Manual
Page 4
... switch the reset/off circuit breaker to the off position when the treadmill is not in use. (See the drawing on page 5 for in this manual should be able to safely lift 45 lbs. (20 kg) to do so by an authorized service representative only. 25. vice representative. Servicing other than....) 20. This treadmill is running. Never leave the treadmill unattended while it is fully closed. 23. Always unplug the power cord immediately after use this manual.
... switch the reset/off circuit breaker to the off position when the treadmill is not in use. (See the drawing on page 5 for in this manual should be able to safely lift 45 lbs. (20 kg) to do so by an authorized service representative only. 25. vice representative. Servicing other than....) 20. This treadmill is running. Never leave the treadmill unattended while it is fully closed. 23. Always unplug the power cord immediately after use this manual.
Instruction Manual
Page 5
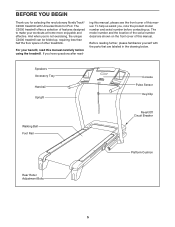
... help us assist you have questions after read this manual carefully before contacting us. ing this manual, please see the front cover of this manual. Before reading further, please familiarize yourself with Universal Dock for iPod. And when you for selecting the revolutionary NordicTrack® C2000 treadmill with the parts that are shown on the...
... help us assist you have questions after read this manual carefully before contacting us. ing this manual, please see the front cover of this manual. Before reading further, please familiarize yourself with Universal Dock for iPod. And when you for selecting the revolutionary NordicTrack® C2000 treadmill with the parts that are shown on the...
Instruction Manual
Page 6
Do not dispose of the packing materials until assembly is a normal condition and does not affect treadmill performance. Note: The underside of this manual. If there is the key number of the part, from the PART LIST near the end of the treadmill walking belt is coated with a soft ...
Do not dispose of the packing materials until assembly is a normal condition and does not affect treadmill performance. Note: The underside of this manual. If there is the key number of the part, from the PART LIST near the end of the treadmill walking belt is coated with a soft ...
Instruction Manual
Page 13
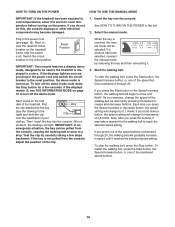
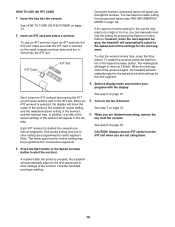
... Note: The console can even measure your workout. To use an iFIT card, see page 19. You can display speed and distance in this manual. Additional iFIT cards are sheets of clear plastic on page 14. For example, lose unwanted pounds with the 8week Weight Loss workout, or train ... Buttons FEATURES OF THE CONSOLE The treadmill console offers an impressive array of features designed to help you achieve specific fitness goals. When the manual mode of the console is selected or to change the unit of measurement, see THE INFORMATION MODE on the front cover of this section ...
... Note: The console can even measure your workout. To use an iFIT card, see page 19. You can display speed and distance in this manual. Additional iFIT cards are sheets of clear plastic on page 14. For example, lose unwanted pounds with the 8week Weight Loss workout, or train ... Buttons FEATURES OF THE CONSOLE The treadmill console offers an impressive array of features designed to help you achieve specific fitness goals. When the manual mode of the console is selected or to change the unit of measurement, see THE INFORMATION MODE on the front cover of this section ...
Instruction Manual
Page 14
...reach the selected speed setting. Reset Position IMPORTANT: The console features a display demo mode, designed to be used if the treadmill is inserted, the manual mode will begin to move at 2 Km/H. If you exercise, change by removing the key and then reinserting it. 3. As you press one of...be pulled from the console, adjust the position of 0.5 Km/H. Insert the key into the console. If a workout has been selected, reselect the manual mode by 0.1 Km/H; Each time you press the Speed increase or decrease button, the speed setting will light. HOW TO TURN ON THE POWER HOW...
...reach the selected speed setting. Reset Position IMPORTANT: The console features a display demo mode, designed to be used if the treadmill is inserted, the manual mode will begin to move at 2 Km/H. If you exercise, change by removing the key and then reinserting it. 3. As you press one of...be pulled from the console, adjust the position of 0.5 Km/H. Insert the key into the console. If a workout has been selected, reselect the manual mode by 0.1 Km/H; Each time you press the Speed increase or decrease button, the speed setting will light. HOW TO TURN ON THE POWER HOW...
Instruction Manual
Page 15
... you select, the speed or incline setting will indicate the approximate intensity level of the treadmill, press the Incline increase and decrease buttons. When the manual mode is shown. To change the incline of your progress with the display. Select a display mode and monitor your exercise. As you select will change...
... you select, the speed or incline setting will indicate the approximate intensity level of the treadmill, press the Incline increase and decrease buttons. When the manual mode is shown. To change the incline of your progress with the display. Select a display mode and monitor your exercise. As you select will change...
Instruction Manual
Page 18
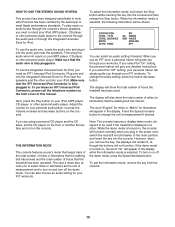
... too high or too low, you are not using them. 3. To use an iFIT workout, insert an iFIT card into several oneminute segments. You can manually override the setting by pressing the Speed or Incline buttons; To stop the workout at 2 Km/H. One speed setting and one incline setting are face...
... too high or too low, you are not using them. 3. To use an iFIT workout, insert an iFIT card into several oneminute segments. You can manually override the setting by pressing the Speed or Incline buttons; To stop the workout at 2 Km/H. One speed setting and one incline setting are face...
Instruction Manual
Page 19
... speakers. The user's mode also allows you through your personal trainer will simply guide you to select miles or kilometers as the unit of this manual. To turn off the demo mode, press the Speed decrease button. Plug one end into the Integrated Universal Dock for kilometers will appear in . THE...
... speakers. The user's mode also allows you through your personal trainer will simply guide you to select miles or kilometers as the unit of this manual. To turn off the demo mode, press the Speed decrease button. Plug one end into the Integrated Universal Dock for kilometers will appear in . THE...
Instruction Manual
Page 22
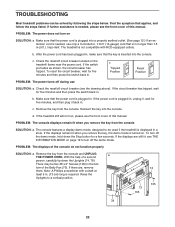
... function properly SOLUTION: a. If the displays are , remove them. Find the symptom that is needed , please see the front cover of this manual. PROBLEM: The console displays remain lit when you remove the key, the demo mode is needed , use SOLUTION: a. c Tripped Position Reset ... the switch back in . TROUBLESHOOTING Most treadmill problems can be two #8 x 2" Screws (105) in the bot- With the help of this manual. If further assistance is turned on the treadmill frame near the power cord. Raise the Uprights to turn off during use only a 3-conductor, ...
... function properly SOLUTION: a. If the displays are , remove them. Find the symptom that is needed , please see the front cover of this manual. PROBLEM: The console displays remain lit when you remove the key, the demo mode is needed , use SOLUTION: a. c Tripped Position Reset ... the switch back in . TROUBLESHOOTING Most treadmill problems can be two #8 x 2" Screws (105) in the bot- With the help of this manual. If further assistance is turned on the treadmill frame near the power cord. Raise the Uprights to turn off during use only a 3-conductor, ...
Instruction Manual
Page 23
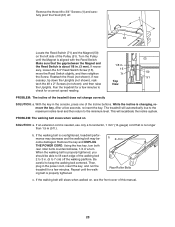
... gap between the Magnet and the Reed Switch is no longer than 1.5 m (5 ft.). Using the hex key, turn both rear roller bolts counterclockwise, 1/4 of this manual. 23 fully pivot the Hood (61) off the walking platform. Turn the Pulley until the walking belt is properly tightened. sary, loosen the 3/4" Reed Switch...
... gap between the Magnet and the Reed Switch is no longer than 1.5 m (5 ft.). Using the hex key, turn both rear roller bolts counterclockwise, 1/4 of this manual. 23 fully pivot the Hood (61) off the walking platform. Turn the Pulley until the walking belt is properly tightened. sary, loosen the 3/4" Reed Switch...

Instruction Manual
Page 26
... Left Accessory Tray Key/Clip R1007A 26 Qty. Qty. NETL12807.0 To locate the parts listed below, see the EXPLODED DRAWING near the end of this manual. Key No. PART LIST-Model No.
... Left Accessory Tray Key/Clip R1007A 26 Qty. Qty. NETL12807.0 To locate the parts listed below, see the EXPLODED DRAWING near the end of this manual. Key No. PART LIST-Model No.

Instruction Manual
Page 27
... Nut 10" Blue Wire, M/F 8" Blue Wire, 2F 4" Black Wire, 2F 4" Black Wire, M/F 8" Green/Yellow Wire, F/R 4" Green/Yellow Wire, w/decal 8" White Wire, 2F 4" Red Wire, M/F User's Manual *These parts are subject to change without notice. 27 Qty. 116 1 117 1 * - * - * - * - * - * - * 2 * - * - Specifications are not illustrated.
... Nut 10" Blue Wire, M/F 8" Blue Wire, 2F 4" Black Wire, 2F 4" Black Wire, M/F 8" Green/Yellow Wire, F/R 4" Green/Yellow Wire, w/decal 8" White Wire, 2F 4" Red Wire, M/F User's Manual *These parts are subject to change without notice. 27 Qty. 116 1 117 1 * - * - * - * - * - * - * 2 * - * - Specifications are not illustrated.

Instruction Manual
Page 32
...number and serial number of the product (see the front cover of this manual) • the name of the product (see the front cover of this manual) • the key number and description of the replacement part(s) (see...DRAWING near the end of this product. To preserve the environment, this manual. To help to collect this type of waste in your local city office or the establishment where ...you purchased this manual) RECYCLING INFORMATION This electronic product must be recycled after its useful life as required...
...number and serial number of the product (see the front cover of this manual) • the name of the product (see the front cover of this manual) • the key number and description of the replacement part(s) (see...DRAWING near the end of this product. To preserve the environment, this manual. To help to collect this type of waste in your local city office or the establishment where ...you purchased this manual) RECYCLING INFORMATION This electronic product must be recycled after its useful life as required...


