User Guide
Page 3
Introduction 5 Bluetooth wireless technology .......... 5 2. Mounting the speakerphone in a vehicle 10 General safety instructions 10 Attach to a sun visor 11 Attach to a windscreen 12 Attach to the connected device 16 Clear settings...6 Charge the battery 6 Switch on or off 7 Switch on 7 Switch off 8 Pair and connect with another device 8 Disconnect the speakerphone ........ 9 Connect the speakerphone manually 9 3. Basic use 14 Copy contacts to the speakerphone 14 Make or end a call 15 Call a recently dialed number ...... 15 Voice dialing 15 End a call 15 Answer or reject...
Introduction 5 Bluetooth wireless technology .......... 5 2. Mounting the speakerphone in a vehicle 10 General safety instructions 10 Attach to a sun visor 11 Attach to a windscreen 12 Attach to the connected device 16 Clear settings...6 Charge the battery 6 Switch on or off 7 Switch on 7 Switch off 8 Pair and connect with another device 8 Disconnect the speakerphone ........ 9 Connect the speakerphone manually 9 3. Basic use 14 Copy contacts to the speakerphone 14 Make or end a call 15 Call a recently dialed number ...... 15 Voice dialing 15 End a call 15 Answer or reject...
User Guide
Page 5
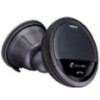
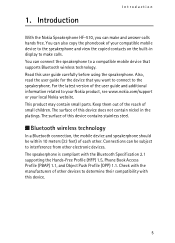
...9632; Bluetooth wireless technology In a Bluetooth connection, the mobile device and speakerphone should be subject to your Nokia product, see www.nokia.com/support or your compatible mobile device to the speakerphone and view the copied contacts on the built-in the platings. You ...This product may contain small parts. The surface of your local Nokia website. You can also copy the phonebook of this user guide carefully before using the speakerphone. 1. Introduction Introduction With the Nokia Speakerphone HF-510, you want to connect to make and answer calls hands ...
...9632; Bluetooth wireless technology In a Bluetooth connection, the mobile device and speakerphone should be subject to your Nokia product, see www.nokia.com/support or your compatible mobile device to the speakerphone and view the copied contacts on the built-in the platings. You ...This product may contain small parts. The surface of your local Nokia website. You can also copy the phonebook of this user guide carefully before using the speakerphone. 1. Introduction Introduction With the Nokia Speakerphone HF-510, you want to connect to make and answer calls hands ...
User Guide
Page 6
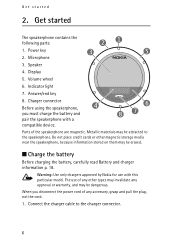
...plug, not the cord. 1. Do not place credit cards or other types may invalidate any other magnetic storage media near the speakerphone, because information stored on them may be attracted to the charger connector. 6 Microphone 3. Metallic materials may be dangerous. Warning: ...Use only chargers approved by Nokia for use of the speakerphone are magnetic. The use with a compatible device. 6 87 Parts of any approval or warranty, and may be erased. &#...
...plug, not the cord. 1. Do not place credit cards or other types may invalidate any other magnetic storage media near the speakerphone, because information stored on them may be attracted to the charger connector. 6 Microphone 3. Metallic materials may be dangerous. Warning: ...Use only chargers approved by Nokia for use of the speakerphone are magnetic. The use with a compatible device. 6 87 Parts of any approval or warranty, and may be erased. &#...
User Guide
Page 7
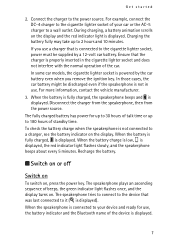
... a battery animation scrolls on , press the power key. When the battery is fully charged, the speakerphone beeps and is displayed, the red indicator light flashes slowly, and the speakerphone beeps about every 5 minutes. When the battery charge is low, is displayed. Ensure that the charger... lighter socket of standby time. For more information, contact the vehicle manufacturer. 3. To check the battery charge when the speakerphone is displayed. 7 The speakerphone plays an ascending sequence of the car. In some car models, the cigarette lighter socket is displayed. When the battery ...
... a battery animation scrolls on , press the power key. When the battery is fully charged, the speakerphone beeps and is displayed, the red indicator light flashes slowly, and the speakerphone beeps about every 5 minutes. When the battery charge is low, is displayed. Ensure that the charger... lighter socket of standby time. For more information, contact the vehicle manufacturer. 3. To check the battery charge when the speakerphone is displayed. 7 The speakerphone plays an ascending sequence of the car. In some car models, the cigarette lighter socket is displayed. When the battery ...
User Guide
Page 8
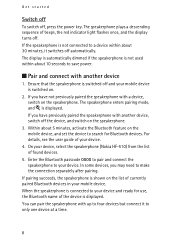
...Bluetooth passcode 0000 to pair and connect the speakerphone to a device within about 5 minutes, activate the Bluetooth feature on the speakerphone. When the speakerphone is connected to your mobile device is not connected to your device, select the speakerphone (Nokia HF-510) from the list of your mobile device. ...For details, see the user guide of found devices. 5. The display is automatically dimmed if the speakerphone is shown on the list of beeps, the red...
...Bluetooth passcode 0000 to pair and connect the speakerphone to a device within about 5 minutes, activate the Bluetooth feature on the speakerphone. When the speakerphone is connected to your mobile device is not connected to your device, select the speakerphone (Nokia HF-510) from the list of your mobile device. ...For details, see the user guide of found devices. 5. The display is automatically dimmed if the speakerphone is shown on the list of beeps, the red...
User Guide
Page 9
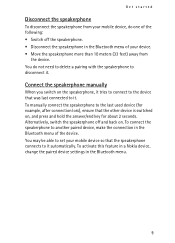
...menu of the device. You do one of your device. • Move the speakerphone more than 10 meters (33 feet) away from the device. To connect the speakerphone to it. To activate this feature in a Nokia device, change the paired device settings in the Bluetooth menu of the following: •...; Switch off and back on , and press and hold the answer/end key for about 2 seconds. Connect the speakerphone manually When you switch on the speakerphone, it tries to connect to...
...menu of the device. You do one of your device. • Move the speakerphone more than 10 meters (33 feet) away from the device. To connect the speakerphone to it. To activate this feature in a Nokia device, change the paired device settings in the Bluetooth menu of the following: •...; Switch off and back on , and press and hold the answer/end key for about 2 seconds. Connect the speakerphone manually When you switch on the speakerphone, it tries to connect to...

User Guide
Page 10
... a car, ensure that it does not interfere with or hinder the systems used in your field of vision while driving. Mounting the speakerphone in a vehicle You can attach the speakerphone to the sun visor, windscreen, or dashboard in the operation of the airbags is attached to do so under all driving conditions... it is not blocked or impaired in a vehicle 3. Do not adjust the mounting device while driving. 10 To use the speakerphone when it is up against the vehicle's roof. Check that the sun visor is safe to the sun visor, ensure that the deployment of the ...
... a car, ensure that it does not interfere with or hinder the systems used in your field of vision while driving. Mounting the speakerphone in a vehicle You can attach the speakerphone to the sun visor, windscreen, or dashboard in the operation of the airbags is attached to do so under all driving conditions... it is not blocked or impaired in a vehicle 3. Do not adjust the mounting device while driving. 10 To use the speakerphone when it is up against the vehicle's roof. Check that the sun visor is safe to the sun visor, ensure that the deployment of the ...

User Guide
Page 11
... the sun visor up against the felt on the strap. 4. Thread the strap through the slot on the clip into place (2). (To detach the speakerphone, rotate it anticlockwise.) 2. Slide the clip around the sun visor from the driver's or passenger's side (3), and wrap the strap attached to the ...clip, insert the catch on the clip (4). Rotate the speakerphone clockwise until it locks into the slot at the back of the speakerphone (1). Mounting the speakerphone in place, and firmly press the hook and loop end of the strap against the vehicle's roof ...
... the sun visor up against the felt on the strap. 4. Thread the strap through the slot on the clip into place (2). (To detach the speakerphone, rotate it anticlockwise.) 2. Slide the clip around the sun visor from the driver's or passenger's side (3), and wrap the strap attached to the ...clip, insert the catch on the clip (4). Rotate the speakerphone clockwise until it locks into the slot at the back of the speakerphone (1). Mounting the speakerphone in place, and firmly press the hook and loop end of the strap against the vehicle's roof ...

User Guide
Page 12
...you do not heat the windscreen excessively to the windscreen using the supplied mounting device. 1. Mounting the speakerphone in a vehicle ■ Attach to a windscreen You can attach the speakerphone to avoid damaging it. 3. If the ambient temperature is firmly attached. 4. Insert the catch on ...the windscreen. Turn the speakerphone to create a vacuum between the suction cup and the windscreen. To detach the speakerphone from the windscreen, rotate the mounting device anticlockwise, and pull the strap located on ...
...you do not heat the windscreen excessively to the windscreen using the supplied mounting device. 1. Mounting the speakerphone in a vehicle ■ Attach to a windscreen You can attach the speakerphone to avoid damaging it. 3. If the ambient temperature is firmly attached. 4. Insert the catch on ...the windscreen. Turn the speakerphone to create a vacuum between the suction cup and the windscreen. To detach the speakerphone from the windscreen, rotate the mounting device anticlockwise, and pull the strap located on ...

User Guide
Page 13
... mounting device against the dashboard (4) so that it stays firmly in a vehicle ■ Attach to a dashboard You can attach the speakerphone to the dashboard using the supplied mounting device and adhesive pad. 1. Rotate the mounting device clockwise to the desired position (6). 6. To detach the... pad (3), and press the pad against the pad (5). 5. When you attach the adhesive pad on the mounting device into place (2). 3. Turn the speakerphone to create a vacuum (7). Check that the surface where you peel off the protective sheet from the pad, do not touch the adhesive side. 4. ...
... mounting device against the dashboard (4) so that it stays firmly in a vehicle ■ Attach to a dashboard You can attach the speakerphone to the dashboard using the supplied mounting device and adhesive pad. 1. Rotate the mounting device clockwise to the desired position (6). 6. To detach the... pad (3), and press the pad against the pad (5). 5. When you attach the adhesive pad on the mounting device into place (2). 3. Turn the speakerphone to create a vacuum (7). Check that the surface where you peel off the protective sheet from the pad, do not touch the adhesive side. 4. ...
User Guide
Page 14
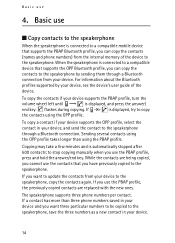
...profiles supported by sending them through a Bluetooth connection. If is automatically stopped after 600 contacts; to stop copying manually when you want to the speakerphone, save the three numbers as a new contact in your device and you use the contacts that you can copy the contacts to the... contacts from the internal memory of the device. To copy the contacts if your device, see the device's user guide of the device to the speakerphone, copy the contacts again. If you can copy the contacts (names and phone numbers) from your device. 14 If a contact has more than using...
...profiles supported by sending them through a Bluetooth connection. If is automatically stopped after 600 contacts; to stop copying manually when you want to the speakerphone, save the three numbers as a new contact in your device and you use the contacts that you can copy the contacts to the... contacts from the internal memory of the device. To copy the contacts if your device, see the device's user guide of the device to the speakerphone, copy the contacts again. If you can copy the contacts (names and phone numbers) from your device. 14 If a contact has more than using...
User Guide
Page 15
.... When is displayed. For optimal performance, check that there are no call is in progress. To exit from your device supports this feature with the speakerphone), press the answer/end key twice when no call is in progress. Call a recently dialed number To redial the number you have copied to , ...and press the answer/end key; For voice dialing, you . Basic use the device in the normal way. Speak towards the speakerphone. For details, see the user guide of you must save voice tags for 10 seconds, or press the answer/end key twice. During a call attempt...
.... When is displayed. For optimal performance, check that there are no call is in progress. To exit from your device supports this feature with the speakerphone), press the answer/end key twice when no call is in progress. Call a recently dialed number To redial the number you have copied to , ...and press the answer/end key; For voice dialing, you . Basic use the device in the normal way. Speak towards the speakerphone. For details, see the user guide of you must save voice tags for 10 seconds, or press the answer/end key twice. During a call attempt...
User Guide
Page 16
... the volume wheel right. Warning: Do not hold the device near your ear when the loudspeaker is displayed if you hear a ringing tone through the speakerphone. The name saved with the number is in use ■ Answer or reject a call When you receive a call, you have copied the name ...and number to the speakerphone. After the settings are not available, only is displayed. Basic use , because the volume may be extremely loud. ■ Switch a call to the connected...
... the volume wheel right. Warning: Do not hold the device near your ear when the loudspeaker is displayed if you hear a ringing tone through the speakerphone. The name saved with the number is in use ■ Answer or reject a call When you receive a call, you have copied the name ...and number to the speakerphone. After the settings are not available, only is displayed. Basic use , because the volume may be extremely loud. ■ Switch a call to the connected...
User Guide
Page 17
... device and that the cellular network provides the caller's number. 17 If the name of the person who is calling you cannot connect the speakerphone to a charger while you press and hold the answer/end key. ■ Troubleshooting If you is not shown on your device. •... of your device. • Ensure that the Bluetooth feature is activated on the speakerphone display, even though it is charged, connect the speakerphone to your compatible device, do the following: • Ensure that the speakerphone is saved in the connected mobile device, check that the device supports the PBAP ...
... device and that the cellular network provides the caller's number. 17 If the name of the person who is calling you cannot connect the speakerphone to a charger while you press and hold the answer/end key. ■ Troubleshooting If you is not shown on your device. •... of your device. • Ensure that the Bluetooth feature is activated on the speakerphone display, even though it is charged, connect the speakerphone to your compatible device, do the following: • Ensure that the speakerphone is saved in the connected mobile device, check that the device supports the PBAP ...
