
User Guide
Page 3
... to a dashboard 12 4. Get started 6 Charge the battery 6 Switch on or off 7 Switch on 7 Switch off 7 Pair and connect with another device 8 Disconnect the speakerphone ........ 8 Connect the speakerphone manually 9 3. Contents For your safety 4 1. Introduction 5 Bluetooth wireless technology .......... 5 2. Mount in a car 10 General safety instructions 10 Attach to a sunvisor 10 Attach to a windscreen...
... to a dashboard 12 4. Get started 6 Charge the battery 6 Switch on or off 7 Switch on 7 Switch off 7 Pair and connect with another device 8 Disconnect the speakerphone ........ 8 Connect the speakerphone manually 9 3. Contents For your safety 4 1. Introduction 5 Bluetooth wireless technology .......... 5 2. Mount in a car 10 General safety instructions 10 Attach to a sunvisor 10 Attach to a windscreen...
User Guide
Page 5
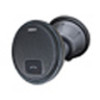
...Nokia Speakerphone HF-310, you connect to the speakerphone. Also, read the user guide for the device that supports Bluetooth wireless technology. The speakerphone is compliant with this device contains stainless steel. ■ Bluetooth wireless technology In a Bluetooth connection, the mobile device and the speakerphone...Profile (HFP) 1.5. For the latest version of small children. Connections can connect the speakerphone to your Nokia product, see www.nokia.com/support or your local Nokia website. Read this device does not contain nickel in the platings. Keep them out ...
...Nokia Speakerphone HF-310, you connect to the speakerphone. Also, read the user guide for the device that supports Bluetooth wireless technology. The speakerphone is compliant with this device contains stainless steel. ■ Bluetooth wireless technology In a Bluetooth connection, the mobile device and the speakerphone...Profile (HFP) 1.5. For the latest version of small children. Connections can connect the speakerphone to your Nokia product, see www.nokia.com/support or your local Nokia website. Read this device does not contain nickel in the platings. Keep them out ...
User Guide
Page 6
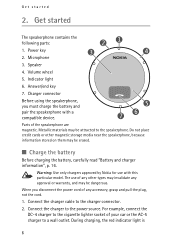
... by Nokia for use of your car or the AC-5 charger to the power source. Connect the charger to a wall outlet. Power key 3 4 2. Speaker 4. For example, connect the DC-4 charger to the cigarette lighter socket of any other magnetic storage media near the speakerphone, because...model. Get started 2. Answer/end key 7. Volume wheel 5. During charging, the red indicator light is 6 Connect the charger cable to the speakerphone. The use with a compatible device. 5 76 Parts of any approval or warranty, and may invalidate any accessory, grasp and pull the plug,...
... by Nokia for use of your car or the AC-5 charger to the power source. Connect the charger to a wall outlet. Power key 3 4 2. Speaker 4. For example, connect the DC-4 charger to the cigarette lighter socket of any other magnetic storage media near the speakerphone, because...model. Get started 2. Answer/end key 7. Volume wheel 5. During charging, the red indicator light is 6 Connect the charger cable to the speakerphone. The use with a compatible device. 5 76 Parts of any approval or warranty, and may invalidate any accessory, grasp and pull the plug,...
User Guide
Page 7
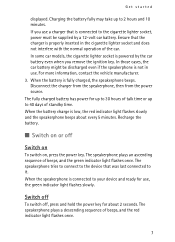
...your device and ready for use, the green indicator light flashes slowly. The fully charged battery has power for about every 5 minutes. The speakerphone tries to connect to the device that the charger is properly inserted in use a charger that is low, the red indicator light flashes slowly... might be supplied by the car battery even when you use . Recharge the battery. ■ Switch on , press the power key. The speakerphone plays a descending sequence of beeps, and the green indicator light flashes once. When the battery is not in the cigarette lighter socket and does not...
...your device and ready for use, the green indicator light flashes slowly. The fully charged battery has power for about every 5 minutes. The speakerphone tries to connect to the device that the charger is properly inserted in use a charger that is low, the red indicator light flashes slowly... might be supplied by the car battery even when you use . Recharge the battery. ■ Switch on , press the power key. The speakerphone plays a descending sequence of beeps, and the green indicator light flashes once. When the battery is not in the cigarette lighter socket and does not...
User Guide
Page 8
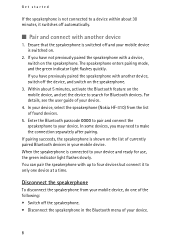
If you have previously paired the speakerphone with a device, switch on the speakerphone. 3. In your device, select the speakerphone (Nokia HF-310) from your mobile device, do one device at a time. Get started If the speakerphone is connected to your device and ready for Bluetooth devices....some devices, you have not previously paired the speakerphone with another device 1. You can pair the speakerphone with another device, switch off the device, and switch on the speakerphone. Disconnect the speakerphone To disconnect the speakerphone from the list of found devices. 5. ...
If you have previously paired the speakerphone with a device, switch on the speakerphone. 3. In your device, select the speakerphone (Nokia HF-310) from your mobile device, do one device at a time. Get started If the speakerphone is connected to your device and ready for Bluetooth devices....some devices, you have not previously paired the speakerphone with another device 1. You can pair the speakerphone with another device, switch off the device, and switch on the speakerphone. Disconnect the speakerphone To disconnect the speakerphone from the list of found devices. 5. ...
User Guide
Page 9
...menu. 9 To connect the speakerphone to it automatically. You may be able to set your mobile device so that the speakerphone connects to the last used device (for about 2 seconds. To manually connect the speakerphone to it . To activate this feature in a Nokia device, change the paired ...device settings in the Bluetooth menu of the device. Connect the speakerphone manually When you switch on the speakerphone, it tries to connect to disconnect it. You...
...menu. 9 To connect the speakerphone to it automatically. You may be able to set your mobile device so that the speakerphone connects to the last used device (for about 2 seconds. To manually connect the speakerphone to it . To activate this feature in a Nokia device, change the paired ...device settings in the Bluetooth menu of the device. Connect the speakerphone manually When you switch on the speakerphone, it tries to connect to disconnect it. You...
User Guide
Page 10
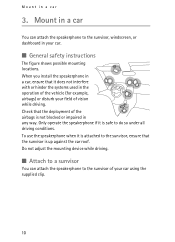
... driving conditions. Check that the deployment of the airbags is safe to the sunvisor of your car using the supplied clip. 10 Only operate the speakerphone if it is up against the car roof. Mount in the operation of the vehicle (for example, airbags) or disturb your field of vision... while driving. When you install the speakerphone in a car, ensure that the sunvisor is attached to the sunvisor, windscreen, or dashboard in any way. Do not adjust the mounting device while ...
... driving conditions. Check that the deployment of the airbags is safe to the sunvisor of your car using the supplied clip. 10 Only operate the speakerphone if it is up against the car roof. Mount in the operation of the vehicle (for example, airbags) or disturb your field of vision... while driving. When you install the speakerphone in a car, ensure that the sunvisor is attached to the sunvisor, windscreen, or dashboard in any way. Do not adjust the mounting device while ...

User Guide
Page 11
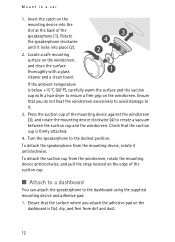
...locks into the slot at the back of the strap against the car roof (5). ■ Attach to a windscreen You can attach the speakerphone to the windscreen using the supplied mounting device. 11 Fold the sunvisor up against the felt on the strap. 4. Slide the clip around... the sunvisor from the driver's or passenger's side (3), and wrap the strap attached to keep the speakerphone securely in a car 1. Rotate the speakerphone clockwise until it anticlockwise.) 2. To attach the speakerphone to the clip, insert the catch on the clip (4). Tighten the strap to the clip around the ...
...locks into the slot at the back of the strap against the car roof (5). ■ Attach to a windscreen You can attach the speakerphone to the windscreen using the supplied mounting device. 11 Fold the sunvisor up against the felt on the strap. 4. Slide the clip around... the sunvisor from the driver's or passenger's side (3), and wrap the strap attached to keep the speakerphone securely in a car 1. Rotate the speakerphone clockwise until it anticlockwise.) 2. To attach the speakerphone to the clip, insert the catch on the clip (4). Tighten the strap to the clip around the ...
User Guide
Page 12
..., and clean the surface thoroughly with a hair dryer to create a vacuum between the suction cup and the windscreen. To detach the speakerphone from the windscreen, rotate the mounting device anticlockwise, and pull the strap located on the edge of the mounting device against the windscreen... attached. 4. To detach the suction cup from the mounting device, rotate it locks into the slot at the back of the speakerphone (1). Rotate the speakerphone clockwise until it anticlockwise. If the ambient temperature is below +15°C (60°F), carefully warm the surface and the suction...
..., and clean the surface thoroughly with a hair dryer to create a vacuum between the suction cup and the windscreen. To detach the speakerphone from the windscreen, rotate the mounting device anticlockwise, and pull the strap located on the edge of the mounting device against the windscreen... attached. 4. To detach the suction cup from the mounting device, rotate it locks into the slot at the back of the speakerphone (1). Rotate the speakerphone clockwise until it anticlockwise. If the ambient temperature is below +15°C (60°F), carefully warm the surface and the suction...

User Guide
Page 13
When you peel off the protective sheet from the other side of the suction cup. 13 Check that it anticlockwise. To detach the speakerphone from the mounting device, rotate it stays firmly in a car 3. Peel off the protective sheet from the pad, do not touch ..., and press the suction cup on the mounting device into place (2). Mount in place. Turn the speakerphone to create a vacuum (7). To detach the mounting device from the adhesive side of the speakerphone (1). Rotate the mounting device clockwise to the desired position (6). 6. 2. Insert the catch on the ...
When you peel off the protective sheet from the other side of the suction cup. 13 Check that it anticlockwise. To detach the speakerphone from the mounting device, rotate it stays firmly in a car 3. Peel off the protective sheet from the pad, do not touch ..., and press the suction cup on the mounting device into place (2). Mount in place. Turn the speakerphone to create a vacuum (7). To detach the mounting device from the adhesive side of the speakerphone (1). Rotate the mounting device clockwise to the desired position (6). 6. 2. Insert the catch on the ...

User Guide
Page 14
...loud. ■ Switch a call to the connected device To switch a call from your device. Basic use the device in the normal way. Speak towards the speakerphone. To end a call or cancel a call attempt, press the answer/end key. ■ Answer or reject a call When you receive a call is ...for about 2 seconds when no call , you . To reject the call, press the answer/end key twice. ■ Adjust volume To increase the speakerphone volume during a call , press the answer/end key. For optimal performance, check that there are no objects in front of the microphone and that ...
...loud. ■ Switch a call to the connected device To switch a call from your device. Basic use the device in the normal way. Speak towards the speakerphone. To end a call or cancel a call attempt, press the answer/end key. ■ Answer or reject a call When you receive a call is ...for about 2 seconds when no call , you . To reject the call, press the answer/end key twice. ■ Adjust volume To increase the speakerphone volume during a call , press the answer/end key. For optimal performance, check that there are no objects in front of the microphone and that ...
User Guide
Page 15
... on, and paired with your device. • Ensure that the Bluetooth feature is activated on your device. • Ensure that the speakerphone is charged, connect the speakerphone to a charger while you press and hold the power key and the answer/end key (for over 4 seconds) until the red and... green indicator lights start to the speakerphone, switch on the speakerphone (if it is within 10 metres (33 feet) of your device and that there are cleared, the speakerphone enters pairing mode. After the settings are no other electronic devices between the...
... on, and paired with your device. • Ensure that the Bluetooth feature is activated on your device. • Ensure that the speakerphone is charged, connect the speakerphone to a charger while you press and hold the power key and the answer/end key (for over 4 seconds) until the red and... green indicator lights start to the speakerphone, switch on the speakerphone (if it is within 10 metres (33 feet) of your device and that there are cleared, the speakerphone enters pairing mode. After the settings are no other electronic devices between the...