
User Guide
Page 3
... technology .......... 5 2. Get started 6 Charge the battery 6 Switch on or off 7 Switch on 7 Switch off 7 Pair and connect with another device 8 Disconnect the speakerphone ........ 8 Connect the speakerphone manually 9 3. Mount in a car 10 General safety instructions 10 Attach to a sunvisor 10 Attach to a windscreen 11 Attach to the connected device 14 Clear settings or reset...
... technology .......... 5 2. Get started 6 Charge the battery 6 Switch on or off 7 Switch on 7 Switch off 7 Pair and connect with another device 8 Disconnect the speakerphone ........ 8 Connect the speakerphone manually 9 3. Mount in a car 10 General safety instructions 10 Attach to a sunvisor 10 Attach to a windscreen 11 Attach to the connected device 14 Clear settings or reset...
User Guide
Page 6
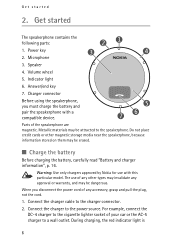
... you must charge the battery and pair the speakerphone with this particular model. Charger connector Before using the speakerphone, you disconnect the power cord of your car or the AC-5 charger to the speakerphone. Indicator light 6. Warning: Use only chargers approved by Nokia for use of the speakerphone are magnetic. The use with a compatible device. 5 76...
... you must charge the battery and pair the speakerphone with this particular model. Charger connector Before using the speakerphone, you disconnect the power cord of your car or the AC-5 charger to the speakerphone. Indicator light 6. Warning: Use only chargers approved by Nokia for use of the speakerphone are magnetic. The use with a compatible device. 5 76...
User Guide
Page 7
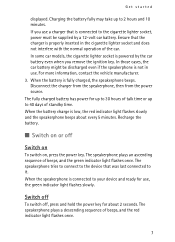
... light flashes once. The fully charged battery has power for up to 30 hours of talk time or up to 40 days of the car. The speakerphone tries to connect to the device that is connected to the cigarette lighter socket, power must be discharged even if the...and the red indicator light flashes once. 7 In some car models, the cigarette lighter socket is fully charged, the speakerphone beeps. When the battery is powered by a 12-volt car battery. Recharge the battery. ■ Switch on , press the power key. When the speakerphone is not in the cigarette lighter socket and does not...
... light flashes once. The fully charged battery has power for up to 30 hours of talk time or up to 40 days of the car. The speakerphone tries to connect to the device that is connected to the cigarette lighter socket, power must be discharged even if the...and the red indicator light flashes once. 7 In some car models, the cigarette lighter socket is fully charged, the speakerphone beeps. When the battery is powered by a 12-volt car battery. Recharge the battery. ■ Switch on , press the power key. When the speakerphone is not in the cigarette lighter socket and does not...
User Guide
Page 10
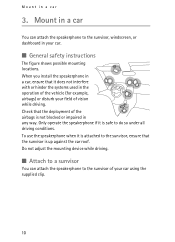
...to the sunvisor, ensure that the sunvisor is up against the car roof. Check that it is not blocked or impaired in a car 3. To use the speakerphone when it does not interfere with or hinder the systems used in your car using the supplied clip. 10 Mount in any way. When... you install the speakerphone in a car, ensure that the deployment of your car. ■ General safety instructions The...
...to the sunvisor, ensure that the sunvisor is up against the car roof. Check that it is not blocked or impaired in a car 3. To use the speakerphone when it does not interfere with or hinder the systems used in your car using the supplied clip. 10 Mount in any way. When... you install the speakerphone in a car, ensure that the deployment of your car. ■ General safety instructions The...

User Guide
Page 11
... the strap to the clip around the sunvisor from the back. 3. Rotate the speakerphone clockwise until it locks into the slot at the back of the strap against the car roof (5). ■ Attach to a windscreen You can attach the speakerphone to the windscreen using the supplied mounting device. 11 Fold the sunvisor up... the slot on the strap. 4. Slide the clip around the sunvisor from the driver's or passenger's side (3), and wrap the strap attached to keep the speakerphone securely in a car 1. Mount in place, and firmly press the hook and loop end of the...
... the strap to the clip around the sunvisor from the back. 3. Rotate the speakerphone clockwise until it locks into the slot at the back of the strap against the car roof (5). ■ Attach to a windscreen You can attach the speakerphone to the windscreen using the supplied mounting device. 11 Fold the sunvisor up... the slot on the strap. 4. Slide the clip around the sunvisor from the driver's or passenger's side (3), and wrap the strap attached to keep the speakerphone securely in a car 1. Mount in place, and firmly press the hook and loop end of the...
User Guide
Page 12
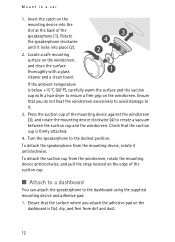
... not heat the windscreen excessively to avoid damage to create a vacuum between the suction cup and the windscreen. To detach the speakerphone from dirt and dust. 12 Mount in a car 1. If the ambient temperature is below +15°C (60°F), carefully warm the surface and the suction cup with a... glass cleaner and a clean towel. Turn the speakerphone to the dashboard using the supplied mounting device and adhesive pad. 1. To detach the ...
... not heat the windscreen excessively to avoid damage to create a vacuum between the suction cup and the windscreen. To detach the speakerphone from dirt and dust. 12 Mount in a car 1. If the ambient temperature is below +15°C (60°F), carefully warm the surface and the suction cup with a... glass cleaner and a clean towel. Turn the speakerphone to the dashboard using the supplied mounting device and adhesive pad. 1. To detach the ...

User Guide
Page 13
... back of the suction cup. 13 To detach the speakerphone from the adhesive side of the pad (3), and press the pad against the pad (5). 5. Check that it anticlockwise. Peel off the protective sheet from the mounting device, rotate it stays firmly in a car 3. Peel off the protective sheet from the dashboard, rotate... side. 4. When you peel off the protective sheet from the other side of the pad, and press the suction cup on the edge of the speakerphone (1). Insert the catch on the mounting device into place (2). Mount in place. 2. Turn the...
... back of the suction cup. 13 To detach the speakerphone from the adhesive side of the pad (3), and press the pad against the pad (5). 5. Check that it anticlockwise. Peel off the protective sheet from the mounting device, rotate it stays firmly in a car 3. Peel off the protective sheet from the dashboard, rotate... side. 4. When you peel off the protective sheet from the other side of the pad, and press the suction cup on the edge of the speakerphone (1). Insert the catch on the mounting device into place (2). Mount in place. 2. Turn the...