Installation Guide
Page 12
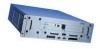
... supplies, and fan trays. For information about accessing Voyager and the related reference materials, see "Using Voyager to the proven Nokia platform. Voyager is fully supported by Nokia Horizon Manager for secure image management, including: ...Nokia Horizon Manager software. With Voyager, you to manage all your network connections. The IP700 Series platform is preinstalled on the IP700 Series appliance. The combination of the Check Point VPN-1/FireWall-1® enterprise security suite. Ideally suited to provide secure Internet connectivity, the IP710 and IP740 combine high-performance...
... supplies, and fan trays. For information about accessing Voyager and the related reference materials, see "Using Voyager to the proven Nokia platform. Voyager is fully supported by Nokia Horizon Manager for secure image management, including: ...Nokia Horizon Manager software. With Voyager, you to manage all your network connections. The IP700 Series platform is preinstalled on the IP700 Series appliance. The combination of the Check Point VPN-1/FireWall-1® enterprise security suite. Ideally suited to provide secure Internet connectivity, the IP710 and IP740 combine high-performance...

Installation Guide
Page 22
... not place objects over the ventilation holes on the IP700 ! Do not use telephone equipment, follow basic safety precautions. WARNING: Using controls, making adjustments in performance, or following procedures that your computer room or wiring closet conforms to the manufacturer's instructions. Series appliance. The components might be optional. the United States...
... not place objects over the ventilation holes on the IP700 ! Do not use telephone equipment, follow basic safety precautions. WARNING: Using controls, making adjustments in performance, or following procedures that your computer room or wiring closet conforms to the manufacturer's instructions. Series appliance. The components might be optional. the United States...

Installation Guide
Page 23
...from static discharge by making sure you are properly grounded before you touch any electronic components. See these topics for instructions to perform the tasks necessary for installing or maintaining your appliance: • Using DHCP to Configure the Appliance (see page 24) •...8226; Connecting to your IP700 Series appliance and other electronic ! CHAPTER 2 Installing the IP700 Series Appliance This chapter describes how to install the Nokia IP700 Series appliance, configure the system, connect it to the Console (see page 30) • Monitoring the Appliance (see page 33) ...
...from static discharge by making sure you are properly grounded before you touch any electronic components. See these topics for instructions to perform the tasks necessary for installing or maintaining your appliance: • Using DHCP to Configure the Appliance (see page 24) •...8226; Connecting to your IP700 Series appliance and other electronic ! CHAPTER 2 Installing the IP700 Series Appliance This chapter describes how to install the Nokia IP700 Series appliance, configure the system, connect it to the Console (see page 30) • Monitoring the Appliance (see page 33) ...

Installation Guide
Page 26
...the system on the IP700 Series Appliance NOTE: Do not perform this procedure unless you must connect the NIC that has... system configuration, as appropriate. Connect a NIC in the DHCP configuration information, you have configured an appropriate DHCP server with configuration information for your IP700 Series appliance to ten minutes.) 3. option host-name "IP710"; If you ... IP700 Series appliance is started automatically and the DHCP server provides the appropriate configuration information. (This can use Nokia Network Voyager to connect to the system. 4. fixed-address 10.1.1.11;
...the system on the IP700 Series Appliance NOTE: Do not perform this procedure unless you must connect the NIC that has... system configuration, as appropriate. Connect a NIC in the DHCP configuration information, you have configured an appropriate DHCP server with configuration information for your IP700 Series appliance to ten minutes.) 3. option host-name "IP710"; If you ... IP700 Series appliance is started automatically and the DHCP server provides the appropriate configuration information. (This can use Nokia Network Voyager to connect to the system. 4. fixed-address 10.1.1.11;

Installation Guide
Page 28
... the cord into the power socket on the power supply to 264]) and configure themselves appropriately. Back Panel View Power Sockets Power Supply Switches 00086 Perform the following steps for each power supply: 1. Connect the power cord securely into a three-wire grounded power strip or wall outlet.
... the cord into the power socket on the power supply to 264]) and configure themselves appropriately. Back Panel View Power Sockets Power Supply Switches 00086 Perform the following steps for each power supply: 1. Connect the power cord securely into a three-wire grounded power strip or wall outlet.

Installation Guide
Page 37
... 66-MHz card, it continues running at 33 Mhz; Network Interface Card Preinstallation Considerations In the IP740, each cPCI bus runs only at 33 Mhz. For example, if the bus is running at...offline (although it can also run at 66 Mhz, but certain configurations might not provide optimum performance. IP700 Series Installation Guide 37 In the IP710, each cPCI bus is visible using Voyager). Cards...MHz card. Circumstances Under Which the cPCI Busses Change Speed in any compatible card in the IP740 The bus speed is set to the following questions, which should help you reboot the appliance,...
... 66-MHz card, it continues running at 33 Mhz; Network Interface Card Preinstallation Considerations In the IP740, each cPCI bus runs only at 33 Mhz. For example, if the bus is running at...offline (although it can also run at 66 Mhz, but certain configurations might not provide optimum performance. IP700 Series Installation Guide 37 In the IP710, each cPCI bus is visible using Voyager). Cards...MHz card. Circumstances Under Which the cPCI Busses Change Speed in any compatible card in the IP740 The bus speed is set to the following questions, which should help you reboot the appliance,...

Installation Guide
Page 38
... 33 Mhz 33 Mhz 33 Mhz 33 Mhz 33 Mhz 33 Mhz 33 Mhz 33 Mhz 33 Mhz Configuration Guidelines for the IP740 To maximize the performance of your system, observe the following 66-Mhz and 33-Mhz cards are installing more than one gigabit Ethernet card. Load ...from those cards. 38 IP700 Series Installation Guide However, if either of your busses is especially important if you configure an IP740 appliance with only 66-Mhz cards installed, keep all gigabit Ethernet cards on . Balancing the busses is running at 33 Mhz, try to attain optimum performance from Nokia.
... 33 Mhz 33 Mhz 33 Mhz 33 Mhz 33 Mhz 33 Mhz 33 Mhz 33 Mhz 33 Mhz Configuration Guidelines for the IP740 To maximize the performance of your system, observe the following 66-Mhz and 33-Mhz cards are installing more than one gigabit Ethernet card. Load ...from those cards. 38 IP700 Series Installation Guide However, if either of your busses is especially important if you configure an IP740 appliance with only 66-Mhz cards installed, keep all gigabit Ethernet cards on . Balancing the busses is running at 33 Mhz, try to attain optimum performance from Nokia.

Installation Guide
Page 39
... NICs. As a result, the second bus continues to provide a highavailability firewall with six available gigabit Ethernet ports each (for a total of the IP740 appliance slots, that bus runs at 33 Mhz. All twelve ports can choose any slot for the necessary connections. The rest of this section describes...install more than two 33-Mhz cards, both busses run at 66 Mhz. Therefore, if possible, confine your 33-Mhz cards to achieve optimum performance. If you install a 33-Mhz card in one bus. The remaining two ports are provided by two single-port gigabit Ethernet NICs. IP700 ...
... NICs. As a result, the second bus continues to provide a highavailability firewall with six available gigabit Ethernet ports each (for a total of the IP740 appliance slots, that bus runs at 33 Mhz. All twelve ports can choose any slot for the necessary connections. The rest of this section describes...install more than two 33-Mhz cards, both busses run at 66 Mhz. Therefore, if possible, confine your 33-Mhz cards to achieve optimum performance. If you install a 33-Mhz card in one bus. The remaining two ports are provided by two single-port gigabit Ethernet NICs. IP700 ...

Installation Guide
Page 46
.... Use a screwdriver to reinstall the card before you can deactivate the logical and physical interfaces. For information about how to access Voyager and the related reference materials, see "Using Voyager to perform the following procedure applies to all network interface cards: 1. Use Voyager to Configure the Network Interfaces" on the card. Chapter...
.... Use a screwdriver to reinstall the card before you can deactivate the logical and physical interfaces. For information about how to access Voyager and the related reference materials, see "Using Voyager to perform the following procedure applies to all network interface cards: 1. Use Voyager to Configure the Network Interfaces" on the card. Chapter...

Installation Guide
Page 55
To perform an orderly shut down of the device. On the Voyager home page for the drive unit is off the appliance using the power supply switches ...
To perform an orderly shut down of the device. On the Voyager home page for the drive unit is off the appliance using the power supply switches ...

Installation Guide
Page 61
... can replace one of each is as shown circled in the following figure. LED Meaning Pwr OK (green) Performing within specifications Fault (red) Not performing within specifications Over Temp (yellow) Power supply has overheated Access the power supply from left to the right of the power supplies without turning off the IP700 Series...
... can replace one of each is as shown circled in the following figure. LED Meaning Pwr OK (green) Performing within specifications Fault (red) Not performing within specifications Over Temp (yellow) Power supply has overheated Access the power supply from left to the right of the power supplies without turning off the IP700 Series...

Installation Guide
Page 65
... the appliance using Voyager for this purpose, see "Using Voyager to perform an orderly shutdown of electric shock, before you access the DIMM sockets, perform the following : • Physical access to the appliance • A Phillips-head screwdriver • The appropriate number of Nokia memory upgrade kits, each of which includes two 256-MB Dual Inline...
... the appliance using Voyager for this purpose, see "Using Voyager to perform an orderly shutdown of electric shock, before you access the DIMM sockets, perform the following : • Physical access to the appliance • A Phillips-head screwdriver • The appropriate number of Nokia memory upgrade kits, each of which includes two 256-MB Dual Inline...
Installation Guide
Page 71
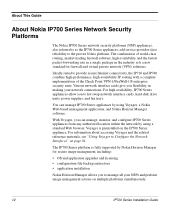
... and work in adjacent DIMM sockets. Press the two retaining clips outward and carefully pull each of the appliance. NOTE: If your IP700 series appliance, perform the following figure shows. NOTE: The figures show these steps for the DIMM socket closest to gradually free it from your appliance has four 128...
... and work in adjacent DIMM sockets. Press the two retaining clips outward and carefully pull each of the appliance. NOTE: If your IP700 series appliance, perform the following figure shows. NOTE: The figures show these steps for the DIMM socket closest to gradually free it from your appliance has four 128...

Installation Guide
Page 72
... the DIMM into place. Be sure the two keys and slots line up. Slide the chassis assembly back into place, as you install the DIMMs, perform the following figure shows. The bottom edge of the DIMM has two keyed sets of the DIMM is smooth. Chapter 3: Installing, Monitoring, and Replacing Components...
... the DIMM into place. Be sure the two keys and slots line up. Slide the chassis assembly back into place, as you install the DIMMs, perform the following figure shows. The bottom edge of the DIMM has two keyed sets of the DIMM is smooth. Chapter 3: Installing, Monitoring, and Replacing Components...

Installation Guide
Page 109
... before the appliance is delivered to you specify that enhances performance.The accelerator card comes in a cPCI format for the IP700 series appliances. The card provides high-speed cryptographic processing that a Nokia accelerator card is part of IPSO 3.4.1, so the appliance ...Enabling the Encryption Accelerator Card (see page 117) IP700 Series Installation Guide 109 CHAPTER 6 Installing the Nokia Encryption Accelerator Card This chapter contains information about the Nokia encryption accelerator card for tasks related to be included with Check Point VPN-1 FireWall 4.1 SP4 or ...
... before the appliance is delivered to you specify that enhances performance.The accelerator card comes in a cPCI format for the IP700 series appliances. The card provides high-speed cryptographic processing that a Nokia accelerator card is part of IPSO 3.4.1, so the appliance ...Enabling the Encryption Accelerator Card (see page 117) IP700 Series Installation Guide 109 CHAPTER 6 Installing the Nokia Encryption Accelerator Card This chapter contains information about the Nokia encryption accelerator card for tasks related to be included with Check Point VPN-1 FireWall 4.1 SP4 or ...

Installation Guide
Page 110
Use Voyager or Lynx to install the card. Chapter 6: Installing the Nokia Encryption Accelerator Card Installing the Encryption Accelerator Card When you specify that a Nokia encryption accelerator card is to be included with an IP700 series appliance, the card is installed before you handle ...is delivered to you install the card, perform the following information to shut down the appliance. 2. If you purchase an accelerator card separately, use the following tasks: 1. Before you . What You Need Before you install the card, you need: • Physical access to the unit • A Phillips-...
Use Voyager or Lynx to install the card. Chapter 6: Installing the Nokia Encryption Accelerator Card Installing the Encryption Accelerator Card When you specify that a Nokia encryption accelerator card is to be included with an IP700 series appliance, the card is installed before you handle ...is delivered to you install the card, perform the following information to shut down the appliance. 2. If you purchase an accelerator card separately, use the following tasks: 1. Before you . What You Need Before you install the card, you need: • Physical access to the unit • A Phillips-...

Installation Guide
Page 114
Do not use the 33-MHz connectors, as using them impairs performance. 33-MHz PMC connectors (do not use) 66-MHz PMC connectors Front of Motherboard 114 IP700 Series Installation Guide Caution: Two 33-MHz connectors are also located on the motherboard. Chapter 6: Installing the Nokia Encryption Accelerator Card 3. Locate the 66-MHz PMC connectors on the motherboard. !
Do not use the 33-MHz connectors, as using them impairs performance. 33-MHz PMC connectors (do not use) 66-MHz PMC connectors Front of Motherboard 114 IP700 Series Installation Guide Caution: Two 33-MHz connectors are also located on the motherboard. Chapter 6: Installing the Nokia Encryption Accelerator Card 3. Locate the 66-MHz PMC connectors on the motherboard. !

Installation Guide
Page 116
Enable the card. Turn on page 117." 116 IP700 Series Installation Guide Chapter 6: Installing the Nokia Encryption Accelerator Card Final Installation Steps After you install the accelerator card, perform the following procedure: 1. For more information, see ""Enabling the Encryption Accelerator Card" on the power. 4. Reattach the power cords. 3. Slide the chassis assembly back into the appliance and resecure the four thumbscrews. 2.
Enable the card. Turn on page 117." 116 IP700 Series Installation Guide Chapter 6: Installing the Nokia Encryption Accelerator Card Final Installation Steps After you install the accelerator card, perform the following procedure: 1. For more information, see ""Enabling the Encryption Accelerator Card" on the power. 4. Reattach the power cords. 3. Slide the chassis assembly back into the appliance and resecure the four thumbscrews. 2.

Installation Guide
Page 119
... the Boot Manager with a Password (see page 130) IP700 Series Installation Guide 119 The boot manager allows you to perform a number of IPSO (the operating system) • Obtaining system information • Performing various housekeeping tasks The boot manager provides commands that allow you to boot from a specified kernel, which typically resides on...
... the Boot Manager with a Password (see page 130) IP700 Series Installation Guide 119 The boot manager allows you to perform a number of IPSO (the operating system) • Obtaining system information • Performing various housekeeping tasks The boot manager provides commands that allow you to boot from a specified kernel, which typically resides on...

Installation Guide
Page 129
... a password, the boot manager prompts you to the appropriate version of release notes for your system IP address, the server IP address, and other information). 3. NOTE: A full installation using the boot manager, perform the following steps: 1. Reboot the IP700 Series appliance. Enter the information the install command requests (your password before allowing...
... a password, the boot manager prompts you to the appropriate version of release notes for your system IP address, the server IP address, and other information). 3. NOTE: A full installation using the boot manager, perform the following steps: 1. Reboot the IP700 Series appliance. Enter the information the install command requests (your password before allowing...