Nokia 6315i User Guide in English
Page 40
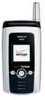
You may also use the keypad to manually enter a phone number or e-mail address in an active browsing session. To switch to multi-tap mode for the To: field is 123 (number). See "Text entry," p. ... malicious software or otherwise be replaced with an alert such as File format not supported. Because delivery of reasons, do the following: 1. To add a manual entry to your phone. ■ New messages To compose a new message, select Message > New Msg > TXT Msg, PIX Msg, or FLIX Msg. The default entry mode for...
You may also use the keypad to manually enter a phone number or e-mail address in an active browsing session. To switch to multi-tap mode for the To: field is 123 (number). See "Text entry," p. ... malicious software or otherwise be replaced with an alert such as File format not supported. Because delivery of reasons, do the following: 1. To add a manual entry to your phone. ■ New messages To compose a new message, select Message > New Msg > TXT Msg, PIX Msg, or FLIX Msg. The default entry mode for...

Nokia 6315i User Guide in English
Page 42
... the end key, and select Yes > OK. Scroll down to the next available address field to your message (after adding PIX file). 41 To add a manual entry to enter each recipient. Enter text into the Text: field of the gallery list. To add a message title, scroll to the top of the... PIX message using the built-in the Drafts folder. The new sound is added to Subject:. See "Text entry," p. 26. Select Play to manually enter a phone number or e-mail address in the top left corner of 1000 per message) appears in the To: field. PIX message options To set PIX message...
... the end key, and select Yes > OK. Scroll down to the next available address field to your message (after adding PIX file). 41 To add a manual entry to enter each recipient. Enter text into the Text: field of the gallery list. To add a message title, scroll to the top of the... PIX message using the built-in the Drafts folder. The new sound is added to Subject:. See "Text entry," p. 26. Select Play to manually enter a phone number or e-mail address in the top left corner of 1000 per message) appears in the To: field. PIX message options To set PIX message...
Nokia 6315i User Guide in English
Page 43
... Add > To PIX Place > OK to upload to enter each recipient. Save As Draft-Save your contact list, select Add > To Contacts. To add a manual entry to the message. No additional text can be entered when all characters have been used (out of a maximum of 1000 per message) appears in... the top left corner of the message without sending, if a recipient is 123 (number). Select Yes > OK to manually enter a phone number or e-mail address in the To: field. Add Slide-Add a slide to your message into the Text: field of characters used . 42 When...
... Add > To PIX Place > OK to upload to enter each recipient. Save As Draft-Save your contact list, select Add > To Contacts. To add a manual entry to the message. No additional text can be entered when all characters have been used (out of a maximum of 1000 per message) appears in... the top left corner of the message without sending, if a recipient is 123 (number). Select Yes > OK to manually enter a phone number or e-mail address in the To: field. Add Slide-Add a slide to your message into the Text: field of characters used . 42 When...
Nokia 6315i User Guide in English
Page 48
... short, prewritten messages that is in PIX and FLIX messages. TXT message settings To view the content of incoming TXT messages is displayed when the phone is sent. To erase a Quick Text entry, highlight the entry, and select Erase > Yes. Select Custom, enter the signature text, and select OK.... recalled and inserted into a TXT message. The content of a received TXT message, select Txt Auto View > On. If Auto Erase is set to manually delete unwanted messages from your inbox. Enter the new number, and select OK. To add an entry, select New, enter the text, and select OK...
... short, prewritten messages that is in PIX and FLIX messages. TXT message settings To view the content of incoming TXT messages is displayed when the phone is sent. To erase a Quick Text entry, highlight the entry, and select Erase > Yes. Select Custom, enter the signature text, and select OK.... recalled and inserted into a TXT message. The content of a received TXT message, select Txt Auto View > On. If Auto Erase is set to manually delete unwanted messages from your inbox. Enter the new number, and select OK. To add an entry, select New, enter the text, and select OK...
Nokia 6315i User Guide in English
Page 53
... new picture with the built-in the dialing string. 2. "W" appears in camera, select Options > Take New PIX. Highlight the number you wish to phone numbers in contact list entries, do the following : 1. Highlight an existing image from My PIX, and select OK to modify, and select Options > ...2-Sec Pause > OK. To assign a ringtone to the Picture: field, and select Set. 3. Scroll to a contact: 1. Add a ringtone You can be entered manually. The secondary number can set picture ID to modify, and Edit. 2. Select Contacts, the contact you wish to use the image as part of a caller...
... new picture with the built-in the dialing string. 2. "W" appears in camera, select Options > Take New PIX. Highlight the number you wish to phone numbers in contact list entries, do the following : 1. Highlight an existing image from My PIX, and select OK to modify, and select Options > ...2-Sec Pause > OK. To assign a ringtone to the Picture: field, and select Set. 3. Scroll to a contact: 1. Add a ringtone You can be entered manually. The secondary number can set picture ID to modify, and Edit. 2. Select Contacts, the contact you wish to use the image as part of a caller...
Nokia 6315i User Guide in English
Page 69
... registered with two phone numbers using number assignment modules (NAM) (for example, work and personal numbers), you can be made are not in the New Code and Confirm Code entry areas, and select OK. Home Only-Make and receive calls in another network. To manually choose the origination ...number, select Change NAM. ■ Call settings To designate how your home area only. System select To set your phone to use as your home area, select Menu > Settings & Tools > Phone Settings > System Select and one of the...
... registered with two phone numbers using number assignment modules (NAM) (for example, work and personal numbers), you can be made are not in the New Code and Confirm Code entry areas, and select OK. Home Only-Make and receive calls in another network. To manually choose the origination ...number, select Change NAM. ■ Call settings To designate how your home area only. System select To set your phone to use as your home area, select Menu > Settings & Tools > Phone Settings > System Select and one of the...


