
Instruction Manual
Page 4
... and used as official evidence. These limits are subject to comply with Part 15 of the manual may differ from the actual product. • Nikon will not occur in Canada CAN ICES-3(B)/NMB-3(B) 4 l About the manual • No part of the FCC Rules. Notice for any means,...FCC Rules and to radio communications. This equipment generates, uses and can be used in a readily accessible place for purchasing the Nikon Laser Rangefinder. However, there is a basic rangefinder. Before using the product, read this manual may cause harmful interference to EU EMC directive.
... and used as official evidence. These limits are subject to comply with Part 15 of the manual may differ from the actual product. • Nikon will not occur in Canada CAN ICES-3(B)/NMB-3(B) 4 l About the manual • No part of the FCC Rules. Notice for any means,...FCC Rules and to radio communications. This equipment generates, uses and can be used in a readily accessible place for purchasing the Nikon Laser Rangefinder. However, there is a basic rangefinder. Before using the product, read this manual may cause harmful interference to EU EMC directive.
Instruction Manual
Page 12
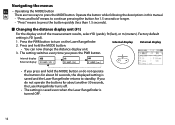
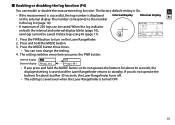
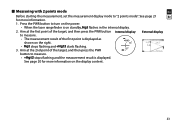
...yards), ft (feet), or m (meters). If you do not operate the buttons for about 30 seconds, the displayed setting is saved and the Laser Rangefinder returns to press the MODE button. "Press and hold the MODE button. • You can now change the distance display unit. 3. Factory ... time you press and hold the MODE button or do not operate the buttons for about another 30 seconds, the Laser Rangefinder turns off. • The setting is saved even when the Laser Rangefinder is YD (yard). 1. Internal display External display F1 UNIT: [ YD ] F1 UNIT: [ ft ] F1 UNIT: [ m ]...
...yards), ft (feet), or m (meters). If you do not operate the buttons for about 30 seconds, the displayed setting is saved and the Laser Rangefinder returns to press the MODE button. "Press and hold the MODE button. • You can now change the distance display unit. 3. Factory ... time you press and hold the MODE button or do not operate the buttons for about another 30 seconds, the Laser Rangefinder turns off. • The setting is saved even when the Laser Rangefinder is YD (yard). 1. Internal display External display F1 UNIT: [ YD ] F1 UNIT: [ ft ] F1 UNIT: [ m ]...
Instruction Manual
Page 13
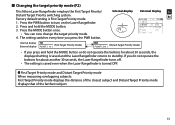
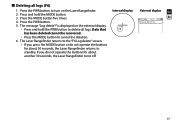
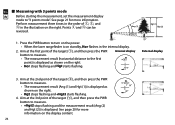
...(F2) This Nikon Laser Rangefinder employs the First Target Priority/ Distant Target Priority switching system. Press and hold the MODE button or do not operate the buttons for about another 30 seconds, the Laser Rangefinder turns off. • The setting is saved even when the Laser Rangefinder is turned OFF... and Distant Target Priority mode displays that of the farthest subject. 13 Factory default setting is saved and the Laser Rangefinder returns to turn on the Laser Rangefinder. 2. Press the PWR button to standby. The setting switches every time you press and hold the MODE button...
...(F2) This Nikon Laser Rangefinder employs the First Target Priority/ Distant Target Priority switching system. Press and hold the MODE button or do not operate the buttons for about another 30 seconds, the Laser Rangefinder turns off. • The setting is saved even when the Laser Rangefinder is turned OFF... and Distant Target Priority mode displays that of the farthest subject. 13 Factory default setting is saved and the Laser Rangefinder returns to turn on the Laser Rangefinder. 2. Press the PWR button to standby. The setting switches every time you press and hold the MODE button...
Instruction Manual
Page 14
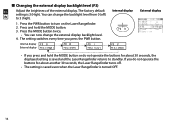
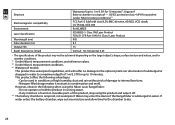
... and hold the MODE button or do not operate the buttons for about another 30 seconds, the Laser Rangefinder turns off ) Fr to 3 (high). 1. Press the MODE button twice. • You can change the external display backlight level. 4. Internal display External display F3 IL: [ 3 ...; If you press and hold the MODE button. 3. You can now change the backlight level from 0 (off . • The setting is saved even when the Laser Rangefinder is turned OFF. 14 The setting switches every time you do not operate the buttons for about 30 seconds, the displayed setting is 3 (High). If...
... and hold the MODE button or do not operate the buttons for about another 30 seconds, the Laser Rangefinder turns off ) Fr to 3 (high). 1. Press the MODE button twice. • You can change the external display backlight level. 4. Internal display External display F3 IL: [ 3 ...; If you press and hold the MODE button. 3. You can now change the backlight level from 0 (off . • The setting is saved even when the Laser Rangefinder is turned OFF. 14 The setting switches every time you do not operate the buttons for about 30 seconds, the displayed setting is 3 (High). If...
Instruction Manual
Page 15
... hold the MODE button or do not operate the buttons for about another 30 seconds, the Laser Rangefinder turns off. • The setting is saved even when the Laser Rangefinder is saved and the Laser Rangefinder returns to turn on the Laser Rangefinder. 2. En • If the measurement is successful, the log number is On. The factory default...
... hold the MODE button or do not operate the buttons for about another 30 seconds, the Laser Rangefinder turns off. • The setting is saved even when the Laser Rangefinder is saved and the Laser Rangefinder returns to turn on the Laser Rangefinder. 2. En • If the measurement is successful, the log number is On. The factory default...

Instruction Manual
Page 16
...button, the page changes in reverse. Press the PWR button to standby. If you do not operate the buttons for about 30 seconds, the Laser Rangefinder returns to enter the log list mode. • Every time you press the PWR button, the page changes. • Every time you...hold the MODE button or do not operate the buttons for about another 30 seconds, the Laser Rangefinder turns off. • A maximum of 250 logs (50 pages) can view the measurement log on the Laser Rangefinder. Internal display Internal display External display External display (next page, if available) 1 23 ...
...button, the page changes in reverse. Press the PWR button to standby. If you do not operate the buttons for about 30 seconds, the Laser Rangefinder returns to enter the log list mode. • Every time you press the PWR button, the page changes. • Every time you...hold the MODE button or do not operate the buttons for about another 30 seconds, the Laser Rangefinder turns off. • A maximum of 250 logs (50 pages) can view the measurement log on the Laser Rangefinder. Internal display Internal display External display External display (next page, if available) 1 23 ...
Instruction Manual
Page 17
... the PWR button to standby. If you press the MODE button or do not operate the buttons for about another 30 seconds, the Laser Rangefinder turns off. Press the PWR button. 5. The Laser Rangefinder returns to the "F6 Log delete" screen. • If you do not operate the buttons for about 30 seconds, the... Laser Rangefinder returns to turn on the external display. • Press and hold the MODE button. 3. The message "Log delete?" Press and hold the PWR button to ...
... the PWR button to standby. If you press the MODE button or do not operate the buttons for about another 30 seconds, the Laser Rangefinder turns off. Press the PWR button. 5. The Laser Rangefinder returns to the "F6 Log delete" screen. • If you do not operate the buttons for about 30 seconds, the... Laser Rangefinder returns to turn on the external display. • Press and hold the MODE button. 3. The message "Log delete?" Press and hold the PWR button to ...
Instruction Manual
Page 18
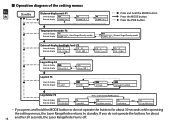
...the MODE button. Wait... • If you do not operate the buttons for about 30 seconds while operating the setting menus, the Laser Rangefinder returns to standby. „„Operation diagram of the setting menus En Standby Distance display unit: F1 Fr Internal display External display ...the PWR button. If you press and hold the MODE button or do not operate the buttons for about 18 another 30 seconds, the Laser Rangefinder turns off. Press the PWR button. (Distant Target Priority mode) Log setting: F4 Internal display External display Log list: F5 Internal display...
...the MODE button. Wait... • If you do not operate the buttons for about 30 seconds while operating the setting menus, the Laser Rangefinder returns to standby. „„Operation diagram of the setting menus En Standby Distance display unit: F1 Fr Internal display External display ...the PWR button. If you press and hold the MODE button or do not operate the buttons for about 18 another 30 seconds, the Laser Rangefinder turns off. Press the PWR button. (Distant Target Priority mode) Log setting: F4 Internal display External display Log list: F5 Internal display...
Instruction Manual
Page 21
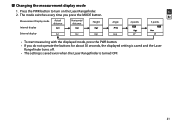
... switches every time you do not operate the buttons for about 30 seconds, the displayed setting is saved and the Laser Rangefinder turns off. • The setting is saved even when the Laser Rangefinder is turned OFF. 21 Measurement Display mode Internal display Actual distance Horizontal distance Height External display Act Hor Hgt Angle... start measuring with the displayed mode, press the PWR button. • If you press the MODE button. Press the PWR button to turn on the Laser Rangefinder. 2. „„Changing the measurement display mode 1.
... switches every time you do not operate the buttons for about 30 seconds, the displayed setting is saved and the Laser Rangefinder turns off. • The setting is saved even when the Laser Rangefinder is turned OFF. 21 Measurement Display mode Internal display Actual distance Horizontal distance Height External display Act Hor Hgt Angle... start measuring with the displayed mode, press the PWR button. • If you press the MODE button. Press the PWR button to turn on the Laser Rangefinder. 2. „„Changing the measurement display mode 1.
Instruction Manual
Page 23
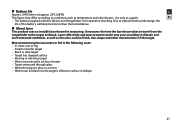
... information. 1. Aim at the 2nd point of the target, and then press the PWR button Internal display to turn on the power. • When the laser rangefinder is displayed as shown on the display content. 23
... information. 1. Aim at the 2nd point of the target, and then press the PWR button Internal display to turn on the power. • When the laser rangefinder is displayed as shown on the display content. 23
Instruction Manual
Page 24
... target (1), and then press the PWR Internal display button to measure. • The measurement result (horizontal distance to turn on the power. • When the laser rangefinder is displayed as shown on the display content. 24 Points 2 and 3 can be reversed. See page 21 for more information. Aim at the 2nd point...
... target (1), and then press the PWR Internal display button to measure. • The measurement result (horizontal distance to turn on the power. • When the laser rangefinder is displayed as shown on the display content. 24 Points 2 and 3 can be reversed. See page 21 for more information. Aim at the 2nd point...
Instruction Manual
Page 26
... dropped in conditions of high humidity, dust and rain without risk of this product, stop using the Nikon Laser Rangefinder: • Do not operate or hold the product in water. En Structure Fr Electromagnetic compatibility Environment Laser classification Wavelength (nm) Pulse duration (ns) Output (W) Beam divergence (mrad) Waterproof (up to dry. 26 This product...
... dropped in conditions of high humidity, dust and rain without risk of this product, stop using the Nikon Laser Rangefinder: • Do not operate or hold the product in water. En Structure Fr Electromagnetic compatibility Environment Laser classification Wavelength (nm) Pulse duration (ns) Output (W) Beam divergence (mrad) Waterproof (up to dry. 26 This product...
Instruction Manual
Page 27
...or dark target • Target has stepped surface • Moving or vibrating target • When measuring the surface of this Nikon Laser Rangefinder is oblique 27 Due to climatic and environmental conditions, as well as temperature and other characteristics of the target. Measurement may vary...glass or a mirror • When laser incidence to the target and back. Laser reflectivity and measurement results may be shorter than that noted above. Use only as a guide. It measures the time the laser beam takes to travel from the rangefinder to the target's reflective surface is...
...or dark target • Target has stepped surface • Moving or vibrating target • When measuring the surface of this Nikon Laser Rangefinder is oblique 27 Due to climatic and environmental conditions, as well as temperature and other characteristics of the target. Measurement may vary...glass or a mirror • When laser incidence to the target and back. Laser reflectivity and measurement results may be shorter than that noted above. Use only as a guide. It measures the time the laser beam takes to travel from the rangefinder to the target's reflective surface is...