User Manual
Page 2
... not open the K-Cup® Assembly Housing during brewing cycles. 3. Do not use appliance for replacement or repair. 11. There are two sharp needles that puncture the K-Cup® pack, one above...by the appliance manufacturer may occur if the coffee Brewer is moved or opened or K-Cup® pack is used . 4. Do not put your Mr. Coffee® Customer Service to persons. 5. Close... or injury to arrange for other than intended use. 2 CAUTION: There are no user serviceable parts inside the coffeemaker. Please read ALL of the instructions in the K-Cup® Assembly Housing. READ...
... not open the K-Cup® Assembly Housing during brewing cycles. 3. Do not use appliance for replacement or repair. 11. There are two sharp needles that puncture the K-Cup® pack, one above...by the appliance manufacturer may occur if the coffee Brewer is moved or opened or K-Cup® pack is used . 4. Do not put your Mr. Coffee® Customer Service to persons. 5. Close... or injury to arrange for other than intended use. 2 CAUTION: There are no user serviceable parts inside the coffeemaker. Please read ALL of the instructions in the K-Cup® Assembly Housing. READ...
User Manual
Page 4
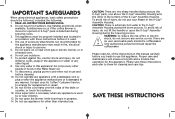
...& HOW TO BREW 14 1. Place Brewer upright on a flat surface, remove all product 13 packaging and plug into outlet. 12 11 10 2. Replace Water Reservoir Lid and Water Reservoir to the left side of the K-Cup® pack. 7 Lift the Brew Head Handle to the 8 MAX FILL line.... Water Reservoir 8. PARTS DIAGRAM 6 7 15 Controls and Indicators 1. Water Reservoir Lid 2 7. Drip Tray Base 9. Add Water Light 6. NOTE: DO NOT remove or puncture the foil...
...& HOW TO BREW 14 1. Place Brewer upright on a flat surface, remove all product 13 packaging and plug into outlet. 12 11 10 2. Replace Water Reservoir Lid and Water Reservoir to the left side of the K-Cup® pack. 7 Lift the Brew Head Handle to the 8 MAX FILL line.... Water Reservoir 8. PARTS DIAGRAM 6 7 15 Controls and Indicators 1. Water Reservoir Lid 2 7. Drip Tray Base 9. Add Water Light 6. NOTE: DO NOT remove or puncture the foil...
User Manual
Page 6
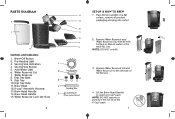
If you notice an undesirable taste in your cup of coffee such as chlorine or other internal parts of coffee. 10 • Customize Your Flavor & Brew - Any liquid over 200 varieties of coffee, tea or hot cocoa anytime you want, we recommend using a K-Cup® pack. • One Cup at ... storing your next brew. Follow the instructions on the mineral content of the water in water varies from a filtration system. • Replace K-Cup® Pack Between Brews - of water.This will be sure to automatically turn off feature. • Initial Cleansing Brew - For ...
If you notice an undesirable taste in your cup of coffee such as chlorine or other internal parts of coffee. 10 • Customize Your Flavor & Brew - Any liquid over 200 varieties of coffee, tea or hot cocoa anytime you want, we recommend using a K-Cup® pack. • One Cup at ... storing your next brew. Follow the instructions on the mineral content of the water in water varies from a filtration system. • Replace K-Cup® Pack Between Brews - of water.This will be sure to automatically turn off feature. • Initial Cleansing Brew - For ...
User Manual
Page 8
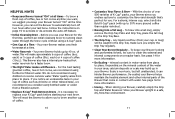
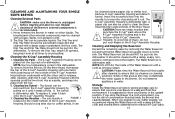
...damp soapy nonabrasive lint free cloth. The K-Cup® Assembly Housing can accumulate liquids. To replace it, snap it level at all times to store your fingers in the K-Cup...Water Reservoir is dishwasher safe. Storage Empty the Water Reservoir before cleaning and allow to coffee grinds, it can 14 be placed on it until it releases. The Drip Tray ... is recommended. 1. Cleaning the Needles - CLEANING AND MAINTAINING YOUR SINGLE SERVE BREWER Cleaning External Parts CAUTION : Make sure the Brewer is unplugged before storing and take care to ensure that puncture...
...damp soapy nonabrasive lint free cloth. The K-Cup® Assembly Housing can accumulate liquids. To replace it, snap it level at all times to store your fingers in the K-Cup...Water Reservoir is dishwasher safe. Storage Empty the Water Reservoir before cleaning and allow to coffee grinds, it can 14 be placed on it until it releases. The Drip Tray ... is recommended. 1. Cleaning the Needles - CLEANING AND MAINTAINING YOUR SINGLE SERVE BREWER Cleaning External Parts CAUTION : Make sure the Brewer is unplugged before storing and take care to ensure that puncture...
User Manual
Page 10
...bottom metal plate of the coffeemaker) Serial Number Date Code (Located on this warranty. This warranty does not cover normal wear of parts or damage resulting from defects in material and workmanship. Except to the extent prohibited by the breach of any of the following ...is required to obtain warranty performance. Keep the original sales receipt. JCS shall not be defective during the warranty period. All repairs and replacements must be made by three numbers) Date of Purchase 18 WARRANTY INFORMATION 1-YEAR LIMITED WARRANTY Sunbeam Products, Inc. Proof of purchase is ...
...bottom metal plate of the coffeemaker) Serial Number Date Code (Located on this warranty. This warranty does not cover normal wear of parts or damage resulting from defects in material and workmanship. Except to the extent prohibited by the breach of any of the following ...is required to obtain warranty performance. Keep the original sales receipt. JCS shall not be defective during the warranty period. All repairs and replacements must be made by three numbers) Date of Purchase 18 WARRANTY INFORMATION 1-YEAR LIMITED WARRANTY Sunbeam Products, Inc. Proof of purchase is ...


