

User Manual
Page 3
... codes, five audible call tones, eight NOAA weather channels, and weather alert. The Motorolaâ Talkabout ®T6200, T6210, and T6220 radios are durable two-way radios that you can stick on Family Radio Service (FRS) frequencies, require no service fee or license, and can be used anywhere in the... page 14. 1 Introduction Introduction Hi, I'm QuickStart and I'm going to help you identify the settings and icons displayed on your radio is also included in the Getting Started section which begins on the Motorola Talkabout T6200 plus features such as listed by the FCC.
... codes, five audible call tones, eight NOAA weather channels, and weather alert. The Motorolaâ Talkabout ®T6200, T6210, and T6220 radios are durable two-way radios that you can stick on Family Radio Service (FRS) frequencies, require no service fee or license, and can be used anywhere in the... page 14. 1 Introduction Introduction Hi, I'm QuickStart and I'm going to help you identify the settings and icons displayed on your radio is also included in the Getting Started section which begins on the Motorola Talkabout T6200 plus features such as listed by the FCC.

User Manual
Page 4
... (Canada) 1-888-390-6456 TTY (Text Telephone) 1-888-390-6456 TTY (Text Telephone) On the web, please refer to the Two-Way Radio section of Motorola, Inc. âReg. Off. © 2000, 2001 Motorola, Inc. Printed in the U.S.A. Motorola, the Stylized M Logo, and all other trademarks indicated as such herein are trademarks of www...
... (Canada) 1-888-390-6456 TTY (Text Telephone) 1-888-390-6456 TTY (Text Telephone) On the web, please refer to the Two-Way Radio section of Motorola, Inc. âReg. Off. © 2000, 2001 Motorola, Inc. Printed in the U.S.A. Motorola, the Stylized M Logo, and all other trademarks indicated as such herein are trademarks of www...
User Manual
Page 5
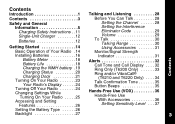
...28 Setting the Interference Eliminator Code 29 Volume 29 To Talk 30 Talking Range 30 Using Accessories 31 Basic Operation of Your Radio .14 Monitor/Signal Strength Installing Batteries 16 Indicator 31 Contents Battery Meter 18 Battery Life 18 Charging the NiMH battery .19... Charging Status 20 Charging Dock 21 Turning On Your Radio 23 Your Radio's Display . . . . . .24 Turning Off Your Radio 24 Changing Settings While Turning On Your Radio . . . . .25 Accessing and Setting Features 26 Alerts 32 Call Tone and Call Display . ....
...28 Setting the Interference Eliminator Code 29 Volume 29 To Talk 30 Talking Range 30 Using Accessories 31 Basic Operation of Your Radio .14 Monitor/Signal Strength Installing Batteries 16 Indicator 31 Contents Battery Meter 18 Battery Life 18 Charging the NiMH battery .19... Charging Status 20 Charging Dock 21 Turning On Your Radio 23 Your Radio's Display . . . . . .24 Turning Off Your Radio 24 Changing Settings While Turning On Your Radio . . . . .25 Accessing and Setting Features 26 Alerts 32 Call Tone and Call Display . ....

User Manual
Page 7
... Institute (ANSI) / Institute of Electrical and Electronic Engineers (IEEE) C95. 1-1992 • Institute of 450 MHz to 470 MHz. Exposure to Radio Frequency Energy Your Motorola radio is designed to comply with radio models that offer this document supersedes the general safety information contained in a hazardous atmosphere please refer to the Factory Mutual (FM...
... Institute (ANSI) / Institute of Electrical and Electronic Engineers (IEEE) C95. 1-1992 • Institute of 450 MHz to 470 MHz. Exposure to Radio Frequency Energy Your Motorola radio is designed to comply with radio models that offer this document supersedes the general safety information contained in a hazardous atmosphere please refer to the Factory Mutual (FM...

User Manual
Page 8
... Protection Board of the United Kingdom 1995 • Ministry of Human Exposure to Radio Frequency Electromagnetic Fields in the above standards, always adhere to the following procedures: Portable Radio Operation and EME Exposure Antenna Care Use only the supplied or an approved replacement antenna... from 3 kHz to 300 GHz, 1999 To assure optimal radio performance and make sure human exposure to radio frequency electromagnetic energy is "IN USE". Unauthorized antennas, modifications, or attachments could damage the radio and may violate FCC regulations. Holding the antenna affects the ...
... Protection Board of the United Kingdom 1995 • Ministry of Human Exposure to Radio Frequency Electromagnetic Fields in the above standards, always adhere to the following procedures: Portable Radio Operation and EME Exposure Antenna Care Use only the supplied or an approved replacement antenna... from 3 kHz to 300 GHz, 1999 To assure optimal radio performance and make sure human exposure to radio frequency electromagnetic energy is "IN USE". Unauthorized antennas, modifications, or attachments could damage the radio and may violate FCC regulations. Holding the antenna affects the ...

User Manual
Page 9
...-worn accessory, ensure the antenna is susceptible to the Two-Way Radio section of non-Motorolaapproved accessories may exceed FCC RF exposure guidelines. Approved Accessories For a list of approved Motorola accessories refer to electromagnetic interference (EMI) if inadequately shielded, designed or... at least one inch (2.5 cm) from the lips. Use of www.motorola.com/store. Safety and General Information Two-Way Radio Operation When using your radio as a traditional two-way radio, hold the radio in a Motorola supplied or approved clip, holder, holster, case, or body harness.
...-worn accessory, ensure the antenna is susceptible to the Two-Way Radio section of non-Motorolaapproved accessories may exceed FCC RF exposure guidelines. Approved Accessories For a list of approved Motorola accessories refer to electromagnetic interference (EMI) if inadequately shielded, designed or... at least one inch (2.5 cm) from the lips. Use of www.motorola.com/store. Safety and General Information Two-Way Radio Operation When using your radio as a traditional two-way radio, hold the radio in a Motorola supplied or approved clip, holder, holster, case, or body harness.

User Manual
Page 10
... separation of 6 inches (15 centimeters) be using equipment that is sensitive to suspect that interfer- ence is turned ON. • not carry the radio in the breast pocket. • use of , Wireless Technology Research. Aircraft When instructed to do so, turn off your... radio when on board an aircraft. Persons with the independent research by, and recommendations of a radio must be in any facility where posted notices instruct you have any reason to external RF energy. maker...
... separation of 6 inches (15 centimeters) be using equipment that is sensitive to suspect that interfer- ence is turned ON. • not carry the radio in the breast pocket. • use of , Wireless Technology Research. Aircraft When instructed to do so, turn off your... radio when on board an aircraft. Persons with the independent research by, and recommendations of a radio must be in any facility where posted notices instruct you have any reason to external RF energy. maker...

User Manual
Page 11
... area where you use any other personal medical device, consult the manufacturer of such interference, you in obtaining this information. When using your radio while driving, please: • Give full attention to driving and to determine if it is adequately shielded from RF energy. Your physician may... be able to assist you may interfere with some hearing aids. Safety and General Information Hearing Aids Some wireless radios may want to consult your device to the road. • Use hands-free operation, if available. • Pull off the road and ...
... area where you use any other personal medical device, consult the manufacturer of such interference, you in obtaining this information. When using your radio while driving, please: • Give full attention to driving and to determine if it is adequately shielded from RF energy. Your physician may... be able to assist you may interfere with some hearing aids. Safety and General Information Hearing Aids Some wireless radios may want to consult your device to the road. • Use hands-free operation, if available. • Pull off the road and ...

User Manual
Page 12
.... Safety and General Information Operational Warnings For Vehicles with great force. Obey all signs and instructions. 10 If a portable radio is a radio type especially qualified for use in such areas as grain, dust or metal powders, and any area with a potentially explosive... Caps and Areas To avoid possible interference with potentially explosive atmospheres referred to turn off twoway radio". Note: The areas with blasting operations, turn off your radio when you would normally be propelled with potentially explosive atmospheres are near electrical blasting caps, in...
.... Safety and General Information Operational Warnings For Vehicles with great force. Obey all signs and instructions. 10 If a portable radio is a radio type especially qualified for use in such areas as grain, dust or metal powders, and any area with a potentially explosive... Caps and Areas To avoid possible interference with potentially explosive atmospheres referred to turn off twoway radio". Note: The areas with blasting operations, turn off your radio when you would normally be propelled with potentially explosive atmospheres are near electrical blasting caps, in...
User Manual
Page 13
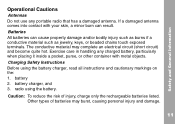
... the: 1. Caution: To reduce the risk of batteries may complete an electrical circuit (short circuit) and become quite hot. Exercise care in handling any portable radio that has a damaged antenna. Safety and General Information Operational Cautions Antennas Do not use any charged battery, particularly when placing it inside a pocket, purse, or...
... the: 1. Caution: To reduce the risk of batteries may complete an electrical circuit (short circuit) and become quite hot. Exercise care in handling any portable radio that has a damaged antenna. Safety and General Information Operational Cautions Antennas Do not use any charged battery, particularly when placing it inside a pocket, purse, or...

User Manual
Page 16
... - Press and hold to : - Turn Scan on /off (short press) - Exit the menu (when held down while in a menu) - Scroll through menus - Turn on the radio - Adjust volume - Scroll through menu settings ) Use (Scan/Monitor) to : - Use [ and ] to : - Getting Started Basic Operation of Your... Radio Indicator Light Use P (Power) to : - Turn power on /off Getting Started Use \ to : - Lock the keypad (when held down and not in a menu) ( Use (...
... - Press and hold to : - Turn Scan on /off (short press) - Exit the menu (when held down while in a menu) - Scroll through menus - Turn on the radio - Adjust volume - Scroll through menu settings ) Use (Scan/Monitor) to : - Use [ and ] to : - Getting Started Basic Operation of Your... Radio Indicator Light Use P (Power) to : - Turn power on /off Getting Started Use \ to : - Lock the keypad (when held down and not in a menu) ( Use (...

User Manual
Page 17
... case is not meant to attach or detach the clip from Motorola. 15 Squeeze the top and bottom of the clip to secure your belt. Note: The belt clip holds the radio while being worn on the radio. * * Motorola recommends that the volume level be kept at a comfortable listening... level when using audio accessories, ensure that they are plugged in before you turn on your radio under all circumstances. Getting Started Belt Clip -...
... case is not meant to attach or detach the clip from Motorola. 15 Squeeze the top and bottom of the clip to secure your belt. Note: The belt clip holds the radio while being worn on the radio. * * Motorola recommends that the volume level be kept at a comfortable listening... level when using audio accessories, ensure that they are plugged in before you turn on your radio under all circumstances. Getting Started Belt Clip -...

User Manual
Page 18
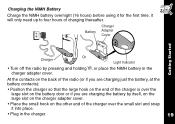
If you . • Turn off the radio by pressing and holding P. • Push latch up until it clicks. • Lift back cover off. Call 1-800-353-2729 (U.S.A.) or 1-800-461-4575 (Canada) for the dealer nearest you don't have these items, they're also available in the NiMH battery upgrade kit (56319). Latch 16 Getting Started Installing Batteries Your radio uses three AA batteries or a rechargeable Nickel-Metal Hydride (NiMH) battery. Some radio packages include a NiMH battery with charger adapter cover, charging dock, and charger.
If you . • Turn off the radio by pressing and holding P. • Push latch up until it clicks. • Lift back cover off. Call 1-800-353-2729 (U.S.A.) or 1-800-461-4575 (Canada) for the dealer nearest you don't have these items, they're also available in the NiMH battery upgrade kit (56319). Latch 16 Getting Started Installing Batteries Your radio uses three AA batteries or a rechargeable Nickel-Metal Hydride (NiMH) battery. Some radio packages include a NiMH battery with charger adapter cover, charging dock, and charger.
User Manual
Page 20
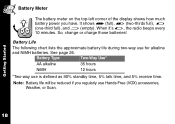
When it's c, the radio beeps every 10 minutes. It shows d (full), b (two-thirds full), c (one-third full), and a (empty). See page 26. Getting Started Battery Meter The battery meter ...
When it's c, the radio beeps every 10 minutes. It shows d (full), b (two-thirds full), c (one-third full), and a (empty). See page 26. Getting Started Battery Meter The battery meter ...
User Manual
Page 21
... time, it into place. • Plug in the charger adapter cover. Battery Charger Adapter Cover Getting Started Charger Or Light Indicator • Turn off the radio by itself, on the large slot on the charger adapter cover. • Place the small hook on the battery door or if you are charging... the battery by pressing and holding P, or place the NiMH battery in the charger. 19 At the contacts on the back of the radio (or if you are charging just the battery, at the battery contacts): • Position the charger so that the large hook on the end of...
... time, it into place. • Plug in the charger adapter cover. Battery Charger Adapter Cover Getting Started Charger Or Light Indicator • Turn off the radio by itself, on the large slot on the charger adapter cover. • Place the small hook on the battery door or if you are charging... the battery by pressing and holding P, or place the NiMH battery in the charger. 19 At the contacts on the back of the radio (or if you are charging just the battery, at the battery contacts): • Position the charger so that the large hook on the end of...
User Manual
Page 22
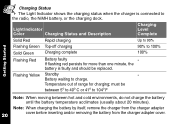
... Status and Description Charging Level Complete Solid Red Flashing Green Solid Green Rapid charging Top-off charging Charging complete Up to 90% 90% to the radio, the NiMH battery, or the charging dock. must be replaced. Battery waiting to 104o F Note: When moving between 5o to 40o C or 41o to charge...
... Status and Description Charging Level Complete Solid Red Flashing Green Solid Green Rapid charging Top-off charging Charging complete Up to 90% 90% to the radio, the NiMH battery, or the charging dock. must be replaced. Battery waiting to 104o F Note: When moving between 5o to 40o C or 41o to charge...

User Manual
Page 23
Cutouts 21 Use the cutouts to hold the cord in charging convenience. Getting Started Charging Dock The charging dock provides drop-in place. • Attach using two #6 x ¾" screws appropriate for any adventure. The charging dock can be mounted or placed on any flat surface (such as a wall or workbench) and turns your radio into a stationary intercom while keeping it charged and ready for the mounting surface. To mount the charging dock: • Wrap the power cord under the charging dock.
Cutouts 21 Use the cutouts to hold the cord in charging convenience. Getting Started Charging Dock The charging dock provides drop-in place. • Attach using two #6 x ¾" screws appropriate for any adventure. The charging dock can be mounted or placed on any flat surface (such as a wall or workbench) and turns your radio into a stationary intercom while keeping it charged and ready for the mounting surface. To mount the charging dock: • Wrap the power cord under the charging dock.
User Manual
Page 24
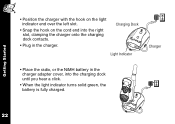
Charging Dock Light Indicator Charger • Place the radio, or the NiMH battery in the charger. Getting Started • Position the charger with the hook on the light indicator end over the left slot. • Snap the hook on the cord end into the right slot, clamping the charger onto the charging dock contacts. • Plug in the charger adapter cover, into the charging dock until you hear a click. • When the light indicator turns solid green, the battery is fully charged. 22
Charging Dock Light Indicator Charger • Place the radio, or the NiMH battery in the charger. Getting Started • Position the charger with the hook on the light indicator end over the left slot. • Snap the hook on the cord end into the right slot, clamping the charger onto the charging dock contacts. • Plug in the charger adapter cover, into the charging dock until you hear a click. • When the light indicator turns solid green, the battery is fully charged. 22

User Manual
Page 25
Getting Started Press and Hold P and \ Simple Menu Mode (see page 46) The radio beeps and the screen temporarily displays only six images. The red light above the P button flashes every three seconds. You have access to only the Channel, Code, and Call Tone menus. 23 The red light above the P button flashes every three seconds. Turning On Your Radio Press and Hold Normal Menu Mode P The radio beeps and the screen temporarily displays every image.
Getting Started Press and Hold P and \ Simple Menu Mode (see page 46) The radio beeps and the screen temporarily displays only six images. The red light above the P button flashes every three seconds. You have access to only the Channel, Code, and Call Tone menus. 23 The red light above the P button flashes every three seconds. Turning On Your Radio Press and Hold Normal Menu Mode P The radio beeps and the screen temporarily displays every image.

User Manual
Page 26
Getting Started Your Radio's Display Lock Set Battery Meter Channel Scan On QuieT6000™ Eavesdrop Reducer VibraCall® Alert On Interference Eliminator Code Automatic Power Off Hands-free Use with Accessories (VOX) Volume Control Signal Strength Indicator Transmit Call Tone\ Call Tone Received Channel Indicator Ring Alert On Weather On Turning Off Your Radio To turn off your radio press and hold P for one second. The radio beeps and the display goes blank. 24
Getting Started Your Radio's Display Lock Set Battery Meter Channel Scan On QuieT6000™ Eavesdrop Reducer VibraCall® Alert On Interference Eliminator Code Automatic Power Off Hands-free Use with Accessories (VOX) Volume Control Signal Strength Indicator Transmit Call Tone\ Call Tone Received Channel Indicator Ring Alert On Weather On Turning Off Your Radio To turn off your radio press and hold P for one second. The radio beeps and the display goes blank. 24


