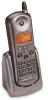
User Guide
Page 6
... Canada (IC) Information xvi Getting Started 1 Battery Safety Instructions 1 Charging the Battery 2 Handset Display Screens 5 Using the Handset Display 5 LLED Using the Soft Keys 7 Using the Navigation Key 7 NTRO Setting Up 8 Registering an Expansion Handset 8 UNCO ENT Deregistering an Expansion Handset 8 Personalizing Your Expansion Handset 9 CUM Ringer Options 9 Setting the Ring Tone and Ring Volume 10 Setting the...
... Canada (IC) Information xvi Getting Started 1 Battery Safety Instructions 1 Charging the Battery 2 Handset Display Screens 5 Using the Handset Display 5 LLED Using the Soft Keys 7 Using the Navigation Key 7 NTRO Setting Up 8 Registering an Expansion Handset 8 UNCO ENT Deregistering an Expansion Handset 8 Personalizing Your Expansion Handset 9 CUM Ringer Options 9 Setting the Ring Tone and Ring Volume 10 Setting the...
User Guide
Page 19
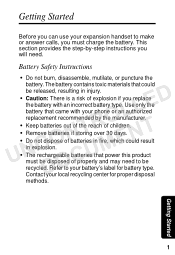
...; The rechargeable batteries that came with an incorrect battery type. Getting Started Before you can use your local recycling center for battery type. Contact your expansion handset to make or answer calls, you must be disposed of explosion if you will need to your phone or an authorized replacement recommended by -step...
...; The rechargeable batteries that came with an incorrect battery type. Getting Started Before you can use your local recycling center for battery type. Contact your expansion handset to make or answer calls, you must be disposed of explosion if you will need to your phone or an authorized replacement recommended by -step...
User Guide
Page 21
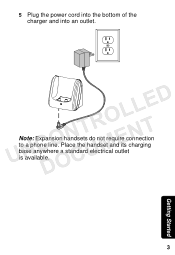
Place the handset and its charging CUM base anywhere a standard electrical outlet DO is available. 3 Getting Started UNCONTROELNLTED Note: Expansion handsets do not require connection to a phone line. 5 Plug the power cord into the bottom of the charger and into an outlet.
Place the handset and its charging CUM base anywhere a standard electrical outlet DO is available. 3 Getting Started UNCONTROELNLTED Note: Expansion handsets do not require connection to a phone line. 5 Plug the power cord into the bottom of the charger and into an outlet.
User Guide
Page 26
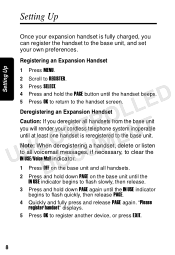
... and hold down PAGE again until the handset beeps. Deregistering an Expansion Handset NTRO Caution: If you can register the handset to the base unit, and set your own preferences. Note: When deregistering a handset, delete or listen CUM to all handsets from the base unit you will render your cordless telephone system inoperable UNCO ENT until at...
... and hold down PAGE again until the handset beeps. Deregistering an Expansion Handset NTRO Caution: If you can register the handset to the base unit, and set your own preferences. Note: When deregistering a handset, delete or listen CUM to all handsets from the base unit you will render your cordless telephone system inoperable UNCO ENT until at...
User Guide
Page 27
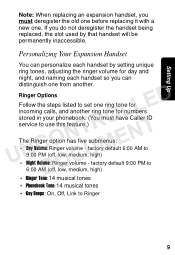
... Tone: 14 musical tones • Key Beeps: On, Off, Link to set one ring tone for incoming calls, and another . Personalizing Your Expansion Handset You can distinguish one . Ringer Options LLED Follow the steps listed to Ringer 9 factory default 9:00 PM to use this feature.) UNCO ENT The...old one before replacing it with a new one from another ring tone for day and night, and naming each handset by that handset will be permanently inaccessible. Setting Up Note: When replacing an expansion handset, you must have Caller ID NTRO service to DO 6:00 AM (off , low, medium, high) &#...
... Tone: 14 musical tones • Key Beeps: On, Off, Link to set one ring tone for incoming calls, and another . Personalizing Your Expansion Handset You can distinguish one . Ringer Options LLED Follow the steps listed to Ringer 9 factory default 9:00 PM to use this feature.) UNCO ENT The...old one before replacing it with a new one from another ring tone for day and night, and naming each handset by that handset will be permanently inaccessible. Setting Up Note: When replacing an expansion handset, you must have Caller ID NTRO service to DO 6:00 AM (off , low, medium, high) &#...
User Guide
Page 30
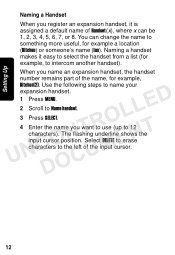
... more useful, for example, to intercom another handset). The flashing underline shows the input cursor position. You can be 1, 2, 3, 4, 5, 6, 7, or 8. When you name an expansion handset, the handset number remains part of the input cursor. 12 Setting Up Naming a Handset When you register an expansion handset, it easy to select the handset from a list (for example a location (Kitchen...
... more useful, for example, to intercom another handset). The flashing underline shows the input cursor position. You can be 1, 2, 3, 4, 5, 6, 7, or 8. When you name an expansion handset, the handset number remains part of the input cursor. 12 Setting Up Naming a Handset When you register an expansion handset, it easy to select the handset from a list (for example a location (Kitchen...