

User Manual
Page 7
... Interface Cable 1-5 Chapter 2: Scanning Introduction ...2-1 Beeper Definitions ...2-2 LED Definitions ...2-3 Scanning in Hand-Held Mode 2-4 Aiming ...2-5 Decode Zone ...2-6 Scanning in Hands-Free Mode 2-7 Assembling the Stand 2-7 Mounting the Stand (optional 2-8 Scanning in Hands-Free Mode 2-9 Scanning in the Hands-Free Mode 2-9
... Interface Cable 1-5 Chapter 2: Scanning Introduction ...2-1 Beeper Definitions ...2-2 LED Definitions ...2-3 Scanning in Hand-Held Mode 2-4 Aiming ...2-5 Decode Zone ...2-6 Scanning in Hands-Free Mode 2-7 Assembling the Stand 2-7 Mounting the Stand (optional 2-8 Scanning in Hands-Free Mode 2-9 Scanning in the Hands-Free Mode 2-9

User Manual
Page 31
... securely in the grooves in the Hands-Free Mode for scanning. Assembling the Stand One piece scanner "cup" with flexible neck. 1. See Assembling the Stand, Mounting the Stand (optional), and Scanning in the base. Tighten the wingnut underneath the base to secure the cup and neck piece to scanning operation. Scanning...
... securely in the grooves in the Hands-Free Mode for scanning. Assembling the Stand One piece scanner "cup" with flexible neck. 1. See Assembling the Stand, Mounting the Stand (optional), and Scanning in the base. Tighten the wingnut underneath the base to secure the cup and neck piece to scanning operation. Scanning...
User Manual
Page 32
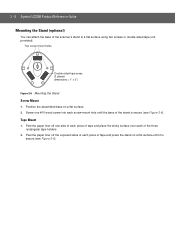
... secure (see Figure 2-6). Screw one side of each piece of tape and place the sticky surface over each of the three rectangular tape holders. 2. Tape Mount 1. Peel the paper liner off the exposed sides of tape and press the stand on a flat surface. 2. Position the assembled base on a flat surface... until the base of the scanner's stand to a flat surface using two screws or double-sided tape (not provided). 2 - 8 Symbol LS2208 Product Reference Guide Mounting the Stand (optional) You can attach the base of the stand is secure (see Figure 2-6).
... secure (see Figure 2-6). Screw one side of each piece of tape and place the sticky surface over each of the three rectangular tape holders. 2. Tape Mount 1. Peel the paper liner off the exposed sides of tape and press the stand on a flat surface. 2. Position the assembled base on a flat surface... until the base of the scanner's stand to a flat surface using two screws or double-sided tape (not provided). 2 - 8 Symbol LS2208 Product Reference Guide Mounting the Stand (optional) You can attach the base of the stand is secure (see Figure 2-6).
User Manual
Page 338
Index - 4 Symbol LS2208 Product Reference Guide keyboard wedge parameters 5-4 M maintenance 3-1 miscellaneous scanner parameters 13-2 mounting the stand 2-8 MSI bar codes check digit algorithm 12-51 check digits 12-50 lengths... to an IBM 468X/469X host 8-2 connecting using wand emulation 9-2, 10-2 installing the cable 1-3 unpacking 1-2 signal descriptions 3-6 specifications 3-4 stand assembling 2-7 mounting 2-8 standard defaults 4-2, A-1 symbology default parameters 12-2 T technical specifications 3-4 U unpacking 1-2 UPC/EAN bar codes bookland EAN 12-8 bookland ISBN 12-19...
Index - 4 Symbol LS2208 Product Reference Guide keyboard wedge parameters 5-4 M maintenance 3-1 miscellaneous scanner parameters 13-2 mounting the stand 2-8 MSI bar codes check digit algorithm 12-51 check digits 12-50 lengths... to an IBM 468X/469X host 8-2 connecting using wand emulation 9-2, 10-2 installing the cable 1-3 unpacking 1-2 signal descriptions 3-6 specifications 3-4 stand assembling 2-7 mounting 2-8 standard defaults 4-2, A-1 symbology default parameters 12-2 T technical specifications 3-4 U unpacking 1-2 UPC/EAN bar codes bookland EAN 12-8 bookland ISBN 12-19...