Operating and Installation manual
Page 1
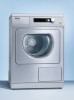
Operating and Installation manual Vented Dryer PT 7136 Plus To prevent accidents and machine damage read these instructions before installation or use. US M.-Nr. 06 975 240 en -
Operating and Installation manual Vented Dryer PT 7136 Plus To prevent accidents and machine damage read these instructions before installation or use. US M.-Nr. 06 975 240 en -
Operating and Installation manual
Page 28
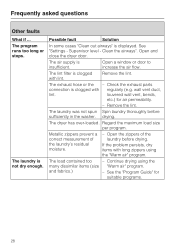
See "Settings - wall vent duct, lint. The dryer has over-loaded. Continue drying using the "Warm air" program. ...exhaust hose or the - Open the zippers of the laundry's residual moisture. - Open and close the dryer door. The lint filter is clogged with regularly (e.g. The laundry was not spun Spin laundry thoroughly before drying.... The laundry is insufficient. Open a window or door to increase the air flow. louvered wall vent, bends, etc.) for suitable programs. 28 Metallic zippers prevent a correct measurement of the laundry before sufficiently...
See "Settings - wall vent duct, lint. The dryer has over-loaded. Continue drying using the "Warm air" program. ...exhaust hose or the - Open the zippers of the laundry's residual moisture. - Open and close the dryer door. The lint filter is clogged with regularly (e.g. The laundry was not spun Spin laundry thoroughly before drying.... The laundry is insufficient. Open a window or door to increase the air flow. louvered wall vent, bends, etc.) for suitable programs. 28 Metallic zippers prevent a correct measurement of the laundry before sufficiently...
Operating and Installation manual
Page 34
... use with the appliance! Flexible venting materials are in accordance with a cord having an equipment grounding conductor and a grounding plug. Work by a Miele authorized service technician. This appliance is a potential fire hazard. ~ The appliance shall not be grounded. If it is equipped with all installation instructions. ~ Clothes dryer installation must be performed by...
... use with the appliance! Flexible venting materials are in accordance with a cord having an equipment grounding conductor and a grounding plug. Work by a Miele authorized service technician. This appliance is a potential fire hazard. ~ The appliance shall not be grounded. If it is equipped with all installation instructions. ~ Clothes dryer installation must be performed by...

Operating and Installation manual
Page 39
...be provided between the machine and the floor. Level the dryer ^ The machine can be leveled by toe kicks, long piled carpet, etc. The dryer must not be mounted in place. 39 The unit is not intended to the installation site. The vents must be operated without the lid in a wall or ...other vertical surface of the lid has transport grips. ^ Use the front dryer feet and the rear overhang to transport the dryer from the packaging base to be blocked by turning the ...
...be provided between the machine and the floor. Level the dryer ^ The machine can be leveled by toe kicks, long piled carpet, etc. The dryer must not be mounted in place. 39 The unit is not intended to the installation site. The vents must be operated without the lid in a wall or ...other vertical surface of the lid has transport grips. ^ Use the front dryer feet and the rear overhang to transport the dryer from the packaging base to be blocked by turning the ...

Operating and Installation manual
Page 41
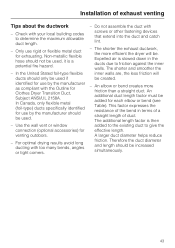
Installation of exhaust venting General notes ,The dryer must be installed, so that the moist exhaust air cannot get drawn back into the installation room and cause constructional damage or unreasonable disturbance. The room air, which is taken in when the dryer is in operation, is small, to ensure... in the wall., for example, will allow more air to enter the room. Danger of suffocation by an installed exhaust duct vent. ,Disconnect the dryer from the drying process is conducted outside by suction of the exhaust duct. Otherwise drying times and energy consumption may increase. It...
Installation of exhaust venting General notes ,The dryer must be installed, so that the moist exhaust air cannot get drawn back into the installation room and cause constructional damage or unreasonable disturbance. The room air, which is taken in when the dryer is in operation, is small, to ensure... in the wall., for example, will allow more air to enter the room. Danger of suffocation by an installed exhaust duct vent. ,Disconnect the dryer from the drying process is conducted outside by suction of the exhaust duct. Otherwise drying times and energy consumption may increase. It...

Operating and Installation manual
Page 42
...noting the type of bends. Do not use the ring adapter if the effective duct length is not employed. 42 Installation of exhaust venting How to calculate the effective duct length The overall duct length will provide optimal drying times and energy consumption. Effective duct lengths over ... 10" (2.4 m). Add the additional duct length (as derived by using flexible metal duct the total length must be 4" (102 mm) in dryer efficiency if the necessary duct diameter is more information on maximum duct lengths and number of bend, angle and radius involved (see the "Additional duct...
...noting the type of bends. Do not use the ring adapter if the effective duct length is not employed. 42 Installation of exhaust venting How to calculate the effective duct length The overall duct length will provide optimal drying times and energy consumption. Effective duct lengths over ... 10" (2.4 m). Add the additional duct length (as derived by using flexible metal duct the total length must be 4" (102 mm) in dryer efficiency if the necessary duct diameter is more information on maximum duct lengths and number of bend, angle and radius involved (see the "Additional duct...
Operating and Installation manual
Page 43
.... Therefore the duct diameter and length should be created. - Use the wall vent or window connection (optional accessories) for Clothes Dryer Transition Duct, Subject ANSI/UL 2158A. An elbow or bend creates more efficient the dryer will be used , it is a potential fire hazard. - Expelled air is... then added to the existing duct to friction against the inner walls. The additional length factor is slowed down in terms of a straight length of exhaust venting Tips about the ...
.... Therefore the duct diameter and length should be created. - Use the wall vent or window connection (optional accessories) for Clothes Dryer Transition Duct, Subject ANSI/UL 2158A. An elbow or bend creates more efficient the dryer will be used , it is a potential fire hazard. - Expelled air is... then added to the existing duct to friction against the inner walls. The additional length factor is slowed down in terms of a straight length of exhaust venting Tips about the ...
Operating and Installation manual
Page 46
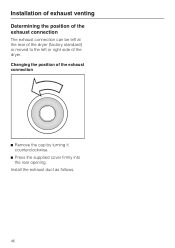
Install the exhaust duct as follows. 46 Installation of exhaust venting Determining the position of the exhaust connection The exhaust connection can be left at the rear of the dryer (factory standard) or moved to the left or right side of the exhaust connection ^ Remove the cap by turning it counterclockwise. ^ Press the supplied cover firmly into the rear opening. Changing the position of the dryer.
Install the exhaust duct as follows. 46 Installation of exhaust venting Determining the position of the exhaust connection The exhaust connection can be left at the rear of the dryer (factory standard) or moved to the left or right side of the exhaust connection ^ Remove the cap by turning it counterclockwise. ^ Press the supplied cover firmly into the rear opening. Changing the position of the dryer.

Operating and Installation manual
Page 47
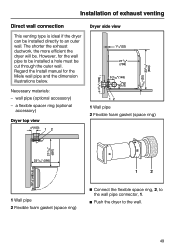
an exhaust hose made of exhaust venting Exhaust connection with the exhaust hose or pipe, 2, to the dryer. 1 Wall pipe 2 Connector 3 Rigid pipe 47 Installation of approved non-flammable material. - Necessary materials: - a wall or window duct (optional accessory) - rigid pipe is more suitable ...
an exhaust hose made of exhaust venting Exhaust connection with the exhaust hose or pipe, 2, to the dryer. 1 Wall pipe 2 Connector 3 Rigid pipe 47 Installation of approved non-flammable material. - Necessary materials: - a wall or window duct (optional accessory) - rigid pipe is more suitable ...
Operating and Installation manual
Page 49
...to the wall pipe connector, 1. ^ Push the dryer to be installed a hole must be cut through the outer wall. Installation of exhaust venting Direct wall connection This venting type is ideal if the dryer can be . However, for the Miele wall pipe and the dimension illustrations below. wall pipe... (optional accessory) - The shorter the exhaust ductwork, the more efficient the dryer will be installed directly...
...to the wall pipe connector, 1. ^ Push the dryer to be installed a hole must be cut through the outer wall. Installation of exhaust venting Direct wall connection This venting type is ideal if the dryer can be . However, for the Miele wall pipe and the dimension illustrations below. wall pipe... (optional accessory) - The shorter the exhaust ductwork, the more efficient the dryer will be installed directly...
Operating and Installation manual
Page 50
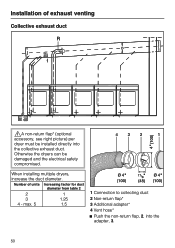
max. 5 1.5 1 Connection to collecting duct 2 Non-return flap* 3 Additional adapter* 4 Vent hose* ^ Push the non-return flap, 2, into the collective exhaust duct. Number of exhaust venting Collective exhaust duct ,A non-return flap* (optional accessory, see right picture) per dryer must be damaged and the electrical safety compromised. Installation of units Increasing factor for duct diameter from table 2 2 1 3 1.25 4 - Otherwise the dryers can be installed directly into the adapter, 3. 50 When installing multiple dryers, increase the duct diameter.
max. 5 1.5 1 Connection to collecting duct 2 Non-return flap* 3 Additional adapter* 4 Vent hose* ^ Push the non-return flap, 2, into the collective exhaust duct. Number of exhaust venting Collective exhaust duct ,A non-return flap* (optional accessory, see right picture) per dryer must be damaged and the electrical safety compromised. Installation of units Increasing factor for duct diameter from table 2 2 1 3 1.25 4 - Otherwise the dryers can be installed directly into the adapter, 3. 50 When installing multiple dryers, increase the duct diameter.


