

Operating and Installation manual
Page 5
... for use of the cooktop. Only certain types of the burners, keep the igniters clean and dry. Do not store aerosols, gasoline, combustibles or any part of the cooktop. Do not use pans that any burners in use the cooktop to line any other countertop appliances.
... for use of the cooktop. Only certain types of the burners, keep the igniters clean and dry. Do not store aerosols, gasoline, combustibles or any part of the cooktop. Do not use pans that any burners in use the cooktop to line any other countertop appliances.

Operating and Installation manual
Page 10
Metal components have a protective coating which may give off a slight odor the first time your new appliance is heated. The harmless odor will dissipate after a short time and does not indicate a faulty connection or appliance defect. ^ Wipe the cooktop with a mild solution of warm water and liquid dish soap. ^ Wipe dry and reassemble the parts in the proper order (see "Cleaning and care"). Before using the cooktop Cleaning the cooktop Before using for the first time clean the appliance as follows: ^ Wash the gas burner assembly with a damp cloth and dry thoroughly. 10
Metal components have a protective coating which may give off a slight odor the first time your new appliance is heated. The harmless odor will dissipate after a short time and does not indicate a faulty connection or appliance defect. ^ Wipe the cooktop with a mild solution of warm water and liquid dish soap. ^ Wipe dry and reassemble the parts in the proper order (see "Cleaning and care"). Before using the cooktop Cleaning the cooktop Before using for the first time clean the appliance as follows: ^ Wash the gas burner assembly with a damp cloth and dry thoroughly. 10
Operating and Installation manual
Page 12
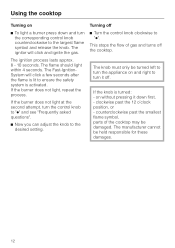
... the appliance on without pressing it off the cooktop. This stops the flow of the cooktop may be damaged. clockwise past the smallest flame symbol, parts of gas and turns off . The ignitor will click a few seconds after the flame is lit to the desired setting. on and right to turn...
... the appliance on without pressing it off the cooktop. This stops the flow of the cooktop may be damaged. clockwise past the smallest flame symbol, parts of gas and turns off . The ignitor will click a few seconds after the flame is lit to the desired setting. on and right to turn...

Operating and Installation manual
Page 17
... extend through their respective holes. ^ Return the burner cap, c. ^ Return the grate. 17 Reassembling Auxiliary, Normal and Fast burner Dismantling and cleaning ^ Remove the burner parts and wash them in a solution of the burner caps will dull with a soft cloth. This is normal and will not affect the operation of the... are clean and completely dry. The shiny surfaces of warm water and liquid dish soap. ^ Dry them thoroughly. Be careful not to mix up the parts.
... extend through their respective holes. ^ Return the burner cap, c. ^ Return the grate. 17 Reassembling Auxiliary, Normal and Fast burner Dismantling and cleaning ^ Remove the burner parts and wash them in a solution of the burner caps will dull with a soft cloth. This is normal and will not affect the operation of the... are clean and completely dry. The shiny surfaces of warm water and liquid dish soap. ^ Dry them thoroughly. Be careful not to mix up the parts.

Operating and Installation manual
Page 18
Cleaning and care Reassembling the wok burner Be careful not to mix up the parts. The burner head must click into place correctly. ^ Replace the burner ring, b. ^ Replace the burner cap, a. 18 Make sure that all the locating tabs and notches align exactly. ^ Place the burner head, c, onto the burner base, d, so that the ignitor, e, and the Ignition Safety Control, f, extend through their respective holes in the burner head.
Cleaning and care Reassembling the wok burner Be careful not to mix up the parts. The burner head must click into place correctly. ^ Replace the burner ring, b. ^ Replace the burner cap, a. 18 Make sure that all the locating tabs and notches align exactly. ^ Place the burner head, c, onto the burner base, d, so that the ignitor, e, and the Ignition Safety Control, f, extend through their respective holes in the burner head.
Operating and Installation manual
Page 20
... goal is the only Extended Service Contract in writing by the Miele Service department, Extended Service Contracts offered by other providers for Miele products will not be recognized by 5 years of this booklet. Only genuine Miele parts installed by a Miele Authorized Service Provider using genuine Miele parts. MieleCare is to prevent unauthorized (and untrained) service personnel from...
... goal is the only Extended Service Contract in writing by the Miele Service department, Extended Service Contracts offered by other providers for Miele products will not be recognized by 5 years of this booklet. Only genuine Miele parts installed by a Miele Authorized Service Provider using genuine Miele parts. MieleCare is to prevent unauthorized (and untrained) service personnel from...

Operating and Installation manual
Page 28
... power cord that this appliance, continuity must be plugged directly into a properly grounded outlet. It is imperative that is accessible after installation. Canadian Electrical Code Part I for the USA or - Power supply The automatic ignition requires that it is ready for damages caused by a qualified electrician. To reduce the risk of...
... power cord that this appliance, continuity must be plugged directly into a properly grounded outlet. It is imperative that is accessible after installation. Canadian Electrical Code Part I for the USA or - Power supply The automatic ignition requires that it is ready for damages caused by a qualified electrician. To reduce the risk of...
