
Specs
Page 2
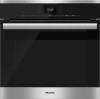
ContourLine 60cm Convection Oven H 6560 B FOREVER BETTER H 6560 B Features: • SensorTronic controls: 5-line TFT display with laterally positioned sensor controls that clearly present menu content. • PerfectClean interior makes for easy clean-up ...; CleanGlass Door • Timer • ComfortSwivel Handle moves with the motion of your wrist, creating a more ergonomic feel when opening and closing the oven door H 6560 B Page 2 of 7 up • Oven 35% larger cavity than Generation 4000 • 17 Operating Modes • Favorites -
ContourLine 60cm Convection Oven H 6560 B FOREVER BETTER H 6560 B Features: • SensorTronic controls: 5-line TFT display with laterally positioned sensor controls that clearly present menu content. • PerfectClean interior makes for easy clean-up ...; CleanGlass Door • Timer • ComfortSwivel Handle moves with the motion of your wrist, creating a more ergonomic feel when opening and closing the oven door H 6560 B Page 2 of 7 up • Oven 35% larger cavity than Generation 4000 • 17 Operating Modes • Favorites -
Specs
Page 3
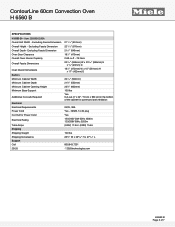
Excluding Fascia Dimension Overall Depth- ContourLine 60cm Convection Oven H 6560 B SPECIFICATIONS H 6560 B- Excluding Fascia Dimension Oven Door Clearance Overall Oven Interior Capacity Overall Fascia Dimensions Oven Interior Dimensions Built-In Minimum Cabinet Width Minimum Cabinet Depth Minimum ... 4200w 120/208V 60Hz 3200w (240V) 17.5A / (208V) 15.4A 109 lbs 263/8" W x 295/16" H x 273/16" L 800.843.7231 82020technologies.com FOREVER BETTER H 6560 B Page 3 of the cabinet for powercord and ventilation 240V, 30A Yes - Item 22656052USA Overal Unit Width -
Excluding Fascia Dimension Overall Depth- ContourLine 60cm Convection Oven H 6560 B SPECIFICATIONS H 6560 B- Excluding Fascia Dimension Oven Door Clearance Overall Oven Interior Capacity Overall Fascia Dimensions Oven Interior Dimensions Built-In Minimum Cabinet Width Minimum Cabinet Depth Minimum ... 4200w 120/208V 60Hz 3200w (240V) 17.5A / (208V) 15.4A 109 lbs 263/8" W x 295/16" H x 273/16" L 800.843.7231 82020technologies.com FOREVER BETTER H 6560 B Page 3 of the cabinet for powercord and ventilation 240V, 30A Yes - Item 22656052USA Overal Unit Width -

Specs
Page 4
ContourLine 60cm Convection Oven H 6560 B PRODUCT VIEWS Front View Front View FOREVER BETTER Front Side with Door Swing H 6560 B Page 4 of 7
ContourLine 60cm Convection Oven H 6560 B PRODUCT VIEWS Front View Front View FOREVER BETTER Front Side with Door Swing H 6560 B Page 4 of 7

Specs
Page 5
ContourLine 60cm Convection Oven H 6560 B PRODUCT VIEWS Isometric View FOREVER BETTER Top View H 6560 B Page 5 of 7
ContourLine 60cm Convection Oven H 6560 B PRODUCT VIEWS Isometric View FOREVER BETTER Top View H 6560 B Page 5 of 7

Specs
Page 6
ContourLine 60cm Convection Oven H 6560 B FOREVER BETTER PRODUCT VIEWS Rear View Rear View Electrical Connection INSTALLATION SPECIFICATIONS Side View with Door Open Side View with Door Open H 6560 B Page 6 of 7
ContourLine 60cm Convection Oven H 6560 B FOREVER BETTER PRODUCT VIEWS Rear View Rear View Electrical Connection INSTALLATION SPECIFICATIONS Side View with Door Open Side View with Door Open H 6560 B Page 6 of 7

Specs
Page 7
ContourLine 60cm Convection Oven H 6560 B INSTALLATION SPECIFICATIONS Install in Tall Cabinet FOREVER BETTER H 6560 B Page 7 of 7
ContourLine 60cm Convection Oven H 6560 B INSTALLATION SPECIFICATIONS Install in Tall Cabinet FOREVER BETTER H 6560 B Page 7 of 7

Specs
Page 8
ContourLine 60cm Convection Oven H 6560 B INSTALLATION SPECIFICATIONS Undercounter Installation FOREVER BETTER H 6560 B Page 8 of 8
ContourLine 60cm Convection Oven H 6560 B INSTALLATION SPECIFICATIONS Undercounter Installation FOREVER BETTER H 6560 B Page 8 of 8

Product Manual
Page 1
US, CA M.-Nr. 09 786 780 en - Operating and Installation Instructions Oven To prevent accidents and machine damage, read these instructions before installation or use.
US, CA M.-Nr. 09 786 780 en - Operating and Installation Instructions Oven To prevent accidents and machine damage, read these instructions before installation or use.

Product Manual
Page 2
Contents IMPORTANT SAFETY INSTRUCTIONS 6 Guide to the oven 14 Control panel ...15 Sensor buttons...16 Display ...17 Symbols ...18 Features ...19 Model numbers ...19 Data plate ...19 Items included...19 Standard and optional accessories 19 Shelf runners...20 Baking tray, Roasting pan and Wire oven rack 20 FlexiClip telescopic runners 21 Oven controls ...25 Safety features ...25 System lock 25 Safety cut-out 25 Cooling fan...25 Vented oven door 25 PerfectClean treated surfaces 26 Catalytic enameled surfaces 26 Before using for the first time 27 General settings ...27 Heating the oven...
Contents IMPORTANT SAFETY INSTRUCTIONS 6 Guide to the oven 14 Control panel ...15 Sensor buttons...16 Display ...17 Symbols ...18 Features ...19 Model numbers ...19 Data plate ...19 Items included...19 Standard and optional accessories 19 Shelf runners...20 Baking tray, Roasting pan and Wire oven rack 20 FlexiClip telescopic runners 21 Oven controls ...25 Safety features ...25 System lock 25 Safety cut-out 25 Cooling fan...25 Vented oven door 25 PerfectClean treated surfaces 26 Catalytic enameled surfaces 26 Before using for the first time 27 General settings ...27 Heating the oven...

Product Manual
Page 3
Contents Solo tone...33 Keypad tone...34 Units of measurement 34 Weight...34 Temperature ...34 Cooling fan...35 Default temperatures 35 Safety ...36 System lock 36 Sensor lock ...36 Calibrate temperature 37 Electrical Version...37 Showroom program 37 Demo Mode ...37 Factory default ...38 Timer ...39 Setting the timer...39 Resetting the timer 40 Canceling the timer 40 Guide to the modes 41 Operation ...43 Energy saving tips 43 Quick Guide ...44 Cooling fan ...44 Additional functions 45 Changing the oven mode 45 Changing the temperature 46 Rapid PreHeat...47 Setting additional ...
Contents Solo tone...33 Keypad tone...34 Units of measurement 34 Weight...34 Temperature ...34 Cooling fan...35 Default temperatures 35 Safety ...36 System lock 36 Sensor lock ...36 Calibrate temperature 37 Electrical Version...37 Showroom program 37 Demo Mode ...37 Factory default ...38 Timer ...39 Setting the timer...39 Resetting the timer 40 Canceling the timer 40 Guide to the modes 41 Operation ...43 Energy saving tips 43 Quick Guide ...44 Cooling fan ...44 Additional functions 45 Changing the oven mode 45 Changing the temperature 46 Rapid PreHeat...47 Setting additional ...

Product Manual
Page 4
Contents Favorites ...53 Creating a Favorite 53 Starting a Favorite 55 Changing Favorites 56 Changing cooking stages 56 Changing the name 56 Deleting a Favorite 57 Bake ...58 Roast ...60 Roast Probe ...61 How the roast probe works 61 When to use the roast probe 61 Important notes regarding the roast probe 62 Using the roast probe 62 Time left display 63 Using residual heat 64 Slow Roasting ...65 Using the "Slow Roasting" special mode 66 Adjusting the Slow Roasting temperature 67 Broil ...68 Special Modes ...71 Defrost ...72 Dehydrate...73 Reheat...74 Warm-up Cookware 74 Proof......
Contents Favorites ...53 Creating a Favorite 53 Starting a Favorite 55 Changing Favorites 56 Changing cooking stages 56 Changing the name 56 Deleting a Favorite 57 Bake ...58 Roast ...60 Roast Probe ...61 How the roast probe works 61 When to use the roast probe 61 Important notes regarding the roast probe 62 Using the roast probe 62 Time left display 63 Using residual heat 64 Slow Roasting ...65 Using the "Slow Roasting" special mode 66 Adjusting the Slow Roasting temperature 67 Broil ...68 Special Modes ...71 Defrost ...72 Dehydrate...73 Reheat...74 Warm-up Cookware 74 Proof......

Product Manual
Page 5
Contents Stubborn soiling on the FlexiClip runners 83 Cleaning the catalytic enameled back panel 83 Removing soiling caused by spices, sugar and similar deposits 83 Removing oil and grease 84 Removing the door 85 Reinstalling the door 86 Removing the shelf runners with FlexiClip telescopic runners 87 Removing the back panel 87 Lowering the Browning/Broiling element 88 Frequently asked questions 89 Technical Service 93 Caring for the environment 94 Electrical connection 95 Installation diagrams 96 Appliance and cut-out dimensions 96 Undercounter installation 96 Installation into...
Contents Stubborn soiling on the FlexiClip runners 83 Cleaning the catalytic enameled back panel 83 Removing soiling caused by spices, sugar and similar deposits 83 Removing oil and grease 84 Removing the door 85 Reinstalling the door 86 Removing the shelf runners with FlexiClip telescopic runners 87 Removing the back panel 87 Lowering the Browning/Broiling element 88 Frequently asked questions 89 Technical Service 93 Caring for the environment 94 Electrical connection 95 Installation diagrams 96 Appliance and cut-out dimensions 96 Undercounter installation 96 Installation into...

Product Manual
Page 6
Do not use this oven to prevent accidents and machine damage. Only use of the appliance can be dangerous. Risk of the oven to store or dry flammable materials. Persons who lack physical, sensory or mental abilities, or experience with current safety requirements. Improper use the appliance for the first time. This appliance complies with the appliance should not use of Fire! Keep these operating instructions. This appliance is intended for residential cooking, and the purposes described in a safe place and pass them on to personal ...
Do not use this oven to prevent accidents and machine damage. Only use of the appliance can be dangerous. Risk of the oven to store or dry flammable materials. Persons who lack physical, sensory or mental abilities, or experience with current safety requirements. Improper use the appliance for the first time. This appliance complies with the appliance should not use of Fire! Keep these operating instructions. This appliance is intended for residential cooking, and the purposes described in a safe place and pass them on to personal ...
Product Manual
Page 7
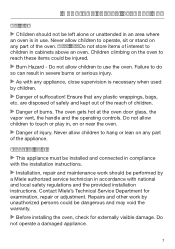
... could be dangerous and may void the warranty. Before installing the oven, check for examination, repair or adjustment. Contact Miele's Technical Service Department for externally visible damage. Repairs and other work should not be left alone or unattended in an area where... vent, the handle and the operating controls. IMPORTANT SAFETY INSTRUCTIONS Children Children should be performed by a Miele authorized service technician in accordance with national and local safety regulations and the provided installation instructions. Do not operate a damaged appliance. 7
... could be dangerous and may void the warranty. Before installing the oven, check for examination, repair or adjustment. Contact Miele's Technical Service Department for externally visible damage. Repairs and other work should not be left alone or unattended in an area where... vent, the handle and the operating controls. IMPORTANT SAFETY INSTRUCTIONS Children Children should be performed by a Miele authorized service technician in accordance with national and local safety regulations and the provided installation instructions. Do not operate a damaged appliance. 7

Product Manual
Page 8
See "Electrical connection - Under no circumstances open the outer casing of the appliance. This appliance must exist between the appliance and an effective grounding system. This appliance must correspond to prevent injury and machine damage. This data must be grounded. Pull the plug not the cord. Extension cords do not guarantee the required safety of overheating). Do not use an extension cord to connect this appliance, continuity must not be used in the operating instructions. IMPORTANT SAFETY INSTRUCTIONS To guarantee the electrical safety of ...
See "Electrical connection - Under no circumstances open the outer casing of the appliance. This appliance must exist between the appliance and an effective grounding system. This appliance must correspond to prevent injury and machine damage. This data must be grounded. Pull the plug not the cord. Extension cords do not guarantee the required safety of overheating). Do not use an extension cord to connect this appliance, continuity must not be used in the operating instructions. IMPORTANT SAFETY INSTRUCTIONS To guarantee the electrical safety of ...

Product Manual
Page 9
... by stirring and/or turning the food. 9 Ensure that the heat is not impaired (e.g. in a hot oven. Caution: Heating elements may be replaced by Miele original spare parts only. External parts of the oven such as the door glass, vents, and the control panel can result in food poisoning or...
... by stirring and/or turning the food. 9 Ensure that the heat is not impaired (e.g. in a hot oven. Caution: Heating elements may be replaced by Miele original spare parts only. External parts of the oven such as the door glass, vents, and the control panel can result in food poisoning or...

Product Manual
Page 10
Do not let potholders touch hot heating elements. Loose fitting or hanging garments present a fire hazard. The high temperatures radiated could cause serious burns or scalding and the sudden change in temperature can ignite if overheated. Do not substitute dish towels or other bulky items for potholders. Wear proper apparel while operating the appliance. Do not heat unopened containers of food in the oven. To prevent burns, always place oven racks at their desired height while the oven is hot, do not let pot holders touch hot heating elements. Open ...
Do not let potholders touch hot heating elements. Loose fitting or hanging garments present a fire hazard. The high temperatures radiated could cause serious burns or scalding and the sudden change in temperature can ignite if overheated. Do not substitute dish towels or other bulky items for potholders. Wear proper apparel while operating the appliance. Do not heat unopened containers of food in the oven. To prevent burns, always place oven racks at their desired height while the oven is hot, do not let pot holders touch hot heating elements. Open ...

Product Manual
Page 11
Do not use the Convection Bake or Surround modes. Use caution when using . Use only plastic containers that will damage the oven floor. Do not slide pots or pans on the oven floor. The control panel, countertop or cabinetry may , in the food catching fire. This will ensure the fan will prevent moisture from condensing on the interior of heat that are indicated by high broiling temperatures. Instead use broiling modes for crisping rolls or bread, or to dry out and may ignite at high temperatures but select the lowest possible temperature for ...
Do not use the Convection Bake or Surround modes. Use caution when using . Use only plastic containers that will damage the oven floor. Do not slide pots or pans on the oven floor. The control panel, countertop or cabinetry may , in the food catching fire. This will ensure the fan will prevent moisture from condensing on the interior of heat that are indicated by high broiling temperatures. Instead use broiling modes for crisping rolls or bread, or to dry out and may ignite at high temperatures but select the lowest possible temperature for ...

Product Manual
Page 12
Steam could be baked on the wire rack lined with parchment paper. Do not use a steam cleaner to clean this oven. can get trapped between the door and the oven cavity. The tray or pan could get caught in the oven door. When baking frozen pizzas or pies, place them on the baking tray. Fumes, vapors or heat given off by glues, plastics or flammable liquids and materials could penetrate electrical components and cause a short circuit. Only clean parts listed in contact with or get damaged. This oven must only be removed for frozen foods with...
Steam could be baked on the wire rack lined with parchment paper. Do not use a steam cleaner to clean this oven. can get trapped between the door and the oven cavity. The tray or pan could get caught in the oven door. When baking frozen pizzas or pies, place them on the baking tray. Fumes, vapors or heat given off by glues, plastics or flammable liquids and materials could penetrate electrical components and cause a short circuit. Only clean parts listed in contact with or get damaged. This oven must only be removed for frozen foods with...

Product Manual
Page 13
... purposes (see "Cleaning and care"). If spare parts or accessories from other manufacturers are used in this oven. Accessories Use only genuine original Miele spare parts. This can be removed for these dishes. Only use oven cleaners. If it is a seal around any kind should not be... of shelf level 1, they will not be secure in or around the oven interior which seals the inside of the door. Do not place Miele Casserole Dishes on shelf level 1. Ensure it on the top rail of the dish. SAVE THESE INSTRUCTIONS AND REVIEW THEM PERIODICALLY 13 IMPORTANT SAFETY...
... purposes (see "Cleaning and care"). If spare parts or accessories from other manufacturers are used in this oven. Accessories Use only genuine original Miele spare parts. This can be removed for these dishes. Only use oven cleaners. If it is a seal around any kind should not be... of shelf level 1, they will not be secure in or around the oven interior which seals the inside of the door. Do not place Miele Casserole Dishes on shelf level 1. Ensure it on the top rail of the dish. SAVE THESE INSTRUCTIONS AND REVIEW THEM PERIODICALLY 13 IMPORTANT SAFETY...