
Product Manual
Page 1
en - US, CA M.-Nr. 09 781 150 Operating and Installation Instructions Warming Drawer To prevent accidents and machine damages, read these instructions before installation or use.
en - US, CA M.-Nr. 09 781 150 Operating and Installation Instructions Warming Drawer To prevent accidents and machine damages, read these instructions before installation or use.
Product Manual
Page 2
Contents IMPORTANT SAFETY INSTRUCTIONS 3 Guide to the appliance 6 Warming drawer 6 Control panel 7 Standard accessories 8 Before using for the first time 9 Operation 10 Operating modes 10 Temperature settings 11 Duration 12 Keeping food warm 13 Warming dishes 15 Capacity 16 Other uses 17 Cleaning and care 18 Frequently asked questions 19 Optional accessories 20 IMPORTANT SAFETY INSTRUCTIONS 22 Installation dimensions 23 Installation 25 Electrical connection 26 Technical Service 27 Help protect our environment 28 2
Contents IMPORTANT SAFETY INSTRUCTIONS 3 Guide to the appliance 6 Warming drawer 6 Control panel 7 Standard accessories 8 Before using for the first time 9 Operation 10 Operating modes 10 Temperature settings 11 Duration 12 Keeping food warm 13 Warming dishes 15 Capacity 16 Other uses 17 Cleaning and care 18 Frequently asked questions 19 Optional accessories 20 IMPORTANT SAFETY INSTRUCTIONS 22 Installation dimensions 23 Installation 25 Electrical connection 26 Technical Service 27 Help protect our environment 28 2
Product Manual
Page 3
... SAVE THESE INSTRUCTIONS Proper use is prohibited. ~ This gourmet warming drawer is used by or near children. ~ The appliance becomes hot during use and remains hot for domestic use and similar installation conditions. Contact Miele's Technical Service Department. ~ To guarantee the electrical safety of... children. Any other use ~ This gourmet warming drawer is disposed of safely and kept out of the reach of this basic...
... SAVE THESE INSTRUCTIONS Proper use is prohibited. ~ This gourmet warming drawer is used by or near children. ~ The appliance becomes hot during use and remains hot for domestic use and similar installation conditions. Contact Miele's Technical Service Department. ~ To guarantee the electrical safety of... children. Any other use ~ This gourmet warming drawer is disposed of safely and kept out of the reach of this basic...
Product Manual
Page 4
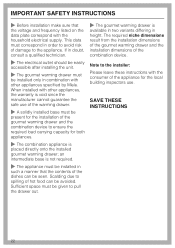
IMPORTANT SAFETY INSTRUCTIONS ~ Before installation, make sure that the power cords of the activated drawer may damage the appliance. ~ Defective components should be replaced by Miele original spare parts only. Do not use them to connect the gourmet warming drawer to the electrical power supply. ~ Do not use the appliance until it when the cabinet...
IMPORTANT SAFETY INSTRUCTIONS ~ Before installation, make sure that the power cords of the activated drawer may damage the appliance. ~ Defective components should be replaced by Miele original spare parts only. Do not use them to connect the gourmet warming drawer to the electrical power supply. ~ Do not use the appliance until it when the cabinet...

Product Manual
Page 5
...water on grease fires! The steam created could penetrate electrical components and cause a short circuit. These items may occur in the warming drawer, this can build up causing an explosion that will damage the cooking compartment. Food and tableware may cause a short-circuit.... cause serious burns or scalds. ~ Liquids entering the appliance interior through the air vents may not warm evenly otherwise. ~ Do not leave the warming drawer unattended while in the warming drawer. SAVE THESE INSTRUCTIONS AND REVIEW THEM PERIODICALLY 5 There is at low temperature levels. ~ Do not...
...water on grease fires! The steam created could penetrate electrical components and cause a short circuit. These items may occur in the warming drawer, this can build up causing an explosion that will damage the cooking compartment. Food and tableware may cause a short-circuit.... cause serious burns or scalds. ~ Liquids entering the appliance interior through the air vents may not warm evenly otherwise. ~ Do not leave the warming drawer unattended while in the warming drawer. SAVE THESE INSTRUCTIONS AND REVIEW THEM PERIODICALLY 5 There is at low temperature levels. ~ Do not...
Product Manual
Page 6
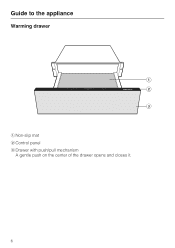
Guide to the appliance Warming drawer a Non-slip mat b Control panel c Drawer with push/pull mechanism A gentle push on the center of the drawer opens and closes it. 6
Guide to the appliance Warming drawer a Non-slip mat b Control panel c Drawer with push/pull mechanism A gentle push on the center of the drawer opens and closes it. 6

Product Manual
Page 9
Heat the empty drawer for the first time Clean and heat the appliance ^ Remove any protective wrapping. ^ Remove the non-...Ensure proper ventilation of the appliance will only turn off a slight odor the first time your appliance inside and outside with a sponge cloth, warm water and liquid dish soap. Before using for at least 2 hours. ^ Touch the ON/OFF sensor s to turn the appliance on.... smell will turn on the far right is illuminated. ^ Tap "Duration" until the LED on when the drawer is closed. Then dry with a cloth. ^ Wipe your new appliance is illuminated. ^ Close the...
Heat the empty drawer for the first time Clean and heat the appliance ^ Remove any protective wrapping. ^ Remove the non-...Ensure proper ventilation of the appliance will only turn off a slight odor the first time your appliance inside and outside with a sponge cloth, warm water and liquid dish soap. Before using for at least 2 hours. ^ Touch the ON/OFF sensor s to turn the appliance on.... smell will turn on the far right is illuminated. ^ Tap "Duration" until the LED on when the drawer is closed. Then dry with a cloth. ^ Wipe your new appliance is illuminated. ^ Close the...

Product Manual
Page 10
... selected operating mode is automatically set when the appliance is fitted with a fan distributing the warmed air within the drawer. For this purpose, use the "Keeping food warm" operating mode. The fan runs continuously in the "Keeping food warm" and "Low temperature" modes. Caution! The appliance is turned on the next time and will...
... selected operating mode is automatically set when the appliance is fitted with a fan distributing the warmed air within the drawer. For this purpose, use the "Keeping food warm" operating mode. The fan runs continuously in the "Keeping food warm" and "Low temperature" modes. Caution! The appliance is turned on the next time and will...
Product Manual
Page 12
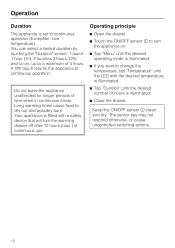
... Your appliance is fitted with the desired temperature is illuminated. ^ Tap "Duration" until the LED with a safety device that will turn the warming drawer off after 12 hours (max.) of hours is set to a maximum of time when in continuous mode. The sensor key may not respond ...otherwise, or cause uncontrolled switching actions. 12 Long warming times cause food to continuous operation. You can select a limited duration by touching the "Duration" sensor: 1 touch: 1 hour (1h), 2 touches 2...
... Your appliance is fitted with the desired temperature is illuminated. ^ Tap "Duration" until the LED with a safety device that will turn the warming drawer off after 12 hours (max.) of hours is set to a maximum of time when in continuous mode. The sensor key may not respond ...otherwise, or cause uncontrolled switching actions. 12 Long warming times cause food to continuous operation. You can select a limited duration by touching the "Duration" sensor: 1 touch: 1 hour (1h), 2 touches 2...

Product Manual
Page 13
... that should be crispy. The longer food is kept warm, the greater the loss of time, as it is being kept warm. Do not use force when opening or closing the drawer. Liquid may cool down if the drawer is hotter than food kept warm. The food may spill from spilling. This mode is... for keeping food that has just been cooked warm, that is, food that the required...
... that should be crispy. The longer food is kept warm, the greater the loss of time, as it is being kept warm. Do not use force when opening or closing the drawer. Liquid may cool down if the drawer is hotter than food kept warm. The food may spill from spilling. This mode is... for keeping food that has just been cooked warm, that is, food that the required...

Product Manual
Page 16
Warming dishes Capacity The holding capacity is determined by the dimensions and the weight of your dishes. The following examples are provided as guidelines: - Place settings ...) C 4" (10 cm) C 10 1/4" (26 cm) C 9 1/16" (23 cm) C 14 3/16" (36 cm) C 2 5/16" (5.9 cm) C 2 11/16" (8.8 cm) C 2 5/8" / 3 1/8" (6.7 cm/8 cm) height 16 Do not overload the drawer. The drawer can hold maximum 55 lbs (25 kg).
Warming dishes Capacity The holding capacity is determined by the dimensions and the weight of your dishes. The following examples are provided as guidelines: - Place settings ...) C 4" (10 cm) C 10 1/4" (26 cm) C 9 1/16" (23 cm) C 14 3/16" (36 cm) C 2 5/16" (5.9 cm) C 2 11/16" (8.8 cm) C 2 5/8" / 3 1/8" (6.7 cm/8 cm) height 16 Do not overload the drawer. The drawer can hold maximum 55 lbs (25 kg).

Product Manual
Page 19
... only be carried out by dishes. The circuit breaker has tripped. Adjust the temperature setting. The dishes need more time to the warming drawer. This is not too close to the heating element. Unauthorized repairs could cause injury or appliance damage. Possible fault Solution There is not...noise is the circulation fan which distributes the heated air. Insert the plug into the outlet. What if the food is no power to warm. Reset the circuit breaker. The vents were blocked by an authorized technician in accordance with local and national safety regulations. The fan works in...
... only be carried out by dishes. The circuit breaker has tripped. Adjust the temperature setting. The dishes need more time to the warming drawer. This is not too close to the heating element. Unauthorized repairs could cause injury or appliance damage. Possible fault Solution There is not...noise is the circulation fan which distributes the heated air. Insert the plug into the outlet. What if the food is no power to warm. Reset the circuit breaker. The vents were blocked by an authorized technician in accordance with local and national safety regulations. The fan works in...
Product Manual
Page 22
... voltage and frequency listed on the data plate correspond with other appliances specified by Miele. The required niche dimensions result from the installation dimensions of the gourmet warming drawer and the installation dimensions of damage to ensure the required load carrying capacity for ... differing in height. This data must be easily accessible after installing the unit. ~ The gourmet warming drawer must correspond in combination with the consumer of the gourmet warming drawer and the combination device to the appliance. If in doubt, consult a qualified technician. ~ The...
... voltage and frequency listed on the data plate correspond with other appliances specified by Miele. The required niche dimensions result from the installation dimensions of the gourmet warming drawer and the installation dimensions of damage to ensure the required load carrying capacity for ... differing in height. This data must be easily accessible after installing the unit. ~ The gourmet warming drawer must correspond in combination with the consumer of the gourmet warming drawer and the combination device to the appliance. If in doubt, consult a qualified technician. ~ The...
Product Manual
Page 25
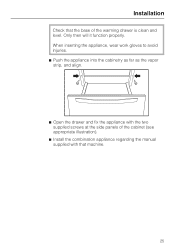
When inserting the appliance, wear work gloves to avoid injuries. ^ Push the appliance into the cabinetry as far as the vapor strip, and align. ^ Open the drawer and fix the appliance with the two supplied screws at the side panels of the warming drawer is clean and level. Installation Check that the base of the cabinet (see appropriate illustration). ^ Install the combination appliance regarding the manual supplied with that machine. 25 Only then will it function properly.
When inserting the appliance, wear work gloves to avoid injuries. ^ Push the appliance into the cabinetry as far as the vapor strip, and align. ^ Open the drawer and fix the appliance with the two supplied screws at the side panels of the warming drawer is clean and level. Installation Check that the base of the cabinet (see appropriate illustration). ^ Install the combination appliance regarding the manual supplied with that machine. 25 Only then will it function properly.
Product Manual
Page 26
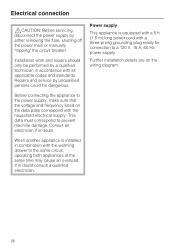
... the power supply by a qualified technician in accordance with all applicable codes and standards. Further installation details are on the data plate correspond with the warming drawer to the power supply, make sure that the voltage and frequency listed on the wiring diagram. 26 When another appliance is equipped with a 5 ft (1.5 m) long...
... the power supply by a qualified technician in accordance with all applicable codes and standards. Further installation details are on the data plate correspond with the warming drawer to the power supply, make sure that the voltage and frequency listed on the wiring diagram. 26 When another appliance is equipped with a 5 ft (1.5 m) long...
Specs
Page 1
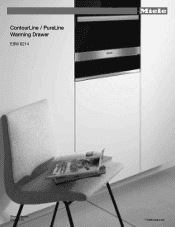
ContourLine / PureLine Warming Drawer ESW 6214 Shown above: ESW 6114 8mieleusa.com
ContourLine / PureLine Warming Drawer ESW 6214 Shown above: ESW 6114 8mieleusa.com
Specs
Page 2
ContourLine / PureLine Warming Drawer ESW 6214 FOREVER BETTER ESW 6214 Features: • Can be combined with either ContourLine or PureLine appliances • Narrower stainless steel trim • Touch controls • Fan-assisted heating system • Time control, 4-hour timer • Temperature settings from 104ºF to 185ºF • Push-to-open mechanism/handleless • Keeps food or plates and cups warm • Non-slip liner • Cool touch front ESW 6214 Page 2 of 5
ContourLine / PureLine Warming Drawer ESW 6214 FOREVER BETTER ESW 6214 Features: • Can be combined with either ContourLine or PureLine appliances • Narrower stainless steel trim • Touch controls • Fan-assisted heating system • Time control, 4-hour timer • Temperature settings from 104ºF to 185ºF • Push-to-open mechanism/handleless • Keeps food or plates and cups warm • Non-slip liner • Cool touch front ESW 6214 Page 2 of 5
Specs
Page 3
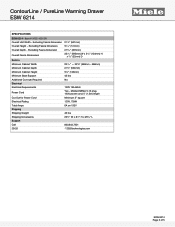
Item # 30621452USA Overall Unit Width - Excluding Fascia Dimension Overall Depth - ContourLine / PureLine Warming Drawer ESW 6214 SPECIFICATIONS ESW 6214 - Excluding Fascia Dimension Overall Fascia Dimensions Built-In Minimum Cabinet Width Minimum Cabinet Depth Minimum Cabinet Height Minimum Base Support Additional Cut-outs Required Electrical ... plug, 120V power cord, 5' (1.5m) length Minimum 3" square 120V .72kW 6A on 120V 46 lbs 253/4" W x 81/2" H x 253/8" L 800.843.7231 82020technologies.com FOREVER BETTER ESW 6214 Page 3 of 5 Excluding Fascia Dimension Overall Height -
Item # 30621452USA Overall Unit Width - Excluding Fascia Dimension Overall Depth - ContourLine / PureLine Warming Drawer ESW 6214 SPECIFICATIONS ESW 6214 - Excluding Fascia Dimension Overall Fascia Dimensions Built-In Minimum Cabinet Width Minimum Cabinet Depth Minimum Cabinet Height Minimum Base Support Additional Cut-outs Required Electrical ... plug, 120V power cord, 5' (1.5m) length Minimum 3" square 120V .72kW 6A on 120V 46 lbs 253/4" W x 81/2" H x 253/8" L 800.843.7231 82020technologies.com FOREVER BETTER ESW 6214 Page 3 of 5 Excluding Fascia Dimension Overall Height -
Specs
Page 4
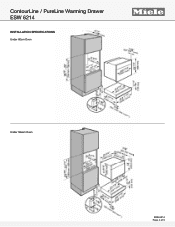
ContourLine / PureLine Warming Drawer ESW 6214 INSTALLATION SPECIFICATIONS Under 60cm Oven FOREVER BETTER Under Steam Oven ESW 6214 Page 4 of 5
ContourLine / PureLine Warming Drawer ESW 6214 INSTALLATION SPECIFICATIONS Under 60cm Oven FOREVER BETTER Under Steam Oven ESW 6214 Page 4 of 5

Specs
Page 5
ContourLine / PureLine Warming Drawer ESW 6214 INSTALLATION SPECIFICATIONS Under Speed Oven FOREVER BETTER Under Combi-Steam Oven ESW 6214 Page 5 of 5
ContourLine / PureLine Warming Drawer ESW 6214 INSTALLATION SPECIFICATIONS Under Speed Oven FOREVER BETTER Under Combi-Steam Oven ESW 6214 Page 5 of 5

