
Specs
Page 2
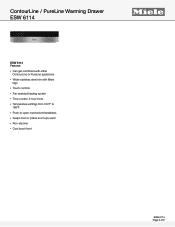
ContourLine / PureLine Warming Drawer ESW 6114 FOREVER BETTER ESW 6114 Features: • Can get combined with either ContourLine or PureLine appliances • Wider stainless steel trim with Miele logo • Touch controls • Fan-assisted heating system • Time control, 4-hour timer • Temperature settings from 104ºF to 185ºF • Push-to-open mechanism/handleless • Keeps food or plates and cups warm • Non-slip liner • Cool touch front ESW 6114 Page 2 of 5
ContourLine / PureLine Warming Drawer ESW 6114 FOREVER BETTER ESW 6114 Features: • Can get combined with either ContourLine or PureLine appliances • Wider stainless steel trim with Miele logo • Touch controls • Fan-assisted heating system • Time control, 4-hour timer • Temperature settings from 104ºF to 185ºF • Push-to-open mechanism/handleless • Keeps food or plates and cups warm • Non-slip liner • Cool touch front ESW 6114 Page 2 of 5
Specs
Page 3
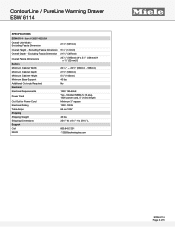
... lbs No 120V 15A 60Hz Yes - Item # 30611452USA Overall Unit Width Excluding Fascia Dimension 211/8" (537mm) Overall Height - Excluding Fascia Dimension Overall Depth - ContourLine / PureLine Warming Drawer ESW 6114 SPECIFICATIONS ESW 6114 - Molded NEMA 5-15 plug, 120V power cord, 5' (1.5m) length Minimum 3" square 120V .72kW 6A on 120V 46 lbs 253/4" W x 81/2" H x 253/8" L 800.843.7231...
... lbs No 120V 15A 60Hz Yes - Item # 30611452USA Overall Unit Width Excluding Fascia Dimension 211/8" (537mm) Overall Height - Excluding Fascia Dimension Overall Depth - ContourLine / PureLine Warming Drawer ESW 6114 SPECIFICATIONS ESW 6114 - Molded NEMA 5-15 plug, 120V power cord, 5' (1.5m) length Minimum 3" square 120V .72kW 6A on 120V 46 lbs 253/4" W x 81/2" H x 253/8" L 800.843.7231...
Specs
Page 4
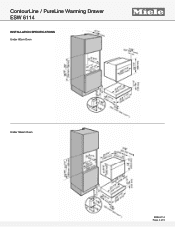
ContourLine / PureLine Warming Drawer ESW 6114 INSTALLATION SPECIFICATIONS Under 60cm Oven FOREVER BETTER Under Steam Oven ESW 6114 Page 4 of 5
ContourLine / PureLine Warming Drawer ESW 6114 INSTALLATION SPECIFICATIONS Under 60cm Oven FOREVER BETTER Under Steam Oven ESW 6114 Page 4 of 5
Specs
Page 5
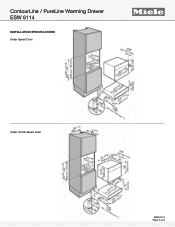
ContourLine / PureLine Warming Drawer ESW 6114 INSTALLATION SPECIFICATIONS Under Speed Oven FOREVER BETTER Under Combi-Steam Oven ESW 6114 Page 5 of 5
ContourLine / PureLine Warming Drawer ESW 6114 INSTALLATION SPECIFICATIONS Under Speed Oven FOREVER BETTER Under Combi-Steam Oven ESW 6114 Page 5 of 5
Product Manual
Page 1
US, CA M.-Nr. 09 781 150 Operating and Installation Instructions Warming Drawer To prevent accidents and machine damages, read these instructions before installation or use. en -
US, CA M.-Nr. 09 781 150 Operating and Installation Instructions Warming Drawer To prevent accidents and machine damages, read these instructions before installation or use. en -
Product Manual
Page 2
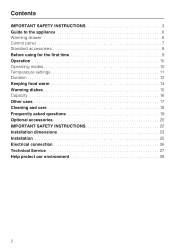
Contents IMPORTANT SAFETY INSTRUCTIONS 3 Guide to the appliance 6 Warming drawer 6 Control panel 7 Standard accessories 8 Before using for the first time 9 Operation 10 Operating modes 10 Temperature settings 11 Duration 12 Keeping food warm 13 Warming dishes 15 Capacity 16 Other uses 17 Cleaning and care 18 Frequently asked questions 19 Optional accessories 20 IMPORTANT SAFETY INSTRUCTIONS 22 Installation dimensions 23 Installation 25 Electrical connection 26 Technical Service 27 Help protect our environment 28 2
Contents IMPORTANT SAFETY INSTRUCTIONS 3 Guide to the appliance 6 Warming drawer 6 Control panel 7 Standard accessories 8 Before using for the first time 9 Operation 10 Operating modes 10 Temperature settings 11 Duration 12 Keeping food warm 13 Warming dishes 15 Capacity 16 Other uses 17 Cleaning and care 18 Frequently asked questions 19 Optional accessories 20 IMPORTANT SAFETY INSTRUCTIONS 22 Installation dimensions 23 Installation 25 Electrical connection 26 Technical Service 27 Help protect our environment 28 2
Product Manual
Page 3
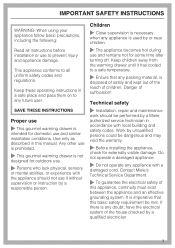
...is imperative that any appliance is intended for domestic use is prohibited. ~ This gourmet warming drawer is disposed of safely and kept out of the reach of the house checked by a Miele authorized service technician in this basic safety requirement be dangerous and may void the warranty.... ~ Before installing the appliance, check for some time after turning off. Keep children away from the warming drawer until it without supervision or instruction...
...is imperative that any appliance is intended for domestic use is prohibited. ~ This gourmet warming drawer is disposed of safely and kept out of the reach of the house checked by a Miele authorized service technician in this basic safety requirement be dangerous and may void the warranty.... ~ Before installing the appliance, check for some time after turning off. Keep children away from the warming drawer until it without supervision or instruction...
Product Manual
Page 4
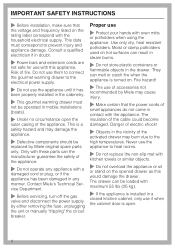
...cabinet, only use it has been properly installed in the cabinetry. ~ This gourmet warming drawer must correspond to heat rooms. ~ Do not replace the non-slip mat with this would damage the drawer. Contact Miele's Technical Service Department. ~ Before servicing, turn off the gas valve and disconnect the... power supply by Miele original spare parts only. They can be loaded with maximum 55 lbs (25 kg...
...cabinet, only use it has been properly installed in the cabinetry. ~ This gourmet warming drawer must correspond to heat rooms. ~ Do not replace the non-slip mat with this would damage the drawer. Contact Miele's Technical Service Department. ~ Before servicing, turn off the gas valve and disconnect the... power supply by Miele original spare parts only. They can be loaded with maximum 55 lbs (25 kg...

Product Manual
Page 5
...the sugar may cause a short-circuit. Smother the fire with a high sugar content. They may melt and cause damage to food in the warming drawer. SAVE THESE INSTRUCTIONS AND REVIEW THEM PERIODICALLY 5 Ensure that the food is sufficiently heated before you place it in foods kept for babies and... mode must be sure food is particularly important when preparing food for lengthy period of loose fitting or hanging clothing while using the warming drawer. If heated for heating cold food. A violent steam explosion may occur in the appliance. ~ It is possible that will damage the cooking...
...the sugar may cause a short-circuit. Smother the fire with a high sugar content. They may melt and cause damage to food in the warming drawer. SAVE THESE INSTRUCTIONS AND REVIEW THEM PERIODICALLY 5 Ensure that the food is sufficiently heated before you place it in foods kept for babies and... mode must be sure food is particularly important when preparing food for lengthy period of loose fitting or hanging clothing while using the warming drawer. If heated for heating cold food. A violent steam explosion may occur in the appliance. ~ It is possible that will damage the cooking...
Product Manual
Page 6
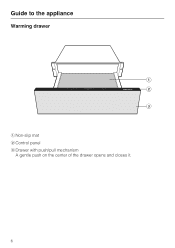
Guide to the appliance Warming drawer a Non-slip mat b Control panel c Drawer with push/pull mechanism A gentle push on the center of the drawer opens and closes it. 6
Guide to the appliance Warming drawer a Non-slip mat b Control panel c Drawer with push/pull mechanism A gentle push on the center of the drawer opens and closes it. 6

Product Manual
Page 9
.... The appliance will turn the appliance on. ^ Tap "Menu" until the s symbol is illuminated. ^ Tap "Temperature" until the LED on when the drawer is closed. Ensure proper ventilation of the appliance will dissipate after two hours. Before using for at least 2 hours. ^ Touch the ON/OFF sensor s ...to turn off a slight odor the first time your appliance inside and outside with a sponge cloth, warm water and liquid dish soap. Heat the empty drawer for the first time Clean and heat the appliance ^ Remove any protective wrapping. ^ Remove the non-slip mat and the rack...
.... The appliance will turn the appliance on. ^ Tap "Menu" until the s symbol is illuminated. ^ Tap "Temperature" until the LED on when the drawer is closed. Ensure proper ventilation of the appliance will dissipate after two hours. Before using for at least 2 hours. ^ Touch the ON/OFF sensor s ...to turn off a slight odor the first time your appliance inside and outside with a sponge cloth, warm water and liquid dish soap. Heat the empty drawer for the first time Clean and heat the appliance ^ Remove any protective wrapping. ^ Remove the non-slip mat and the rack...

Product Manual
Page 10
...warm" operating mode. It works intermittently in the "Cups/glasses" and "Warming dishes/plates" modes. The appliance lets you keep food warm while simultaneously warming dishes. The fan runs continuously in the "Keeping food warm... control panel. Operation Operating modes Touch the "Menu" sensor to warm up but may become very hot! 10 The dishes need more time to ... operating mode; the corresponding symbol will be illuminated: -H Warming cups and glasses -H Warming dishes and plates -2 Keeping food warm -¯ Low temperature The last selected operating mode is ...
...warm" operating mode. It works intermittently in the "Cups/glasses" and "Warming dishes/plates" modes. The appliance lets you keep food warm while simultaneously warming dishes. The fan runs continuously in the "Keeping food warm... control panel. Operation Operating modes Touch the "Menu" sensor to warm up but may become very hot! 10 The dishes need more time to ... operating mode; the corresponding symbol will be illuminated: -H Warming cups and glasses -H Warming dishes and plates -2 Keeping food warm -¯ Low temperature The last selected operating mode is ...
Product Manual
Page 12
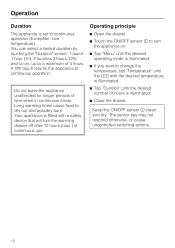
...the appliance unattended for longer periods of time when in continuous mode. Long warming times cause food to continuous operation. Your appliance is illuminated. ^ Close the drawer. Keep the ON/OFF sensor s clean and dry. Operating principle ^ Open the drawer. ^ Touch the ON/OFF sensor s to turn the appliance on ... desired temperature is illuminated. ^ Tap "Duration" until the desired number of hours is fitted with a safety device that will turn the warming drawer off after 12 hours (max.) of continuous use. Operation Duration The appliance is set to a maximum of 4 hours.
...the appliance unattended for longer periods of time when in continuous mode. Long warming times cause food to continuous operation. Your appliance is illuminated. ^ Close the drawer. Keep the ON/OFF sensor s clean and dry. Operating principle ^ Open the drawer. ^ Touch the ON/OFF sensor s to turn the appliance on ... desired temperature is illuminated. ^ Tap "Duration" until the desired number of hours is fitted with a safety device that will turn the warming drawer off after 12 hours (max.) of continuous use. Operation Duration The appliance is set to a maximum of 4 hours.

Product Manual
Page 13
... liquid foods, and those that may cool down if the drawer is maintained. Do not use force when opening or closing the drawer. Keep these foods warm at a higher temperature. - Serve food kept warm on warmed dishes. ^ Replace the dishes in the drawer, and carefully close the drawer to prevent liquid food from spilling. Put the dishes...
... liquid foods, and those that may cool down if the drawer is maintained. Do not use force when opening or closing the drawer. Keep these foods warm at a higher temperature. - Serve food kept warm on warmed dishes. ^ Replace the dishes in the drawer, and carefully close the drawer to prevent liquid food from spilling. Put the dishes...

Product Manual
Page 16
Warming dishes Capacity The holding capacity is determined by the dimensions and the weight of your dishes. The drawer can hold maximum 55 lbs (25 kg). Place settings for 6 persons: 6 dinner plates C 10 1/4" (26 cm) 6 soup plates C 9 1/16" (23 cm) 6 dessert plates C 7 1/2 (19 cm) 1 ...) C 4" (10 cm) C 10 1/4" (26 cm) C 9 1/16" (23 cm) C 14 3/16" (36 cm) C 2 5/16" (5.9 cm) C 2 11/16" (8.8 cm) C 2 5/8" / 3 1/8" (6.7 cm/8 cm) height 16 Do not overload the drawer. The following examples are provided as guidelines: -
Warming dishes Capacity The holding capacity is determined by the dimensions and the weight of your dishes. The drawer can hold maximum 55 lbs (25 kg). Place settings for 6 persons: 6 dinner plates C 10 1/4" (26 cm) 6 soup plates C 9 1/16" (23 cm) 6 dessert plates C 7 1/2 (19 cm) 1 ...) C 4" (10 cm) C 10 1/4" (26 cm) C 9 1/16" (23 cm) C 14 3/16" (36 cm) C 2 5/16" (5.9 cm) C 2 11/16" (8.8 cm) C 2 5/8" / 3 1/8" (6.7 cm/8 cm) height 16 Do not overload the drawer. The following examples are provided as guidelines: -

Product Manual
Page 18
... use agents recommended for an extended period of time or if unsuitable cleaning agents are susceptible to clean the bottom of the drawer. ^ Clean the mat by hand with warm water and liquid dish soap. ^ Dry thoroughly. Glass cleaners may be removed to scratching. Never clean in the washing machine. 18 Remove... chlorides - stainless steel cleaners, - metal scrapers. ^ Clean the appliance with a solution of the appliance are used to sit or "puddle", this appliance. All surfaces of warm water and liquid soap applied with a soft cloth.
... use agents recommended for an extended period of time or if unsuitable cleaning agents are susceptible to clean the bottom of the drawer. ^ Clean the mat by hand with warm water and liquid dish soap. ^ Dry thoroughly. Glass cleaners may be removed to scratching. Never clean in the washing machine. 18 Remove... chlorides - stainless steel cleaners, - metal scrapers. ^ Clean the appliance with a solution of the appliance are used to sit or "puddle", this appliance. All surfaces of warm water and liquid soap applied with a soft cloth.

Product Manual
Page 19
... dishes are too hot? Possible fault Solution The wrong temperature was selected. The dishes need more time to the warming drawer. This is not too close to the heating element. What if the drawer does not heat? Insert the plug into the outlet. The fan works in doubt contact an electrician. Reset the...
... dishes are too hot? Possible fault Solution The wrong temperature was selected. The dishes need more time to the warming drawer. This is not too close to the heating element. What if the drawer does not heat? Insert the plug into the outlet. The fan works in doubt contact an electrician. Reset the...
Product Manual
Page 22
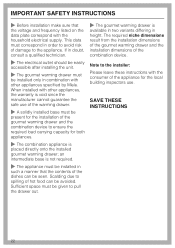
... in doubt, consult a qualified technician. ~ The electrical outlet should be easily accessible after installing the unit. ~ The gourmet warming drawer must correspond in such a manner that the voltage and frequency listed on the data plate correspond with the household electrical supply.... SAVE THESE INSTRUCTIONS 22 When installed with other appliances specified by Miele. an intermediate base is placed directly onto the installed gourmet warming drawer; Scalding due to the appliance. The required niche dimensions result from the installation dimensions...
... in doubt, consult a qualified technician. ~ The electrical outlet should be easily accessible after installing the unit. ~ The gourmet warming drawer must correspond in such a manner that the voltage and frequency listed on the data plate correspond with the household electrical supply.... SAVE THESE INSTRUCTIONS 22 When installed with other appliances specified by Miele. an intermediate base is placed directly onto the installed gourmet warming drawer; Scalding due to the appliance. The required niche dimensions result from the installation dimensions...
Product Manual
Page 25
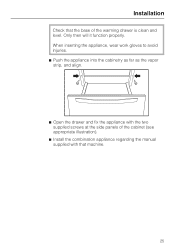
Only then will it function properly. Installation Check that the base of the cabinet (see appropriate illustration). ^ Install the combination appliance regarding the manual supplied with the two supplied screws at the side panels of the warming drawer is clean and level. When inserting the appliance, wear work gloves to avoid injuries. ^ Push the appliance into the cabinetry as far as the vapor strip, and align. ^ Open the drawer and fix the appliance with that machine. 25
Only then will it function properly. Installation Check that the base of the cabinet (see appropriate illustration). ^ Install the combination appliance regarding the manual supplied with the two supplied screws at the side panels of the warming drawer is clean and level. When inserting the appliance, wear work gloves to avoid injuries. ^ Push the appliance into the cabinetry as far as the vapor strip, and align. ^ Open the drawer and fix the appliance with that machine. 25
Product Manual
Page 26
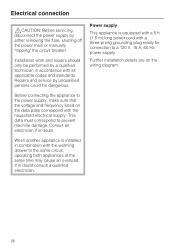
... same circuit, operating both appliances at the same time may cause an overload. When another appliance is equipped with a 5 ft (1.5 m) long power cord with the warming drawer to a 120 V, 15 A, 60 Hz power supply. Further installation details are on the data plate correspond with all applicable codes and standards. This data must...
... same circuit, operating both appliances at the same time may cause an overload. When another appliance is equipped with a 5 ft (1.5 m) long power cord with the warming drawer to a 120 V, 15 A, 60 Hz power supply. Further installation details are on the data plate correspond with all applicable codes and standards. This data must...

