
Operating and Installation manual
Page 2
Runners 28 3. Venting 32 8. Secure the appliance 30 5. Electrical connection 33 Air extraction 34 Condensate trap 35 Electrical connection 36 Technical data 37 2 Installing the hood in the cabinet 28 4. Installing the space ...
Runners 28 3. Venting 32 8. Secure the appliance 30 5. Electrical connection 33 Air extraction 34 Condensate trap 35 Electrical connection 36 Technical data 37 2 Installing the hood in the cabinet 28 4. Installing the space ...
Operating and Installation manual
Page 23
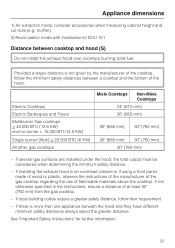
...000 BTU (4.5 KW) Single burner (Wok) < 20,500 BTU (6 KW) All other gas cooktops Miele Cooktops Non-Miele Cooktops 24" (610 mm) 26" (660 mm) 26" (660 mm) 30" (760 mm) 26" (660 mm) 30" (760 mm) 30" (760 mm) - Provided a larger distance is more than one appliance beneath the hood and they... if using a front panel made of wood or plastic, observe the instructions of the manufacturer of the gas cooktop regarding the use of at least 30" (760 mm) from the gas cooktop. - See "Important Safety Instructions" for further information. 23 If local building codes require a greater safety ...
...000 BTU (4.5 KW) Single burner (Wok) < 20,500 BTU (6 KW) All other gas cooktops Miele Cooktops Non-Miele Cooktops 24" (610 mm) 26" (660 mm) 26" (660 mm) 30" (760 mm) 26" (660 mm) 30" (760 mm) 30" (760 mm) - Provided a larger distance is more than one appliance beneath the hood and they... if using a front panel made of wood or plastic, observe the instructions of the manufacturer of the gas cooktop regarding the use of at least 30" (760 mm) from the gas cooktop. - See "Important Safety Instructions" for further information. 23 If local building codes require a greater safety ...
Operating and Installation manual
Page 25
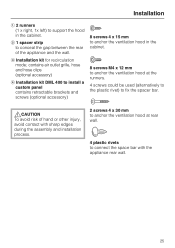
... ventilation hood in the cabinet. Installation a 2 runners (1 x right, 1x left) to connect the space bar with sharp edges during the assembly and installation process. 2 screws 4 x 30 mm to anchor the ventilation hood at rear wall. 4 plastic rivets to support the hood in the cabinet. 8 screws M4 x 12 mm to anchor the...
... ventilation hood in the cabinet. Installation a 2 runners (1 x right, 1x left) to connect the space bar with sharp edges during the assembly and installation process. 2 screws 4 x 30 mm to anchor the ventilation hood at rear wall. 4 plastic rivets to support the hood in the cabinet. 8 screws M4 x 12 mm to anchor the...
Operating and Installation manual
Page 30
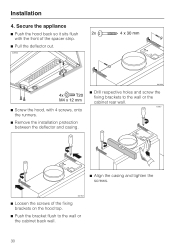
Secure the appliance ^ Push the hood back so it sits flush with the front of the spacer strip. ^ Pull the deflector out. ^ Screw the hood, with 4 screws, onto the runners. ^ Remove the installation protection between the deflector and casing. ^ Drill respective holes and screw the fixing brackets to the wall or the cabinet rear wall. ^ Align the casing and tighten the screws. ^ Loosen the screws of the fixing brackets on the hood top. ^ Push the bracket flush to the wall or the cabinet back wall. 30 Installation 4.
Secure the appliance ^ Push the hood back so it sits flush with the front of the spacer strip. ^ Pull the deflector out. ^ Screw the hood, with 4 screws, onto the runners. ^ Remove the installation protection between the deflector and casing. ^ Drill respective holes and screw the fixing brackets to the wall or the cabinet rear wall. ^ Align the casing and tighten the screws. ^ Loosen the screws of the fixing brackets on the hood top. ^ Push the bracket flush to the wall or the cabinet back wall. 30 Installation 4.

Operating and Installation manual
Page 31
Adjust the deflector until it is necessary. This applies for instance. ^ Connect the space bar from Miele. The installation kit has an installation manual supplied. ^ The deflector can be obtained as an optional accessory from the rear with 4 plastic rivets at the ... The weight of the front panel must be reduced by milling out the back of the panel, for front panels with a depth of up to 1 1/4" (30 mm).
Adjust the deflector until it is necessary. This applies for instance. ^ Connect the space bar from Miele. The installation kit has an installation manual supplied. ^ The deflector can be obtained as an optional accessory from the rear with 4 plastic rivets at the ... The weight of the front panel must be reduced by milling out the back of the panel, for front panels with a depth of up to 1 1/4" (30 mm).
DA3480
Page 1
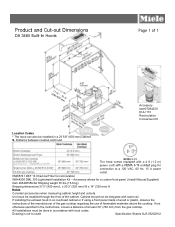
..., 15 A power outlet. 06485741 DKF 13 Charcoal Filter for recirculation 06544200 DML 300 Lightshield Installation Kit - Product and Cut-out Dimensions DA 3480 Built-In Hoods Page 1 of at least 30" (762 mm) from the gas cooktop. Distance between cooktop and hood Accessory Item07294230 DUU 151 Recirculation Conversion Kit The hood comes equipped...
..., 15 A power outlet. 06485741 DKF 13 Charcoal Filter for recirculation 06544200 DML 300 Lightshield Installation Kit - Product and Cut-out Dimensions DA 3480 Built-In Hoods Page 1 of at least 30" (762 mm) from the gas cooktop. Distance between cooktop and hood Accessory Item07294230 DUU 151 Recirculation Conversion Kit The hood comes equipped...