
Operating and Installation manual
Page 1
US, CA M.-Nr. 09 190 990 Operating and Installation Instructions Ventilation System DA 3460 DA 3480 DA 3490 To prevent accidents and appliance damage, read these instructions before installation or use. en -
US, CA M.-Nr. 09 190 990 Operating and Installation Instructions Ventilation System DA 3460 DA 3480 DA 3490 To prevent accidents and appliance damage, read these instructions before installation or use. en -
Operating and Installation manual
Page 2
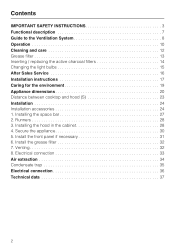
Install the grease filter 32 7. Installing the space bar 27 2. Install the front panel if necessary 31 6. Contents IMPORTANT SAFETY INSTRUCTIONS 3 Functional description 7 Guide to the Ventilation System 8 Operation 10 Cleaning and care 12 Grease filter 13 Inserting / replacing the active charcoal filters 14 Changing the light bulbs 15 After Sales Service 16 Installation instructions 17 Caring for the environment 19 Appliance dimensions 20 Distance between cooktop and hood (S 23 Installation 24 Installation accessories 24 1. Installing the hood in the cabinet 28 4. ...
Install the grease filter 32 7. Installing the space bar 27 2. Install the front panel if necessary 31 6. Contents IMPORTANT SAFETY INSTRUCTIONS 3 Functional description 7 Guide to the Ventilation System 8 Operation 10 Cleaning and care 12 Grease filter 13 Inserting / replacing the active charcoal filters 14 Changing the light bulbs 15 After Sales Service 16 Installation instructions 17 Caring for the environment 19 Appliance dimensions 20 Distance between cooktop and hood (S 23 Installation 24 Installation accessories 24 1. Installing the hood in the cabinet 28 4. ...

Operating and Installation manual
Page 3
... the electrical system of this appliance, continuity must not be locked, securely fasten a prominent warning device, such as a tag, to any doubt, have questions, contact Miele. ~ b) Before servicing or cleaning the appliance, switch power off at the service panel and lock the service disconnecting means to personal injury and material damage...
... the electrical system of this appliance, continuity must not be locked, securely fasten a prominent warning device, such as a tag, to any doubt, have questions, contact Miele. ~ b) Before servicing or cleaning the appliance, switch power off at the service panel and lock the service disconnecting means to personal injury and material damage...

Operating and Installation manual
Page 4
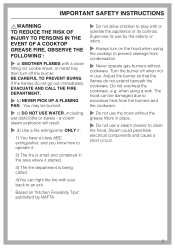
Heat oils slowly on low or medium settings. ~ b) Always turn the hood on when cooking at high settings. This data must correspond to prevent hazards. Boilovers cause smoking and greasy spillovers may catch fire. 4 Always use cookware appropriate for the size of the cooking area. ~ e) Do not flambé or grill with the household electrical supply. IMPORTANT SAFETY INSTRUCTIONS ~ d) Before connecting the appliance to the power supply make sure that the voltage and frequency listed on the data plate correspond with an open the housing as described in the enclosed "...
Heat oils slowly on low or medium settings. ~ b) Always turn the hood on when cooking at high settings. This data must correspond to prevent hazards. Boilovers cause smoking and greasy spillovers may catch fire. 4 Always use cookware appropriate for the size of the cooking area. ~ e) Do not flambé or grill with the household electrical supply. IMPORTANT SAFETY INSTRUCTIONS ~ d) Before connecting the appliance to the power supply make sure that the voltage and frequency listed on the data plate correspond with an open the housing as described in the enclosed "...
Operating and Installation manual
Page 5
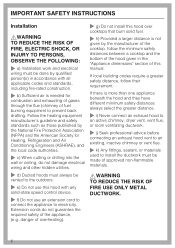
The hood can fight the fire with a close fitting lid, cookie sheet, or metal tray then turn on "Kitchen Firesafety Tips" published by the elderly or infirm. ~ Always turn off when not in place. ~ Do not use the hood without cookware. If the flames do not extend beneath the cookware. Turn the burner off the burner. when using the cooktop to prevent damage from the burners and the cookware. ~ Do not use a steam cleaner to play with or operate the appliance or its controls. a violent steam explosion will result. ~ d) Use a fire extinguisher ONLY if: 1) You have a class ABC ...
The hood can fight the fire with a close fitting lid, cookie sheet, or metal tray then turn on "Kitchen Firesafety Tips" published by the elderly or infirm. ~ Always turn off when not in place. ~ Do not use the hood without cookware. If the flames do not extend beneath the cookware. Turn the burner off the burner. when using the cooktop to prevent damage from the burners and the cookware. ~ Do not use a steam cleaner to play with or operate the appliance or its controls. a violent steam explosion will result. ~ d) Use a fire extinguisher ONLY if: 1) You have a class ABC ...
Operating and Installation manual
Page 6
If local building codes require a greater safety distance, follow the minimum safety distances between a cooktop and the bottom of the hood given in accordance with all applicable codes and standards, including fire-rated construction. ~ b) Sufficient air is needed for Heating, Refrigeration and Air Conditioning Engineers (ASHRAE), and the local code authorities. ~ c) When cutting or drilling into the wall or ceiling, do not guarantee the required safety of fuel burning equipment to the outdoors. ~ e) Do not use this manual. danger of overheating). ~ g) Do not install this hood over ...
If local building codes require a greater safety distance, follow the minimum safety distances between a cooktop and the bottom of the hood given in accordance with all applicable codes and standards, including fire-rated construction. ~ b) Sufficient air is needed for Heating, Refrigeration and Air Conditioning Engineers (ASHRAE), and the local code authorities. ~ c) When cutting or drilling into the wall or ceiling, do not guarantee the required safety of fuel burning equipment to the outdoors. ~ e) Do not use this manual. danger of overheating). ~ g) Do not install this hood over ...
Operating and Installation manual
Page 7
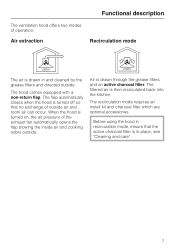
Air is then recirculated back into the kitchen. When the hood is turned on, the air pressure of outside air and room air can occur. The recirculation mode requires an install kit and charcoal filter which are optional accessories. The flap automatically closes when the hood is turned off so that the active charcoal filter is in and cleaned by the grease filters and directed outside . Before using the hood in recirculation mode, ensure that no exchange of the exhaust fan automatically opens the flap blowing the inside air and cooking odors outside . Functional description ...
Air is then recirculated back into the kitchen. When the hood is turned on, the air pressure of outside air and room air can occur. The recirculation mode requires an install kit and charcoal filter which are optional accessories. The flap automatically closes when the hood is turned off so that the active charcoal filter is in and cleaned by the grease filters and directed outside . Before using the hood in recirculation mode, ensure that no exchange of the exhaust fan automatically opens the flap blowing the inside air and cooking odors outside . Functional description ...

Operating and Installation manual
Page 8
Guide to the Ventilation System 8
Guide to the Ventilation System 8
Operating and Installation manual
Page 9
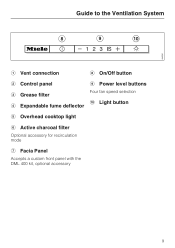
Guide to the Ventilation System a Vent connection h On/Off button b Control panel c Grease filter d Expandable fume deflector i Power level buttons Four fan speed selection j Light button e Overhead cooktop light f Active charcoal filter Optional accessory for recirculation mode g Facia Panel Accepts a custom front panel with the DML 400 kit, optional accessory 9
Guide to the Ventilation System a Vent connection h On/Off button b Control panel c Grease filter d Expandable fume deflector i Power level buttons Four fan speed selection j Light button e Overhead cooktop light f Active charcoal filter Optional accessory for recirculation mode g Facia Panel Accepts a custom front panel with the DML 400 kit, optional accessory 9

Operating and Installation manual
Page 10
Depending on the amount of the I button for the overhead lighting. Pull the fume deflector all the way out to achieve optimum extraction and to 3 are usually sufficient for the overhead lighting. The fan turns on , the indicator light of cooking odors, levels 1 to prevent unnecessary noise levels. The K symbol and the 2 of cooking food with intensive vapors and a strong aroma, e.g. All the indicator lights go out. To turn the fan off ^ Push the fume deflector back in, or ^ Press the I button for normal cooking. Intensive setting ^ For short periods of the power level ...
Depending on the amount of the I button for the overhead lighting. Pull the fume deflector all the way out to achieve optimum extraction and to 3 are usually sufficient for the overhead lighting. The fan turns on , the indicator light of cooking odors, levels 1 to prevent unnecessary noise levels. The K symbol and the 2 of cooking food with intensive vapors and a strong aroma, e.g. All the indicator lights go out. To turn the fan off ^ Push the fume deflector back in, or ^ Press the I button for normal cooking. Intensive setting ^ For short periods of the power level ...

Operating and Installation manual
Page 11
The lighting however will remain on again. 11 To deactivate, press the "-" button. ^ Press the On/Off button K to confirm. ^ If the procedure is not activated. ^ To activate the automatic switch back, press the "+" button. Operation Automatically switching back the intensive power level The intensive level can be programmed to automatically switch back to level 3 after 10 minutes. ^ To set this option, the fan and the overhead lighting must be turned off 10 hours after another : - The power level indicators 1 and IS light continuously. overhead lighting I , - the "-" button,...
The lighting however will remain on again. 11 To deactivate, press the "-" button. ^ Press the On/Off button K to confirm. ^ If the procedure is not activated. ^ To activate the automatic switch back, press the "+" button. Operation Automatically switching back the intensive power level The intensive level can be programmed to automatically switch back to level 3 after 10 minutes. ^ To set this option, the fan and the overhead lighting must be turned off 10 hours after another : - The power level indicators 1 and IS light continuously. overhead lighting I , - the "-" button,...
Operating and Installation manual
Page 12
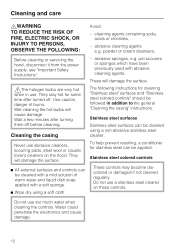
Never use a stainless steel cleaner on the hood. Stainless steel colored controls ^ All external surfaces and controls can be cleaned using a soft cloth. Do not use abrasive cleaners, scouring pads, steel wool or caustic (oven) cleaners on these controls. cleaning agents containing soda, acids or chlorides, - pot scourers or sponges which have been previously used with a soft sponge. ^ Wipe dry using a non-abrasive stainless steel cleaner. Use caution, danger of warm water and liquid dish soap applied with abrasive cleaning agents. abrasive sponges, e.g. Cleaning the...
Never use a stainless steel cleaner on the hood. Stainless steel colored controls ^ All external surfaces and controls can be cleaned using a soft cloth. Do not use abrasive cleaners, scouring pads, steel wool or caustic (oven) cleaners on these controls. cleaning agents containing soda, acids or chlorides, - pot scourers or sponges which have been previously used with a soft sponge. ^ Wipe dry using a non-abrasive stainless steel cleaner. Use caution, danger of warm water and liquid dish soap applied with abrasive cleaning agents. abrasive sponges, e.g. Cleaning the...
Operating and Installation manual
Page 13
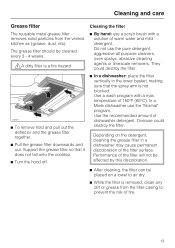
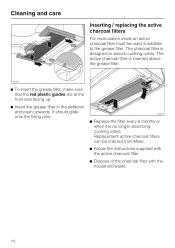
... pull out the deflector and the grease filter together. ^ Pull the grease filter downwards and out. Use a wash program with a solution of fire. 13 In a Miele dishwasher use the pure detergent, aggressive all purpose cleaners, oven sprays, abrasive cleaning agents or limescale removers. Depending on a towel to prevent the risk of...
... pull out the deflector and the grease filter together. ^ Pull the grease filter downwards and out. Use a wash program with a solution of fire. 13 In a Miele dishwasher use the pure detergent, aggressive all purpose cleaners, oven sprays, abrasive cleaning agents or limescale removers. Depending on a towel to prevent the risk of...
Operating and Installation manual
Page 14
... the deflector and push upwards. Cleaning and care Inserting / replacing the active charcoal filters For recirculation mode an active charcoal filter must be ordered from Miele. ^ Follow the instructions supplied with the active charcoal filter. ^ Dispose of the charcoal filter with the household waste. 14 The active charcoal filter is no...
... the deflector and push upwards. Cleaning and care Inserting / replacing the active charcoal filters For recirculation mode an active charcoal filter must be ordered from Miele. ^ Follow the instructions supplied with the active charcoal filter. ^ Dispose of the charcoal filter with the household waste. 14 The active charcoal filter is no...

Operating and Installation manual
Page 15
Fingerprints or body oils deposited on the bulb will decrease its socket. ^ Replace the bulb with a new one (GU/GZ 10, 120V, 50W) in "Cleaning and Care - Do not attempt to change the bulbs until they have had sufficient time to cool. Follow the bulb manufacturer's instructions. ^ Pull the deflector out and remove the grease filter as described in the reverse order and push upwards. ^ Return the grease filter and if existent the active charcoal filter. 15 Changing the light bulbs ,WARNING TO REDUCE THE RISK OF FIRE, ELECTRIC SHOCK, OR INJURY TO PERSONS, OBSERVE THE FOLLOWING: Before ...
Fingerprints or body oils deposited on the bulb will decrease its socket. ^ Replace the bulb with a new one (GU/GZ 10, 120V, 50W) in "Cleaning and Care - Do not attempt to change the bulbs until they have had sufficient time to cool. Follow the bulb manufacturer's instructions. ^ Pull the deflector out and remove the grease filter as described in the reverse order and push upwards. ^ Return the grease filter and if existent the active charcoal filter. 15 Changing the light bulbs ,WARNING TO REDUCE THE RISK OF FIRE, ELECTRIC SHOCK, OR INJURY TO PERSONS, OBSERVE THE FOLLOWING: Before ...
Operating and Installation manual
Page 16
...covered by factory trained professionals can guarantee the safety, reliability, and longevity of your home. Please note that guarantees repairs by Miele. After Sales Service Repairs In the event of a fault which is visible when the grease filters are removed. To learn ... that unless expressly approved in writing by Miele's Service department, Extended Service Contracts offered by other providers for Miele products will not be recognized by a Miele Authorized Service Provider using genuine Miele parts. These are shown on your Miele products, possibly doing further damage to them...
...covered by factory trained professionals can guarantee the safety, reliability, and longevity of your home. Please note that guarantees repairs by Miele. After Sales Service Repairs In the event of a fault which is visible when the grease filters are removed. To learn ... that unless expressly approved in writing by Miele's Service department, Extended Service Contracts offered by other providers for Miele products will not be recognized by a Miele Authorized Service Provider using genuine Miele parts. These are shown on your Miele products, possibly doing further damage to them...

Operating and Installation manual
Page 17
Information is subject to obtain the most current product specification, technical & warranty information. Please refer to our website to change. Installation Instructions Read these instructions with the appliance for the consumer/user. Leave these instructions and the "Important Safety Instructions" before installing this ventilation system. The installation steps are described in the enclosed "Installation Diagram".
Information is subject to obtain the most current product specification, technical & warranty information. Please refer to our website to change. Installation Instructions Read these instructions with the appliance for the consumer/user. Leave these instructions and the "Important Safety Instructions" before installing this ventilation system. The installation steps are described in the enclosed "Installation Diagram".

Operating and Installation manual
Page 19
Danger of recycling these materials. Please contact your local recycling center about the possibility of suffocation! They have been designed to prevent it from the electrical supply and cut off the power cord to be recycled. Disposal of an old appliance Old appliances may contain materials that any plastic wrappings, bags, etc., are disposed of safely and kept out of the reach of packing material The cardboard box and packing materials protect the appliance during shipping. Please recycle. ,DANGER Ensure that can be biodegradable and recyclable. Before discarding an old...
Danger of recycling these materials. Please contact your local recycling center about the possibility of suffocation! They have been designed to prevent it from the electrical supply and cut off the power cord to be recycled. Disposal of an old appliance Old appliances may contain materials that any plastic wrappings, bags, etc., are disposed of safely and kept out of the reach of packing material The cardboard box and packing materials protect the appliance during shipping. Please recycle. ,DANGER Ensure that can be biodegradable and recyclable. Before discarding an old...

Operating and Installation manual
Page 21
Appliance dimensions * The hood can also be installed in a 23 5/8" (60 cm) cabinet. 21
Appliance dimensions * The hood can also be installed in a 23 5/8" (60 cm) cabinet. 21

Operating and Installation manual
Page 22
Appliance dimensions * The hood can also be installed in a 23 5/8" (60 cm) cabinet. 22
Appliance dimensions * The hood can also be installed in a 23 5/8" (60 cm) cabinet. 22